Tips & Tricks

Pro work tip: Build a color-coded work calendar

If you’re living with a default blue and white Outlook calendar, you’re missing out. Not sure what I mean? Take a look at this out-of-the-box calendar:

It’s a veritable wasteland of sameness. Every meeting looks identical. There’s no way to get a sense of what’s coming up each day; it’s just an overwhelming blob of blue.

Now let’s take a look at the same calendar with color-coded categories for meetings and work time:

The color coding helps me see what kind of day (and week) I’m going to have. Each meeting and event has an associated category with an assigned color. Events shaded in yellow are training seminars. Items showing up in red are leadership meetings. Project meetings are orange and design reviews are aqua.

The colors help me pace myself through the day. I know an afternoon of “red” meetings is going to require more focus and diligence. And I know days with more aqua meetings are my favorite (design review meetings are creative and fun).

I also use colors to help schedule upcoming meetings. I know, for example, that I can’t go directly from a leadership meeting to teaching a training class. I simply won’t have enough time to prepare and transition. Color coding makes this planning work easy – I know never to schedule a “yellow” training event immediately after a “red” leadership meeting.

Outlook supports color-coding by allowing me to set up categories for my meetings and events. I can use the Categorize dropdown to select an existing category or create a new one. Adding a color to each category ensures my meetings and appointments are shaded consistently.

I have 7 basic categories in my calendar (each with a different color):

  • Design reviews (aqua)
  • Leadership meetings (red)
  • Project work (orange)
  • Team meetings (green)
  • Training classes (yellow)
  • Heads-down work time (grey)
  • Out of the office / personal time (purple)

These 7 categories help me differentiate between my meetings without creating too much overhead. (It only takes a couple of clicks to categorize new meetings so they appear in living color.) My meeting color palette may be too much for some (or not enough differentiation for others). It’s your calendar, so adapt the coloring and categories to suit your needs. And make sure the colors you use reflect your personal preferences. If there’s a meeting or event you look forward to, give it one of your favorite colors. Seeing the color on your calendar will be a great pick-me-up.

I recommend starting small and adding color categories to a few of your recurring meetings. This will give you an opportunity to see how you like the results before you re-categorize all your meetings.

Integrating Yammer communities in Microsoft Teams

I’m loving the new Yammer app integration in Microsoft Teams. Use the app to highlight Yammer conversation topics that pertain to your team, showcase relevant Yammer communities, and drive employee engagement. The app is fully-functional, enabling users to participate in Yammer conversations without leaving the Teams app. Best of all, the Yammer app leverages the new Yammer user interface!

There are two different ways to integrate Yammer into your Microsoft Teams experience: You can add Yammer to your Teams navigation rail or create a Yammer tab in a team.

Add Yammer to your Teams navigation rail

This option adds a fully-functioning Yammer app to the left-hand navigation menu in Teams:Yammer app in Teams - 09

To add Yammer to your Teams navigation rail:

  1. Go to Microsoft Teams. While on the Teams navigation tab, select the button and select Yammer communities.
    Yammer app in Teams - 01
  2. When the Yammer app appears in your navigation bar, right-click it and select Pin.
    Yammer app in Teams - 02

Add a Yammer tab to your team

This option allows you to add a Yammer tab directly to a Microsoft Teams team. The tab can display a single Yammer community or a Yammer topic. (A Yammer topic is a quick way to tag  your Yammer posts with a common retrieval term. Want a quick way to find all your OneDrive Yammer posts? Just add a #OneDrive topic to each post. You can add topics to your Yammer posts by clicking “add topic” or typing in a hashtag and your topic name.)
Yammer app in Teams - 10

To add a Yammer tab to your team:

  1. Go to Microsoft Teams and navigate to the channel you want to add Yammer to.
  2. Click on the sign next to your channel tabs:
    Yammer app in Teams - 03
  3. Select the Yammer communities box.
    Yammer app in Teams - 04
  4. To add a Yammer community to your team, choose the Yammer Group option, type in a keyword to find your group, select the group, determine whether or not you want to post a message to the channel about this new tab, and click Save.
    Yammer app in Teams - 05
    Your Yammer community will now show up as a tab in your channel:
    Yammer app in Teams - 06
  5. To add a Yammer topic to your team, follow steps 1-3 above. But this time choose the Yammer Topic option, type in the Yammer topic you’d like to use (leaving out the #), determine whether or not you want to post a message about this new tab, and click Save.
    Yammer app in Teams - 07
    All Yammer conversations that include your topic will now display in your new Yammer tab:
    Yammer app in Teams - 08

Things to remember

A few caveats to keep in mind as you work with the Yammer app in Teams:

    • You can’t create new Yammer threads from a Yammer topic tab in Teams. By design, the Yammer topic tabs pull in all Yammer conversations with a given topic tag (regardless of which Yammer community the post is in). While you can respond to any of the Yammer topic conversations shown on your tab, you cannot create a new Yammer topic post from the tab.
    • You can add multiple Yammer tabs to a single team. Want to highlight several Yammer communities or topics in a single team? No worries–just follow the steps outlined above and create several Yammer tabs.

For more information, see Microsoft’s documentation.

Build it with Microsoft Flow: Get a notification when your manager posts in Yammer

yammerWe’re all busy at work, and staying up-to-date on new posts in our favorite Yammer groups isn’t easy. Fortunately, Microsoft Flow can help! I previously shared a blog post on using Flow to monitor Yammer and send email notifications when a specific “watch word” was used. Now let’s take look at another common scenario: setting up Flow to send you an email each time your manager posts in Yammer.

Here’s an overview of what the flow looks like:

Yammer manager flow-01

And here are the steps to re-create the flow:

  1. Create a new flow from blank (aka not from a template).
  2. Add the trigger When there is a new message in a group.
  3. In the Group Id field, select the name of the Yammer group you want to monitor.
    Note: This flow doesn’t monitor multiple Yammer groups at once; it triggers to run when a new message is posted in a single Yammer group. If you’d like to run this flow across multiple Yammer groups, you’ll need to copy your completed flow and create a new flow for each group you want to monitor. The process for copying your finished flow is provided in step 22. 
  4. In the Network Id field, select the name of your Yammer network.
  5. Add the Get user details action. In the User ID field, add the Message List Message Sender field. (This action pulls the email address for the user who posted the Yammer message.)
  6. Add the Get my profile action. (This action obtains your email address and identifying information. You’ll need this to pull your manager’s information and configure your email notification later in the flow.)
  7. Add the Get manager action. In the User field, insert the dynamic content User Principal Name. (This action obtains your manager’s email address.)
  8. Add the Compose action. You’ll be using this action to translate your manager’s email address into all lowercase letters. Odd I know, but this ensure you don’t have any capitalization-based mismatches in your flow.
  9. Place your cursor in the Compose action Inputs field.
  10. Click the Expression option in the config box.
  11. Under the String functions header, choose toLower(text). If you don’t see the toLower option, click the See more link in the String functions header bar.
    Yammer manager flow-02
  12. Click the Add dynamic content option in the config box.
  13. Under the Get manager header, choose Mail.
    Yammer manager flow-03
  14. Click the blue OK button to save your expression.
  15. Add a Condition action.
  16. In the Value box, add the Yammer User Email field.
  17. In the Choose a value box, add Output.
  18. Add a Send an email action in the If yes box.
  19. In the To field of your email, insert the Get My Profile Mail dynamic content. You may need to select “See more” under the Get my profile header to see the Mail content.
  20. Add additional details for your notification (e.g. subject line, email verbiage, etc.).
  21. Save and test your flow.
  22. Optional. If you’d like to set up this flow for a second Yammer group, follow these additional steps:
    1. Go to the information page for your flow.
    2. Click on the More dropdown and select Save As.
      Yammer manager flow-04
    3. Specify a name for your copied flow and click Save.
    4. Return to your My Flows page and edit your newly-copied flow. Update the Yammer group identified in your trigger, save the flow, and turn on the flow.
    5. Repeat step 22 for each Yammer group you want to monitor.

That’s it! I’ll now receive an email each time my manager creates a Yammer post in my Microsoft Flow Yammer group.

Sharing your new flow:
Now that you’ve created your flow, it’s time to think about sharing it with others in your organization.

Build it with Microsoft Flow: Get a notification when a “watch word” is mentioned in Yammer

yammerIf your organization uses Yammer to drive information sharing and employee knowledge transfer, you have a potential treasure trove of great content. But staying up-to-date on Yammer conversations can be tough, particularly when you’re running from meeting to meeting. It’s easy to miss key Yammer posts, even if you subscribe to email notifications.

Fortunately, Microsoft Flow can help! Let’s say you want to monitor a particular Yammer group for one or more “watch words.” When a message that contains the watch word is posted on Yammer, you’d like Microsoft Flow to send you an email notification. This functionality enables you to audit Yammer groups for the content you’re most interested in.

Here’s an overview of what this flow looks like:

Yammer watch word-01.png

And here are the steps to re-create the flow:

  1. Create a new flow from blank (aka not from a template).
  2. Add the trigger When there is a new message in a group.
  3. In the Group Id field, select the name of the Yammer group you want to monitor.
    Note: This flow doesn’t monitor multiple Yammer groups at once; it triggers to run when a new message is posted in a single Yammer group. If you’d like to run this watch word flow across multiple Yammer groups, you’ll need to copy your completed flow and create a new flow for each group you want to monitor. The process for copying your finished flow is provided in step 15. 
  4. In the Network Id field, select the name of your Yammer network.
  5. If you’d like your watch word email notification to include the name of the person that posted the Yammer message, add the Get user details action. In the User ID field, add the Message List Message Sender field.
  6. Add the Get my profile action. This action obtains the SMTP email address for the current user (e.g. john.doe@mycompany.com). You’ll use this SMTP email address to configure your email notification.
  7. Add a Condition action.
  8. In the Value field, add the Message List Message Body Text field.
  9. Change the is equal to field to contains.
  10. Type your watch word(s) in the Choose a value field. In the example flow shown above, my watch word is PowerApps.
  11. Add an action in the If yes box. Since I wanted to send an email notification when my watch word was used, I added the email action.
  12. In the To field of your email, insert the Get My Profile Mail dynamic content.
    Note: You may need to select “See more” under the Get my profile header to see the Mail content.
  13. Add additional details for your notification (e.g. subject line, email verbiage, etc.).
  14. Save and test your flow.
  15. Optional. If you’d like to set up your watch word flow for a second Yammer group, follow these additional steps:
    1. Go to your flow’s information page.
    2. Click on the More dropdown and select Save As.
      Yammer watch word-02.png
    3. Specify a name for your copied flow and click Save.
    4. Return to your My Flows page and edit your newly-copied flow. Update the Yammer group identified in your trigger, save the flow, and turn on the flow.
    5. Repeat step 15 for each Yammer group you want to monitor.

Now that my flow is built, I receive an email notification like the one shown below each time the watch word PowerApps is mentioned in my Microsoft Flow Yammer group:
Yammer watch word-03.png

Sharing your new flow:
Now that you’ve created your flow, it’s time to think about sharing it with others in your organization.

Credits (and a few words of encouragement):
If you’re working with Microsoft Flow and are having a hard time figuring out how to build the workflows you need, don’t despair! When I first started trying to build this “watch word” flow, I got completely stuck. I couldn’t figure out how to build it without complicated formulas or JSON. Many thanks to Jon Levesque, Marcel Haas, and many others on Twitter for jumping in and teaching me a better way to go about it!

Using Microsoft Flow & Azure Cognitive Services to automate sentiment analysis of Yammer posts

yammer sentiment flow-14

As an Office 365 product manager and corporate evangelist, I’m responsible for engaging users and driving adoption of Microsoft Collaboration tools. Measuring the saturation and use of Office 365 is a key part of my role. Yes, I regularly review Office 365 usage metrics for high-level trending. But metrics alone don’t tell the story of user satisfaction and adoption. In order to build better training and adoption programs, I need to understand why my dedicated users love the tools and why others remain resistant.

Many companies rely on surveys to gather end-user feedback. While surveys are useful for gathering specific types of quantitative data, surveys are one-dimensional. You can’t dynamically ask follow-up questions to learn more about specific survey responses, and you can only capture a limited set of data points. Innovation games enable you to gather a much broader set of quantitative and qualitative user data, but require an investment of time to facilitate games and distill the results. For best results, I recommend a multidisciplinary approach that leverages Office 365 usage statistics, user survey responses, innovation games data, user testimonials, etc. to measure user satisfaction. 

With the release of artificial intelligence (AI) and machine-learning algorithms, we also have the ability to gather user sentiments automatically. If your organization uses Yammer to drive employee engagement and empower open dialogue, you have a wealth of user data that can be analyzed. With Azure Cognitive Services and Microsoft Flow, you can perform automated sentiment analysis of your Yammer group posts. Sentiment scores for each Yammer message can be stored in SharePoint and visualized for trending analysis via Power BI. You can even send push email notifications to your Office 365 administrators or Corporate Communications team when strong positive or negative messages are posted in Yammer.

Chris Bortlik, Principal Technical Architect for Microsoft, recently shared a blog post on Yammer sentiment analysis. I used Chris’ model, with a few modifications, to gather and report on Office 365 user sentiment.

The scenario:
My organization leverages a Microsoft Flow Yammer group to foster employee conversations and questions/answers about flow. We want to monitor the Microsoft Flow Yammer group using sentiment analysis so we can:

  • Identify negative flow Yammer posts that require follow-up
  • Identify positive Yammer posts that can serve as user testimonials or references
  • Define trends in our Microsoft Flow Yammer posts (e.g. daily/weekly/monthly positive and negative trends, overall positive or negative sentiments for flow, etc.)
  • Validate the success of our Microsoft Flow education and adoption program (e.g. confirm we’re seeing growth in the volume of positive flow Yammer posts over time)

The setup:
Follow the steps outlined below to set up automated Yammer sentiment analysis.

Step 1: Confirm you have a Cognitive Services Text Analytics Account. In order to set up this solution, you will need a Cognitive Services account key and a root site URL.

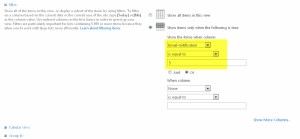
Step 2: Create a SharePoint list to store your Yammer sentiment analysis scores. Flow will create a new item in your list for each Yammer message it analyzes. Here’s a list of the custom columns I added to my list:

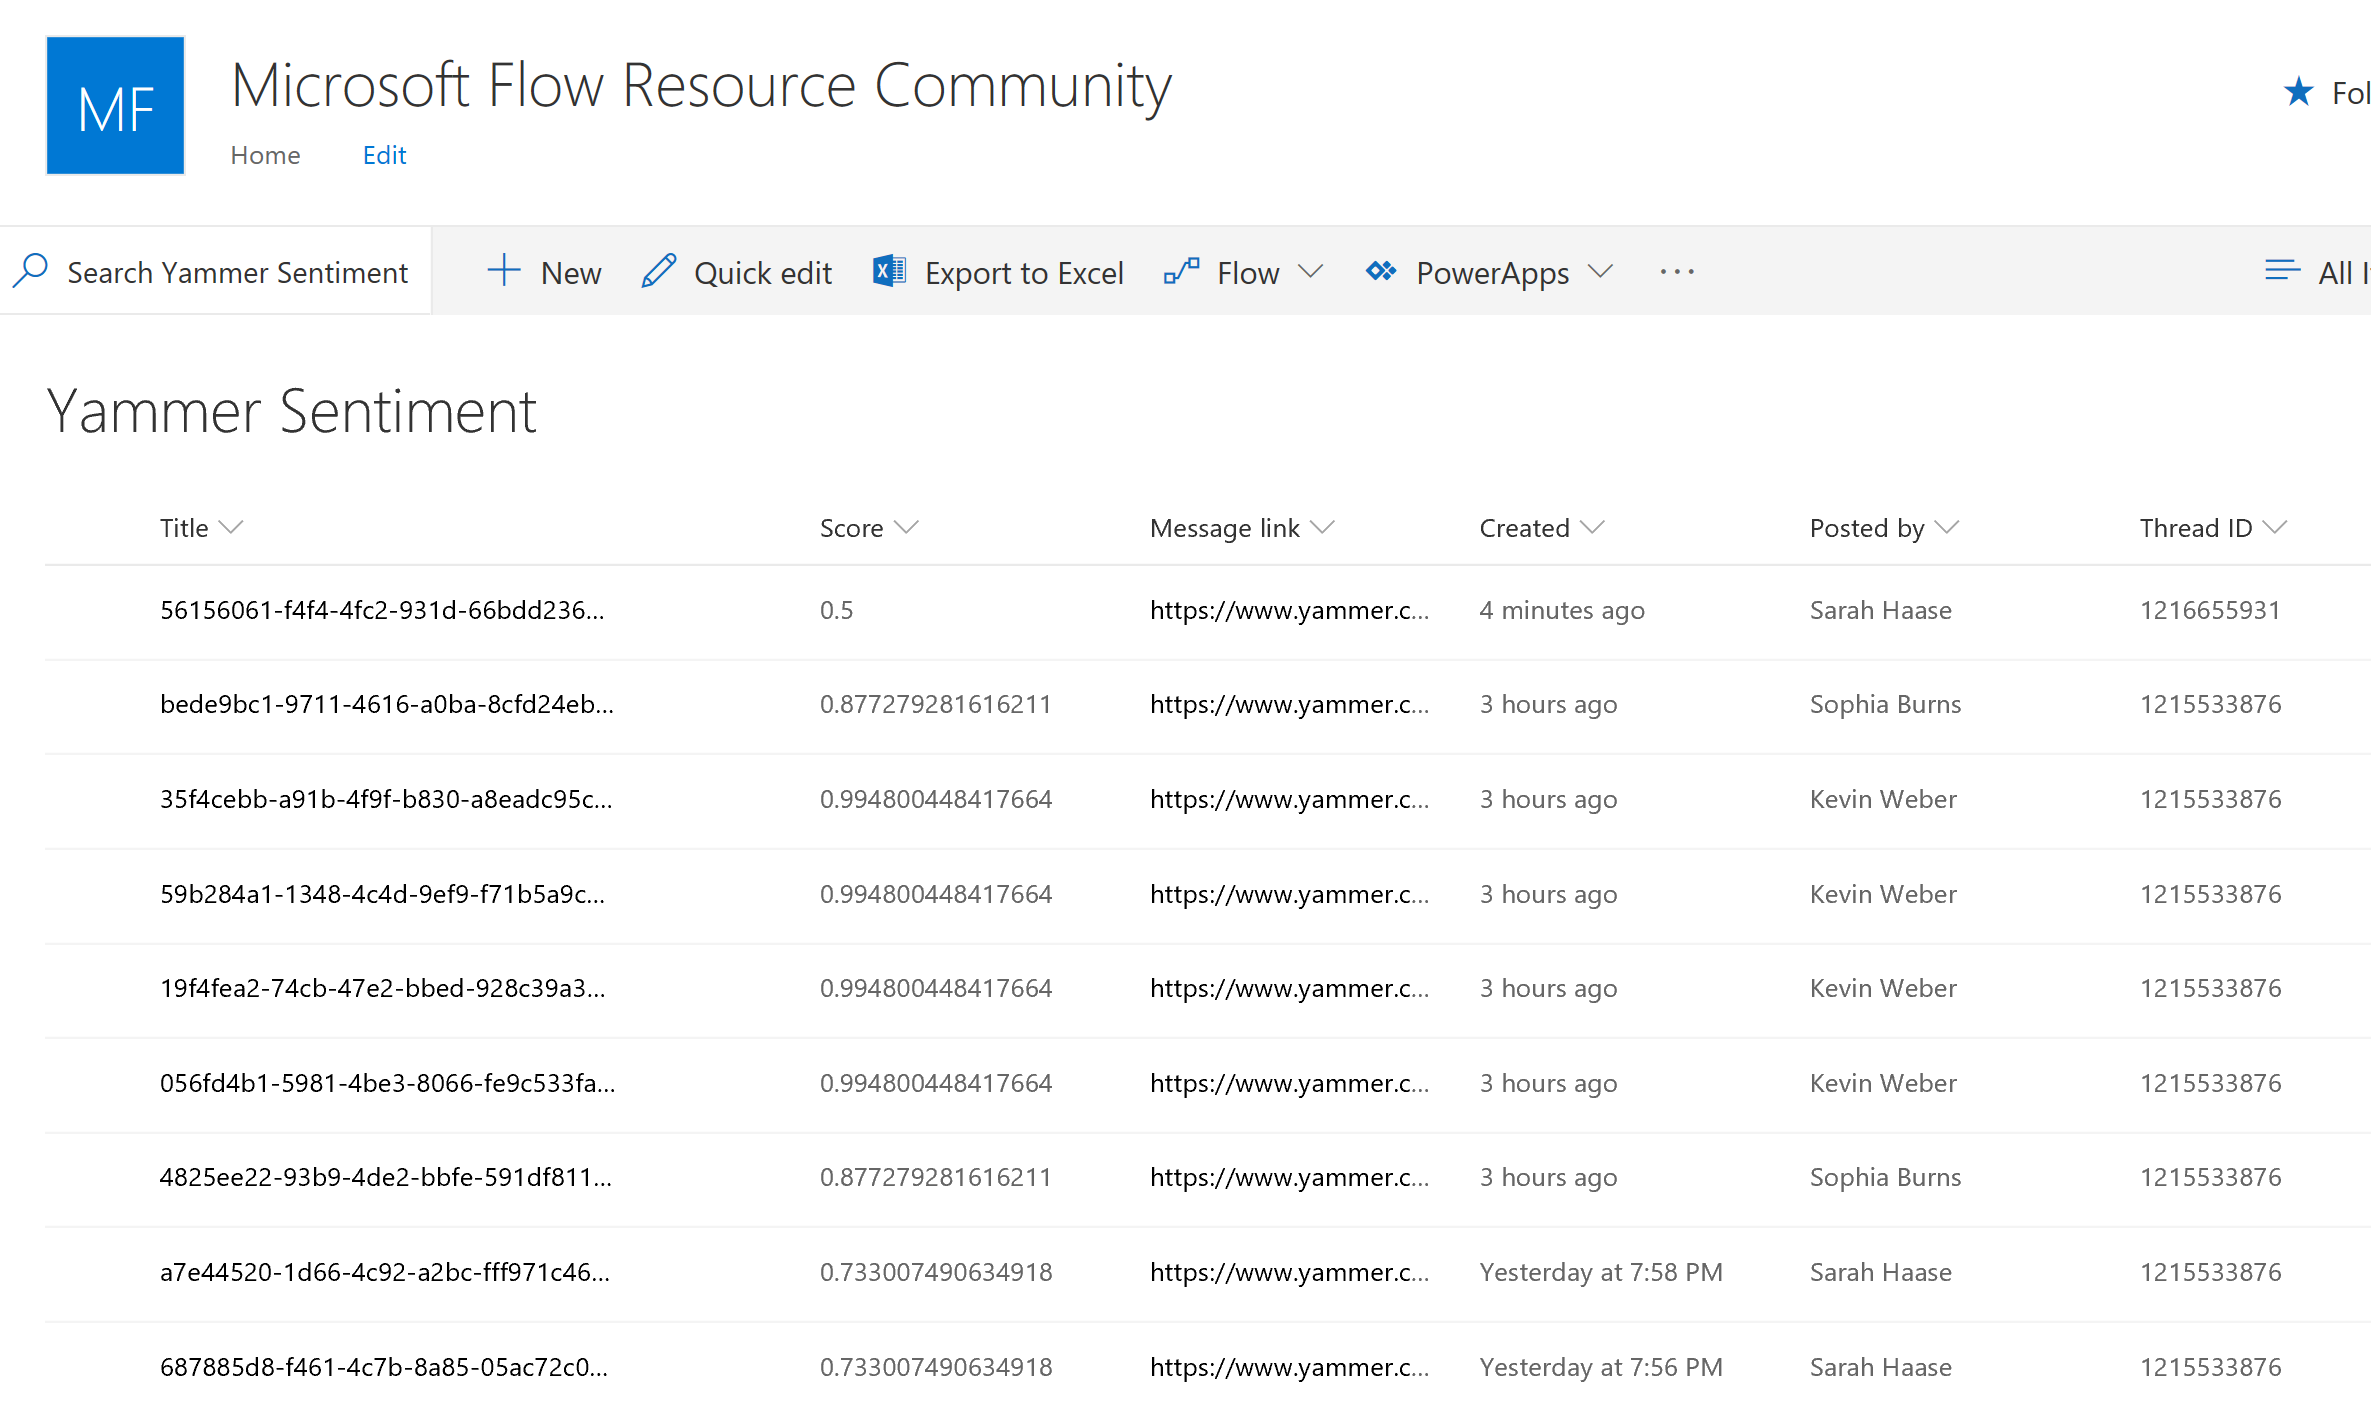
  • Score – Number column; stores the sentiment rating for each Yammer message
  • Message link – Hyperlink column; stores a link to the rated Yammer message
  • Posted by – Person/Group column; stores the name of the person that posted the Yammer message
  • Thread ID – Single line of text column; stores the Yammer thread ID for the message. Enables you to sort, filter, and group sentiment scores for a given Yammer thread (including original message and replies).

Azure Cognitive Services will provide a numeric sentiment score between 0 and 1 for each Yammer message it analyzes. The more negative a Yammer message is, the closer to 0 its score will be. More positive messages will receive a rating closer to 1.

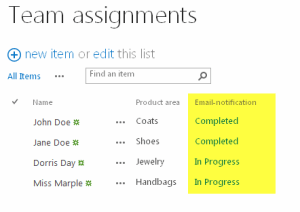
Here’s a screen shot of my SharePoint list. Each list item represents a rated Yammer message:
Yammer sentiment flow-11.png

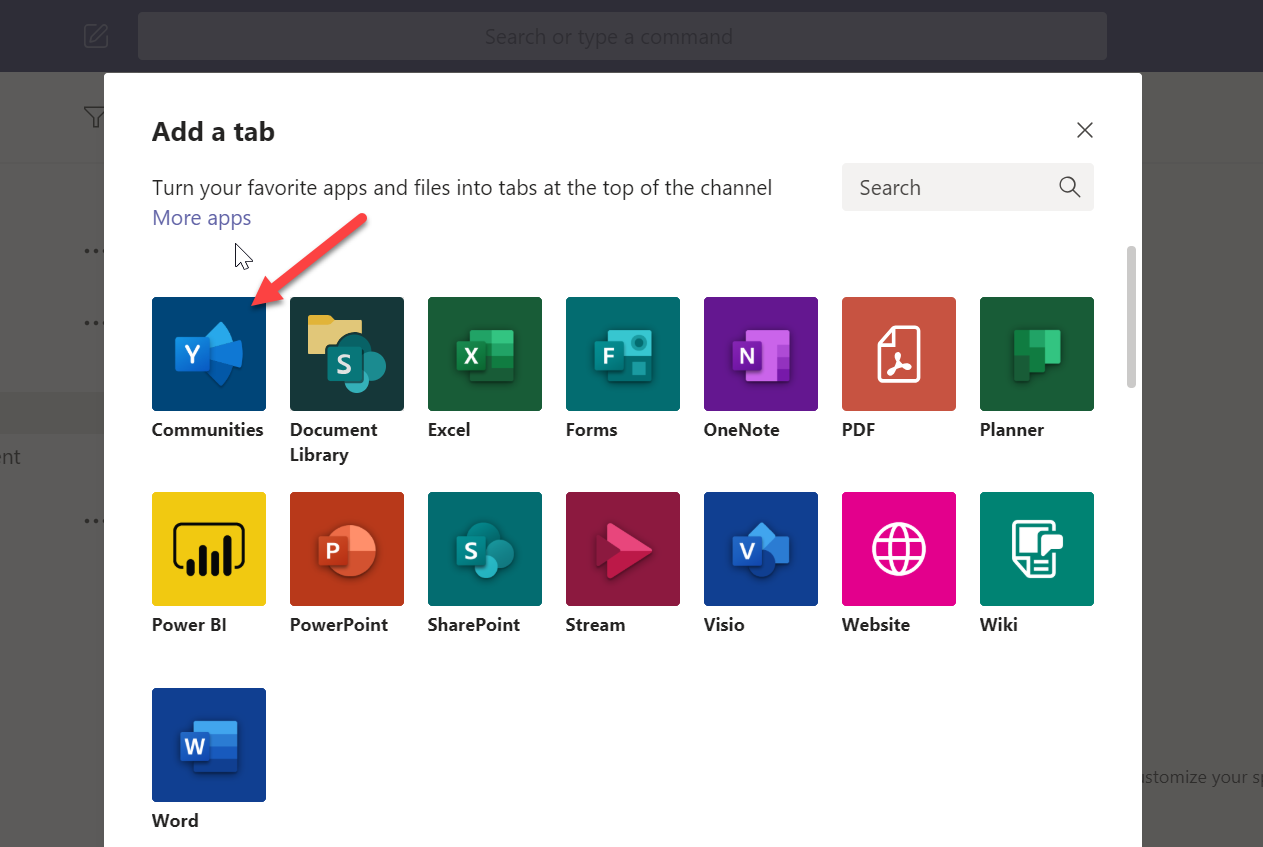
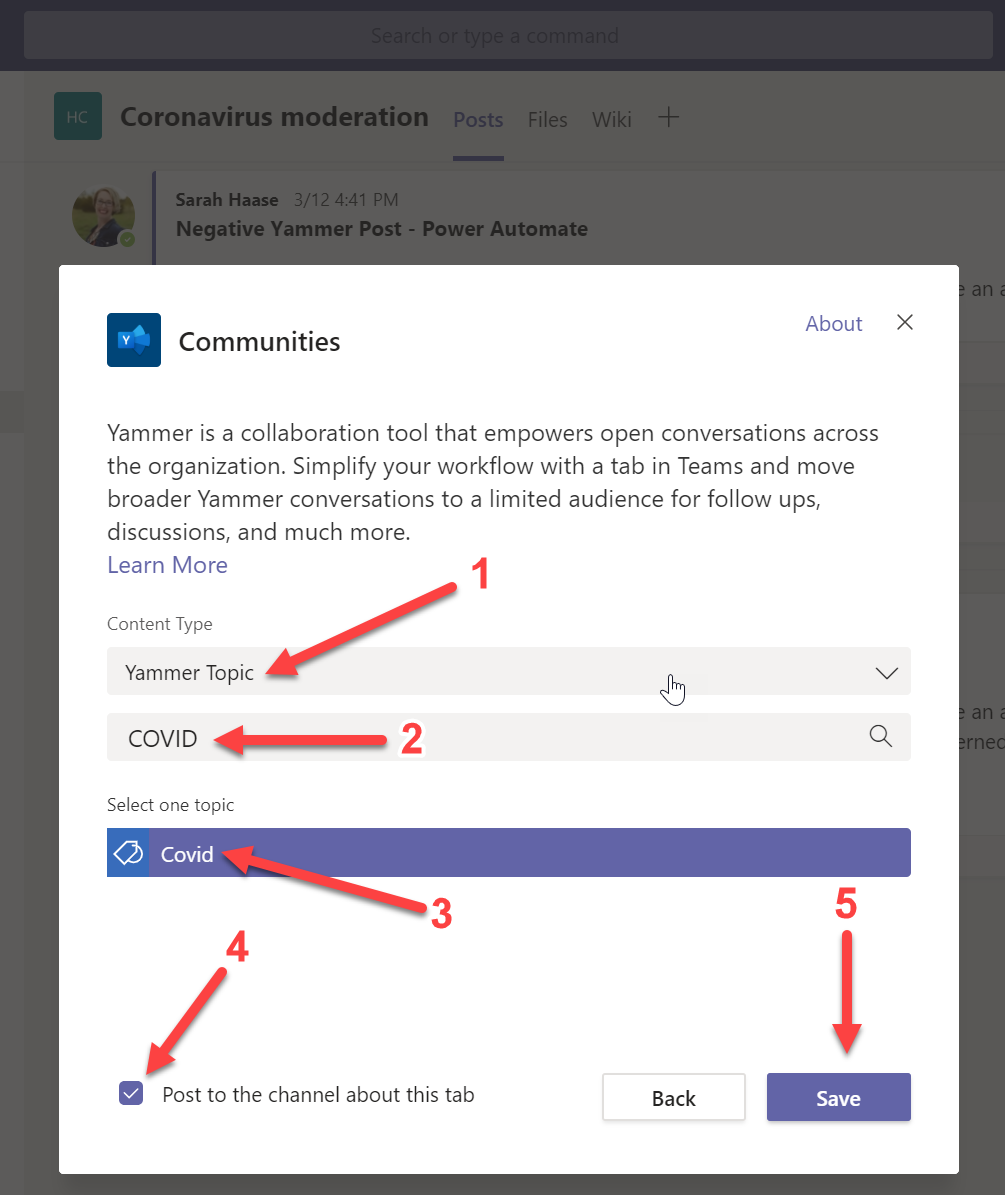
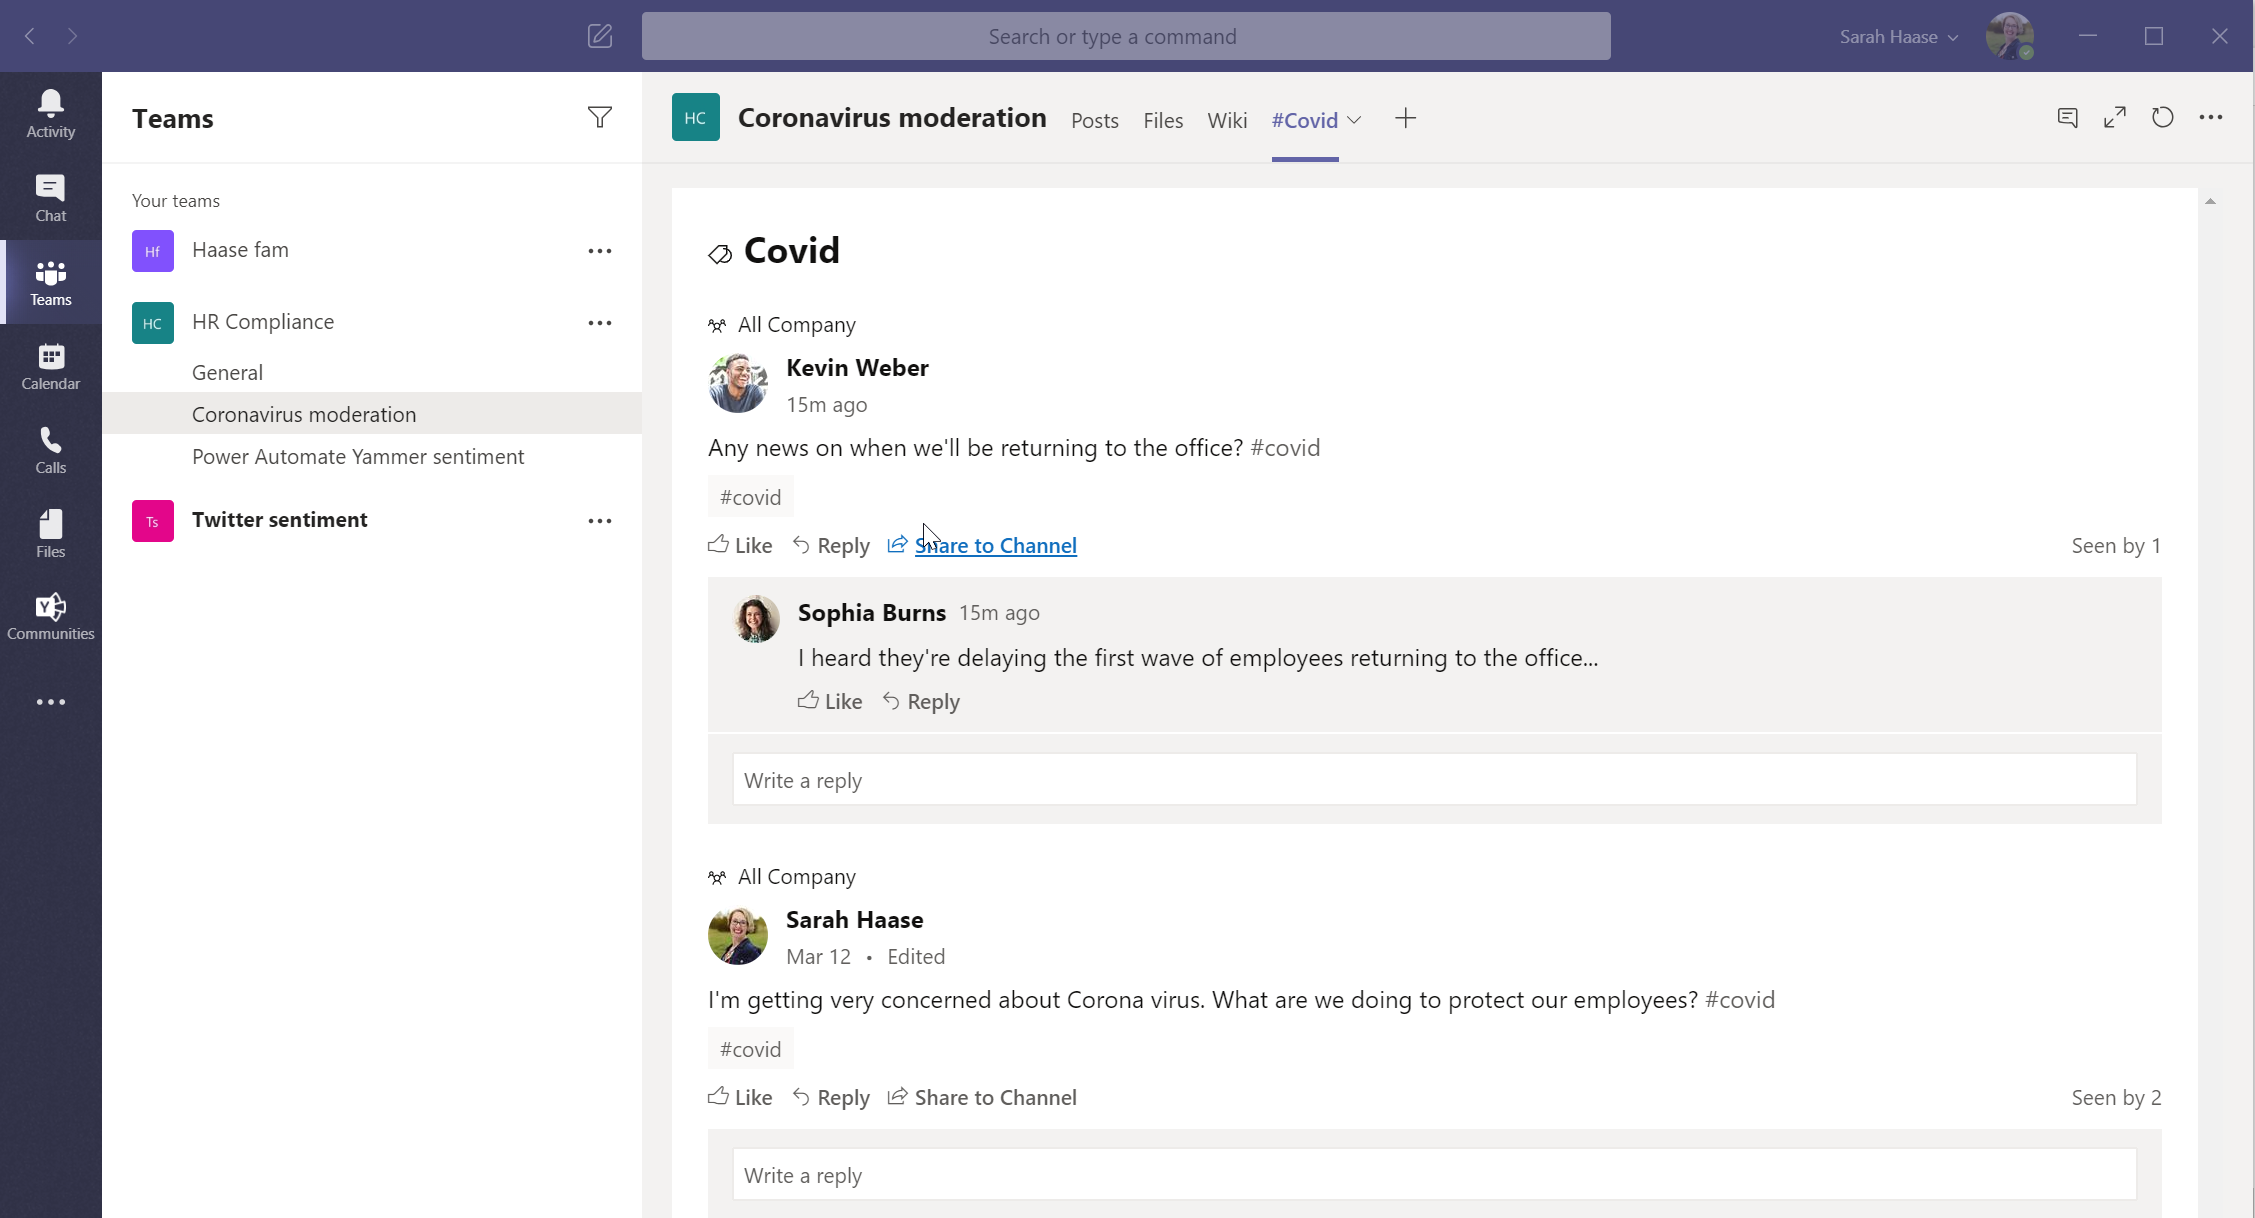
Step 3: Identify the Yammer group you want to perform sentiment analysis on. You can set up sentiment analysis for multiple Yammer groups, but each will require a separate flow process. I also recommend setting up a different SharePoint list to hold sentiment scores for each of your Yammer groups. (Having different SharePoint lists enables you to set up different trending reports on Yammer group sentiment.)

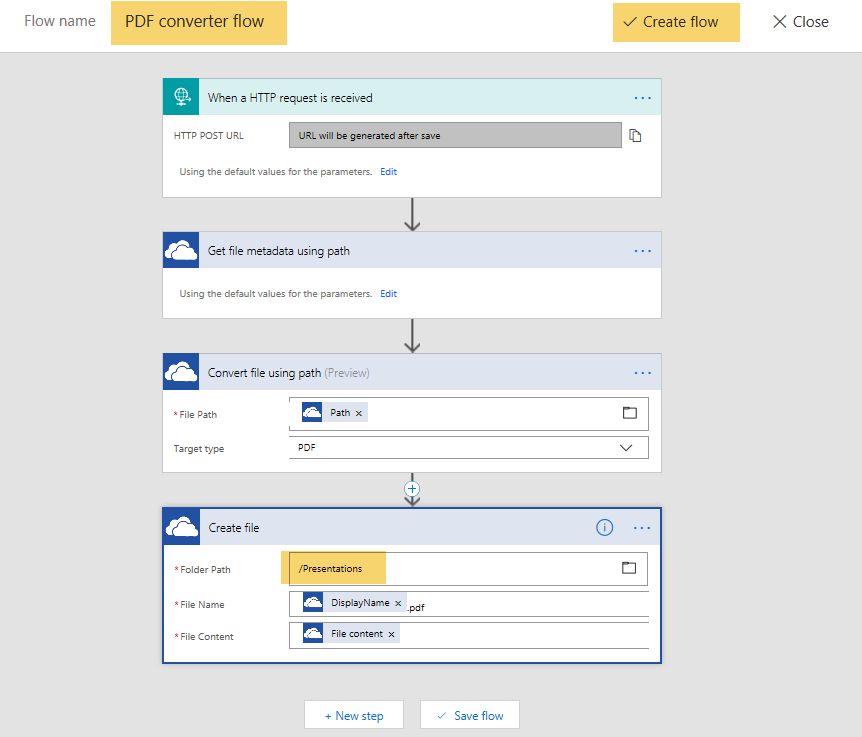
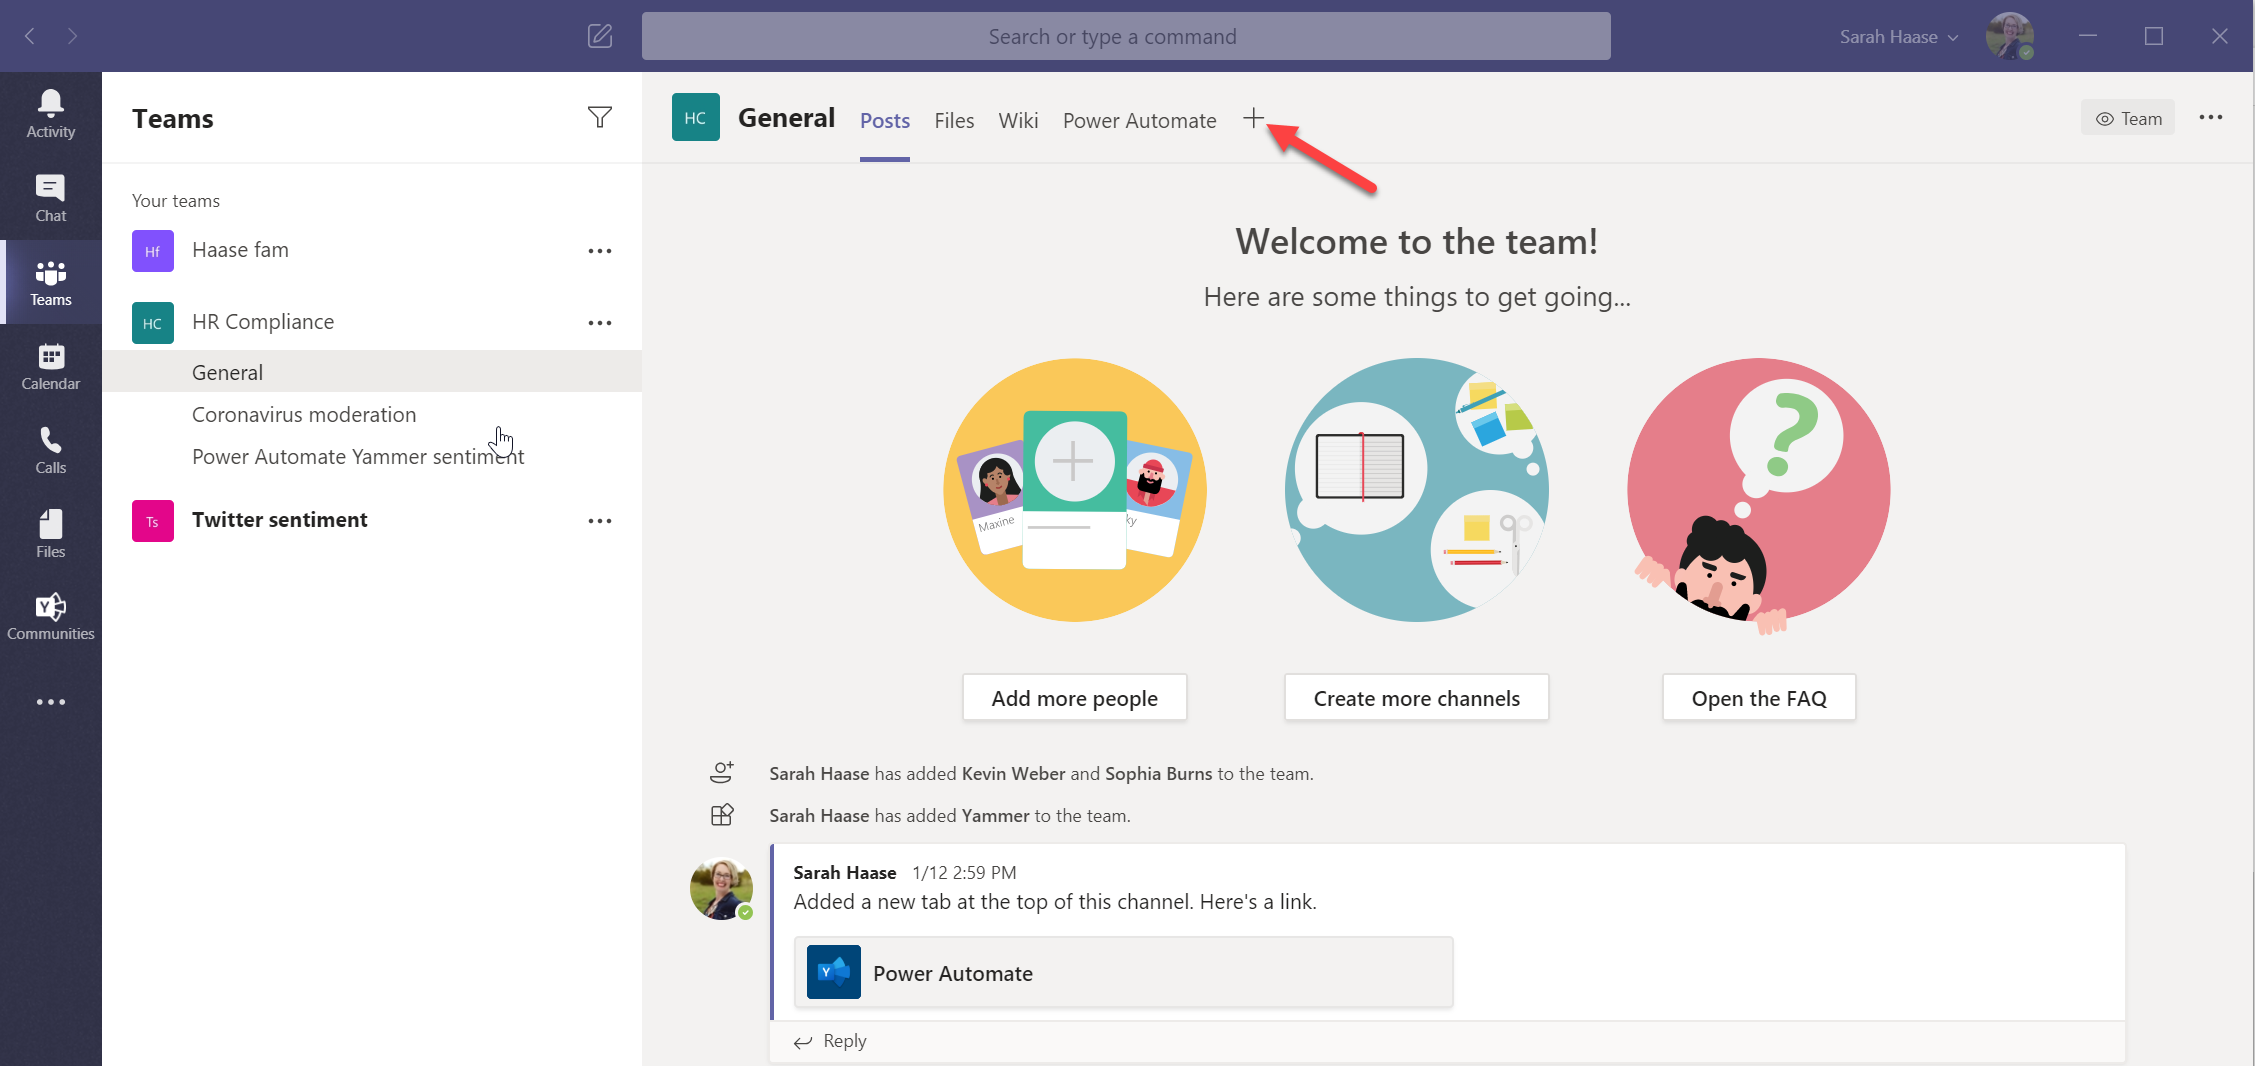
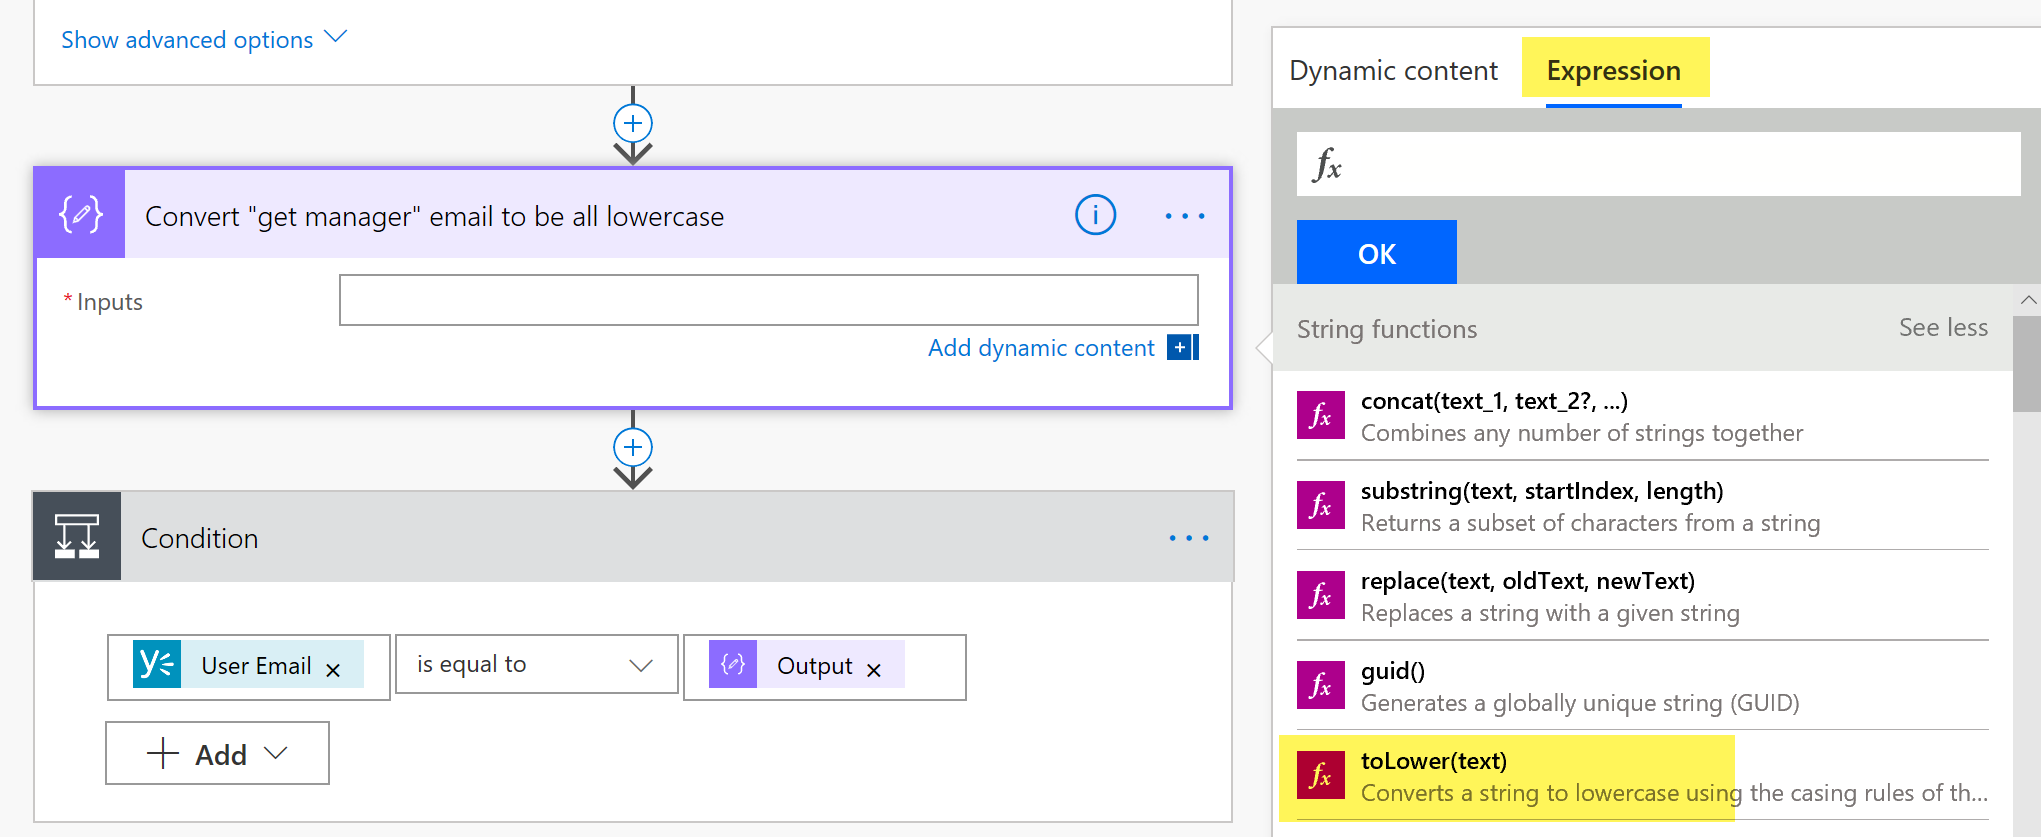
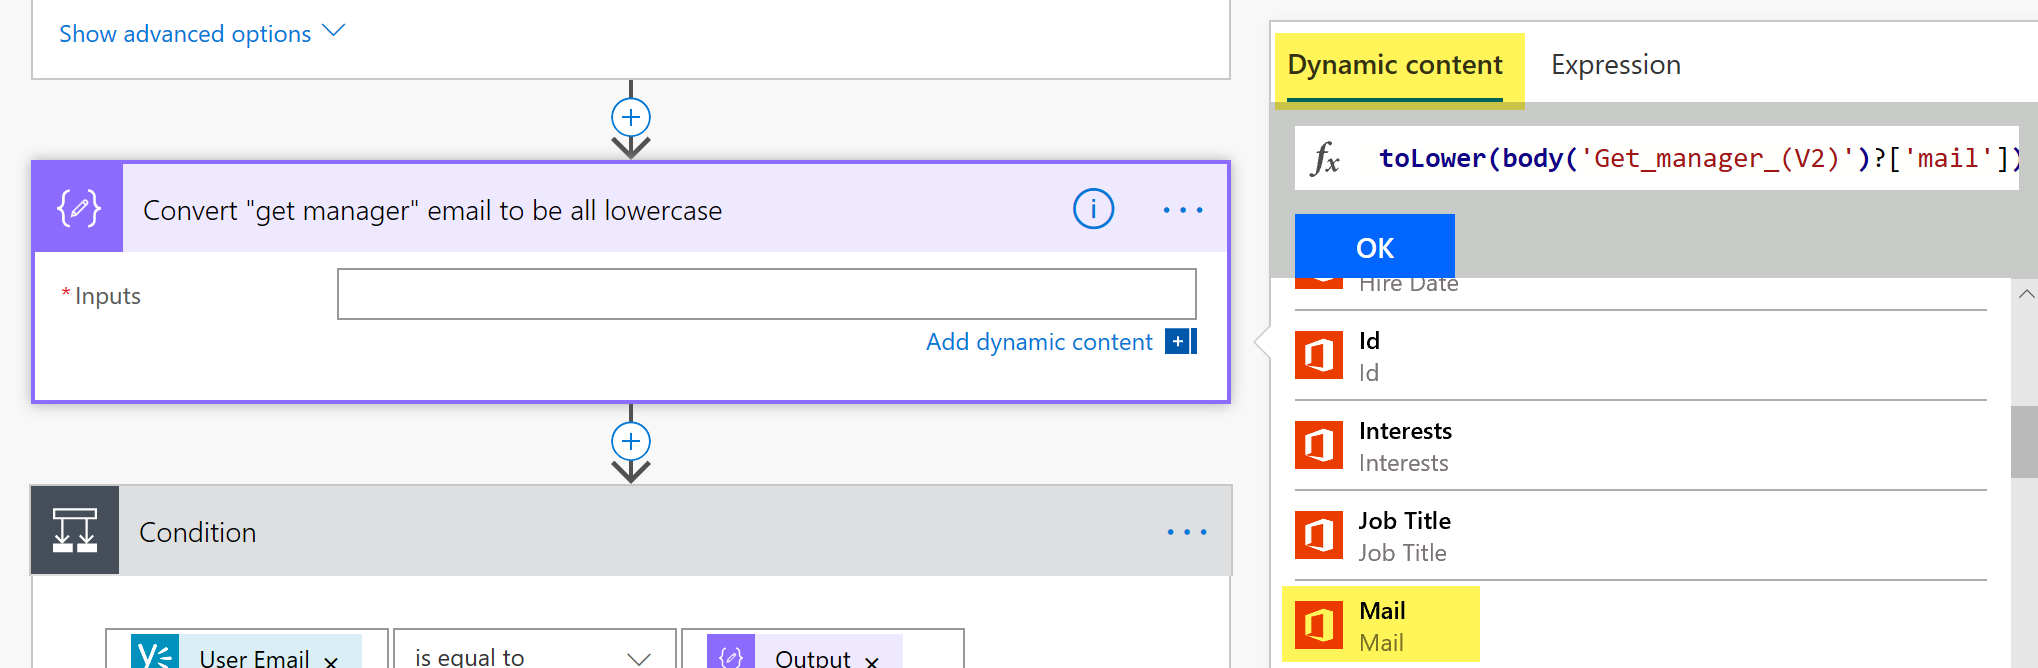
Step 4: Create your Microsoft Flow. I created my flow from scratch (not using a template). Here’s a quick breakdown of the flow conditions and actions:

  • When there is a new message in a group – Detects when a new Yammer message is posted in my Yammer group
  • Get user details – Pulls Yammer user profile details. (Enables us to capture the full name and email address for the person posting the Yammer message.)
  • Detect Sentiment – Calls the Azure Cognitive Services API so it can calculate a sentiment score for the Yammer message
  • Create item – Creates a SharePoint list item for the Yammer message being analyzed
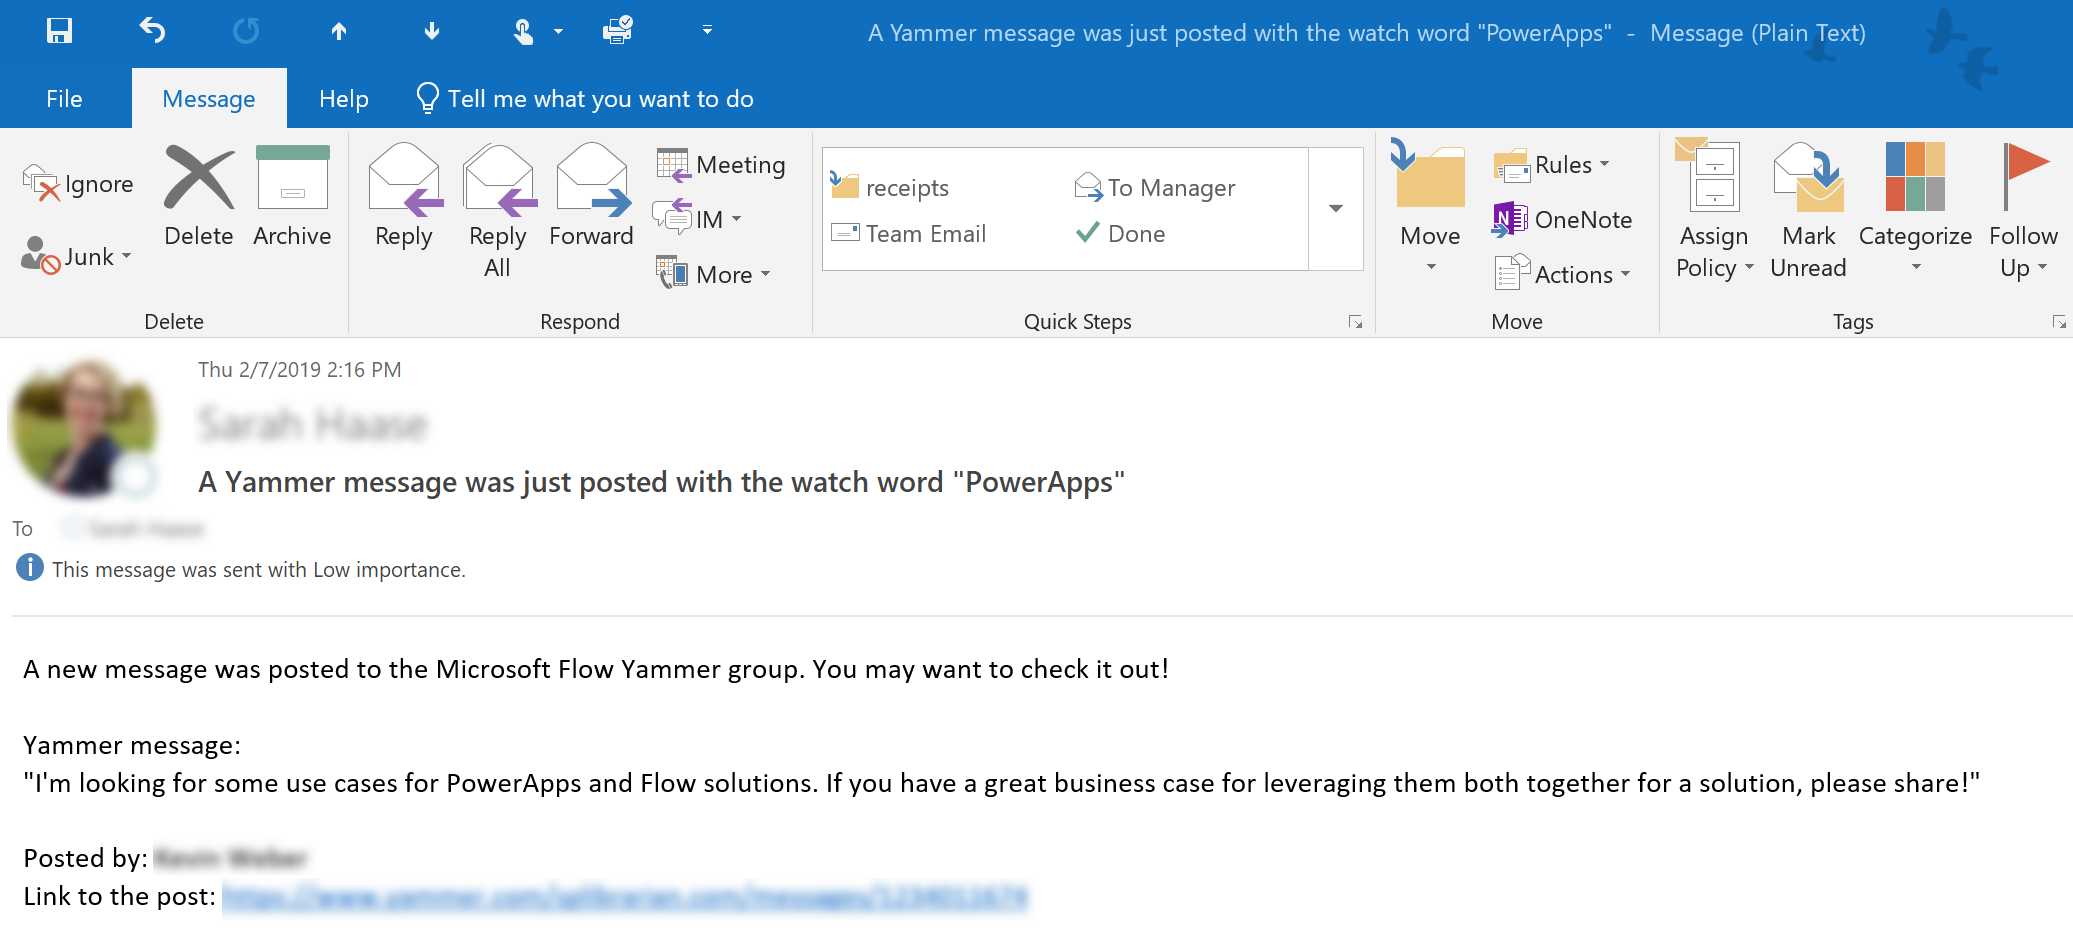
  • If the comment is negative – Sends an email to my Office 365 admin team if the sentiment score for a Yammer message is ≤0.3.
  • If the comment is positive – Sends an email to my Office 365 admin team if the sentiment score for a Yammer message is ≥0.7.

Step 5: Create Power BI report(s) to visualize your Yammer sentiment scores. Published reports can be rendered in your SharePoint Online Communications or Team sites using the Power BI web part. For help in setting up sentiment analysis slicers, check out this DataChant blog post.

Here’s a sample dashboard that shows Yammer sentiment data for my Microsoft Flow Yammer group:

yammer sentiment flow-14

Step 6: Distill the results. Once you start calculating Yammer sentiment and have reports to visualize the data, you can analyze the results and follow up where needed. Here are a few ideas to get you started:

  • Break down negative Yammer posts (e.g. posts with a score ≤0.3) by user. Schedule follow-up meetings with Office 365 end-users that consistently post negative messages. The goal is to ask questions and understand the pain points the users are facing. Perhaps they have hardware or network issues that impact their productivity. Or maybe they’re having issues with Microsoft Flow and need a coach/mentor to spur their learning. Having one-on-one dialogues provides the opportunity for candid feedback and enables you to make a difference in the user’s productivity and technology experience.
  • Identify Office 365 enthusiasts. Break down Yammer posts by volume or by high sentiment average in order to find power users across your organization. Set up meetings with these enthusiasts to understand how they leverage Office 365. Incorporate them into your user group or internal community and support them in their growth. These enthusiasts can become your Office 365 evangelists!
  • Monitor the volume of Yammer posts in your group. Build a gauge that shows your number of Yammer messages month-to-date and identifies progress towards your monthly Yammer message goal. Keeping an eye on your total posts month-to-date and year-to-date will help you monitor use over time and highlight areas you may need to invest additional time and adoption efforts in.

yammer sentiment flow-15

  • Optimize your communications. If one of your Office 365 admin resources has consistent negative Yammer sentiment scores, have them evaluate the verbiage they’re using. Slight wording changes can change the tone of their messages, increasing Yammer sentiment scores and better engaging with end-users.
  • Take a health pulse. Build trending visuals that show average post volumes and sentiment averages by week or month. If you start seeing spikes on volume of posts and/or significant changes in your sentiment averages, it’s time to dig deeper. Perhaps you’re seeing a spike in interest in PowerApps after a compelling user group presentation or have network bandwidth issues that are causing issues. Either way, Yammer sentiment analysis can be your early warning indicator that something has changed.
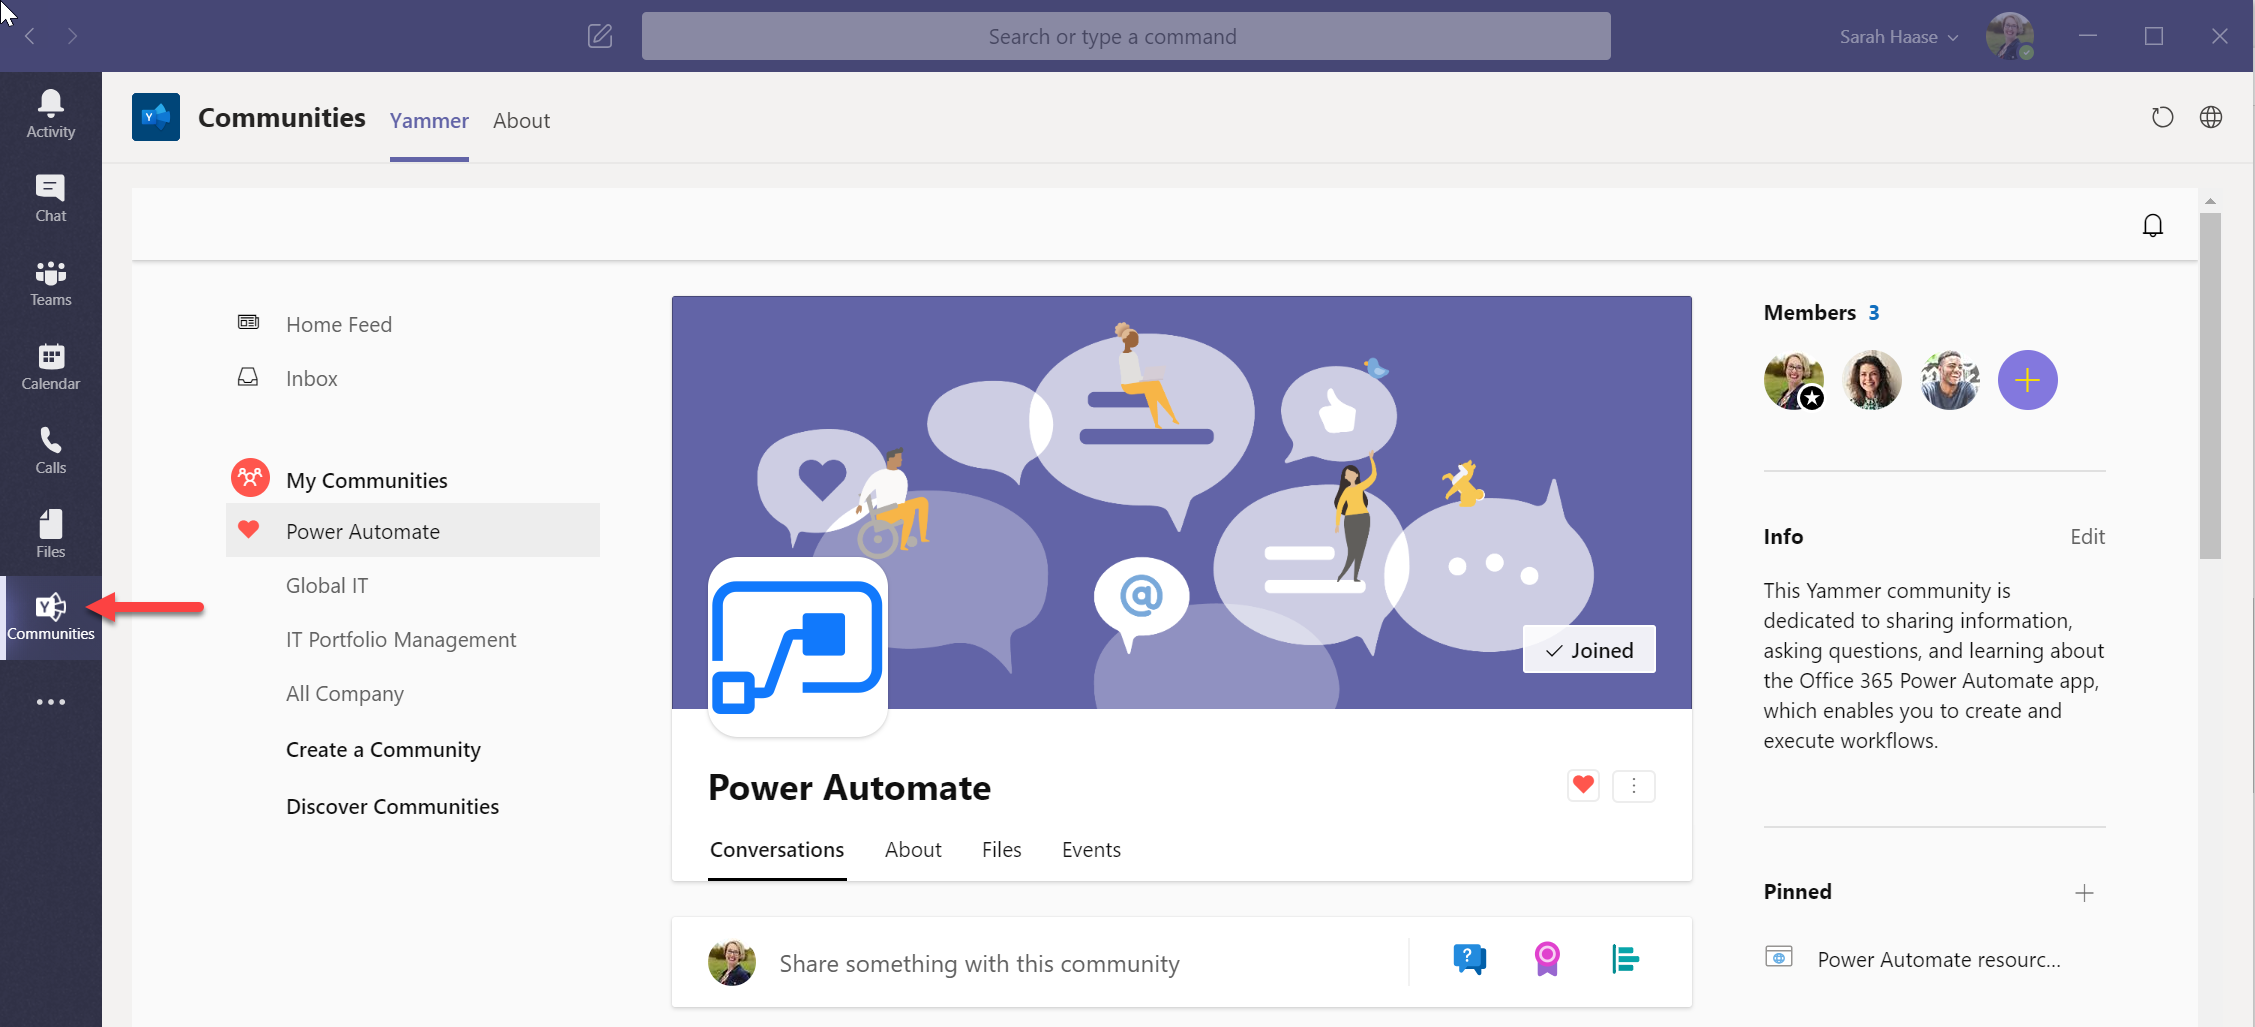
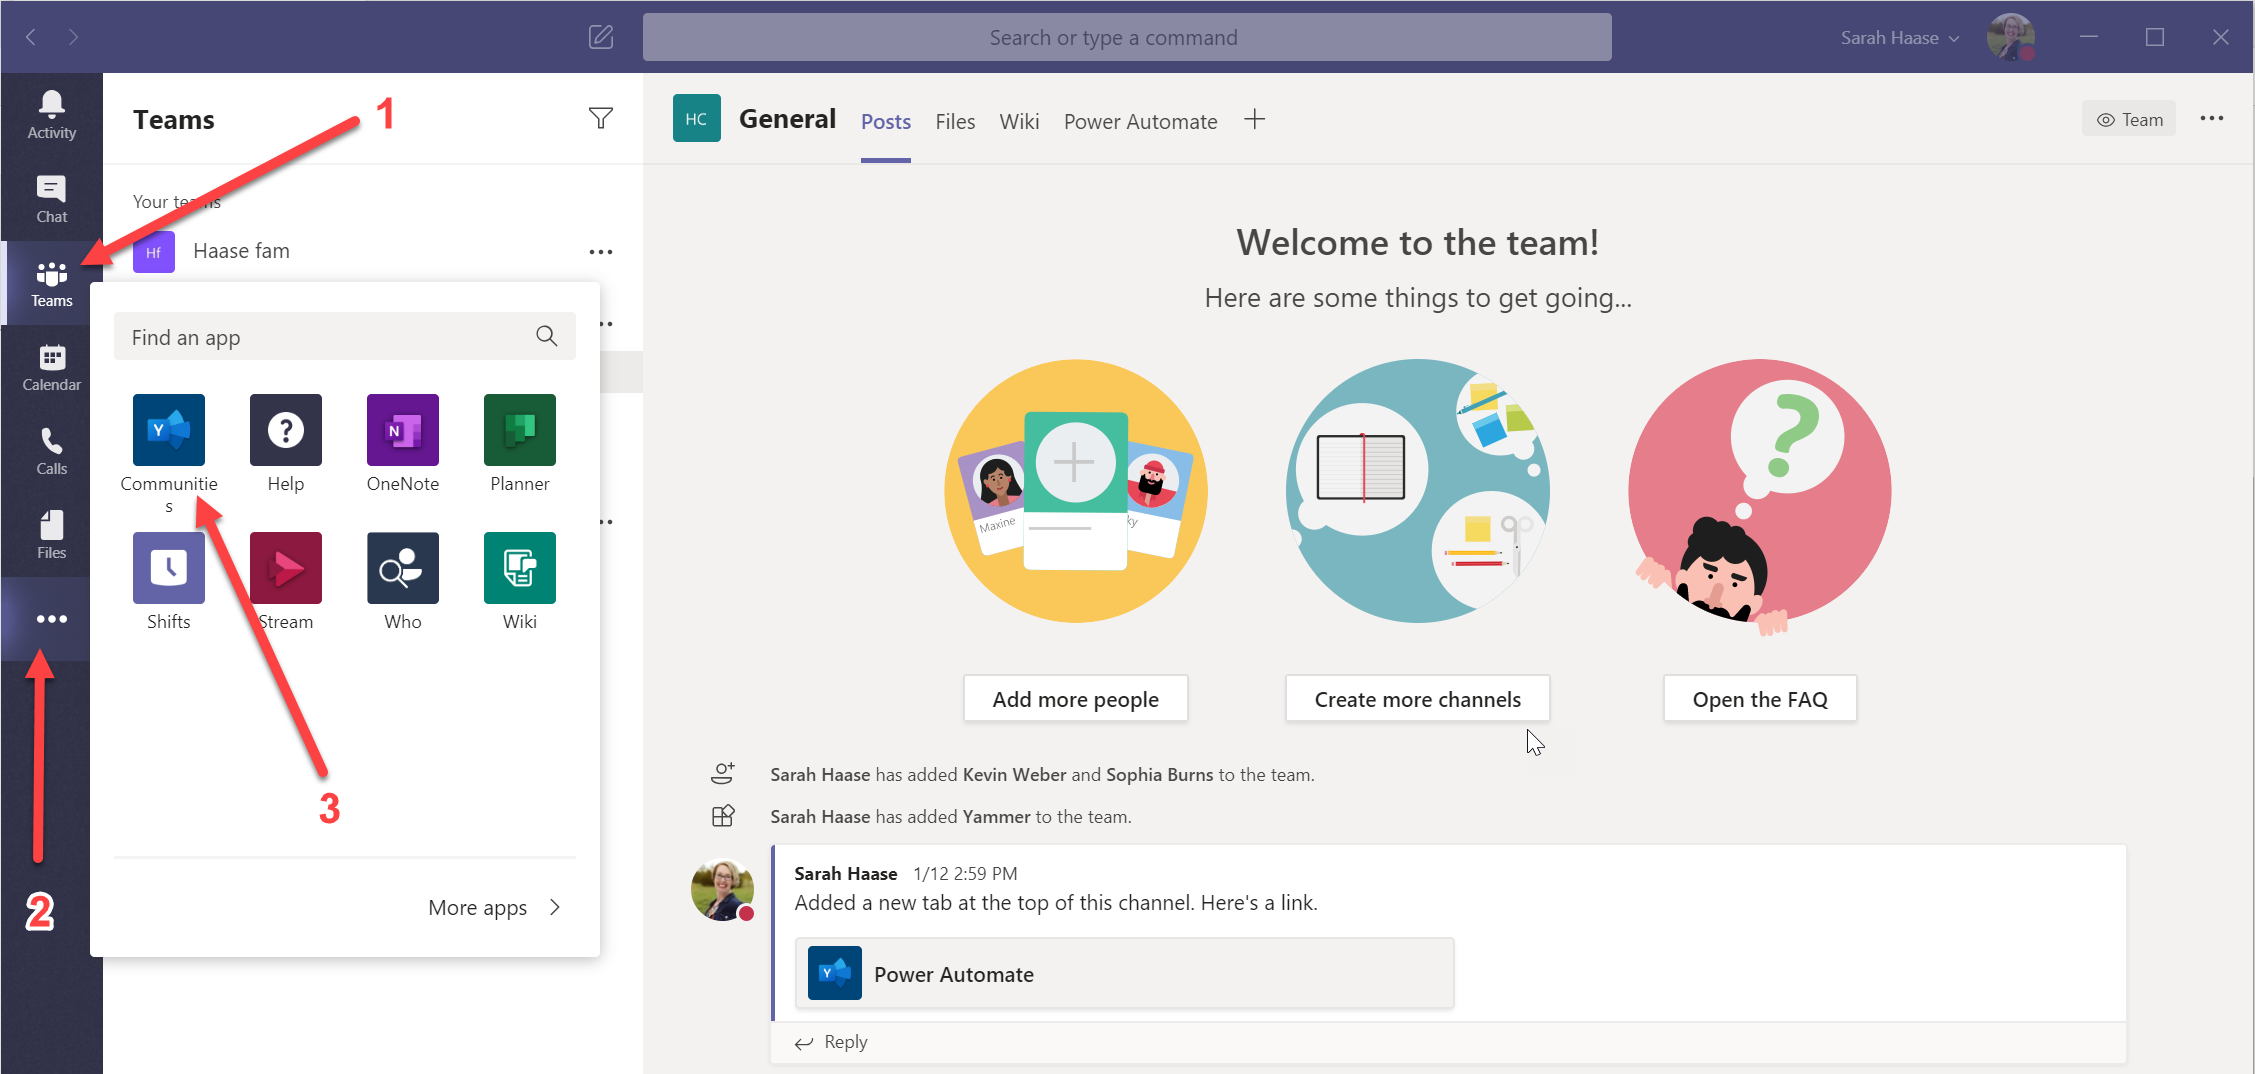
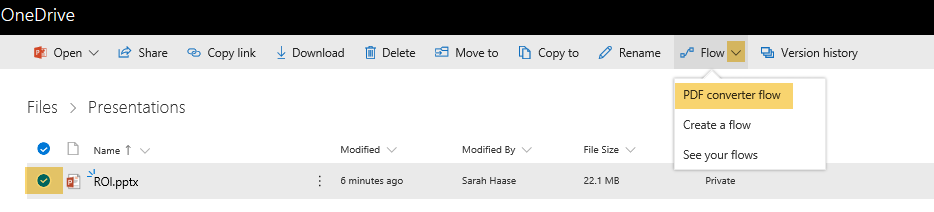
Welcoming the magic of Flow to OneDrive

January 2019 update:
Out-of-the-box Microsoft Flows are now available in OneDrive! Microsoft has integrated two new flows into the OneDrive interface–Copy as a PDF and Request sign-off. The Copy as a PDF flow replaces the custom flow solution outlined in my blog post below. Saving documents as PDF files in OneDrive is now easier than ever before. Simply select the file and start the Copy as a PDF flow. That’s it!

Original post:
In November 2017, Microsoft released its integration between Flow and OneDrive. Users can now create flows in OneDrive that will perform actions on OneDrive documents or folders. There are a wide variety of flows you can create, including:

  • Saving a copy of email attachments to a specified OneDrive folder
  • Routing OneDrive file(s) for approval
  • Sending OneDrive file(s) to other users
  • Sending links to OneDrive file(s)
  • Requesting feedback on OneDrive file(s)
  • Sending OneDrive file(s) to Microsoft Teams
  • Setting up alerts when new document(s) are uploaded
  • Searching for files in a given OneDrive folder
  • Copying OneDrive files
  • Converting OneDrive files to PDF
  • And more….

Because I present at multiple conferences/events per year, I wanted to test the capability of using Flow to convert my PowerPoint files to PDFs for easy sharing with conference attendees. I set up a flow in OneDrive to perform a PDF conversion on whichever files I select. I was able to use one of Microsoft’s standardized templates for the flow, with only a couple of minor tweaks.

Here are the steps to re-create this PDF conversion flow:

  1. Open OneDrive.
  2. Click on the Flow link in the OneDrive ribbon and select Create a flow.
    Flow_OneDrive_01
  3. When the window of flow templates appears, select the Convert selected file to PDF option.
    Flow_OneDrive_02
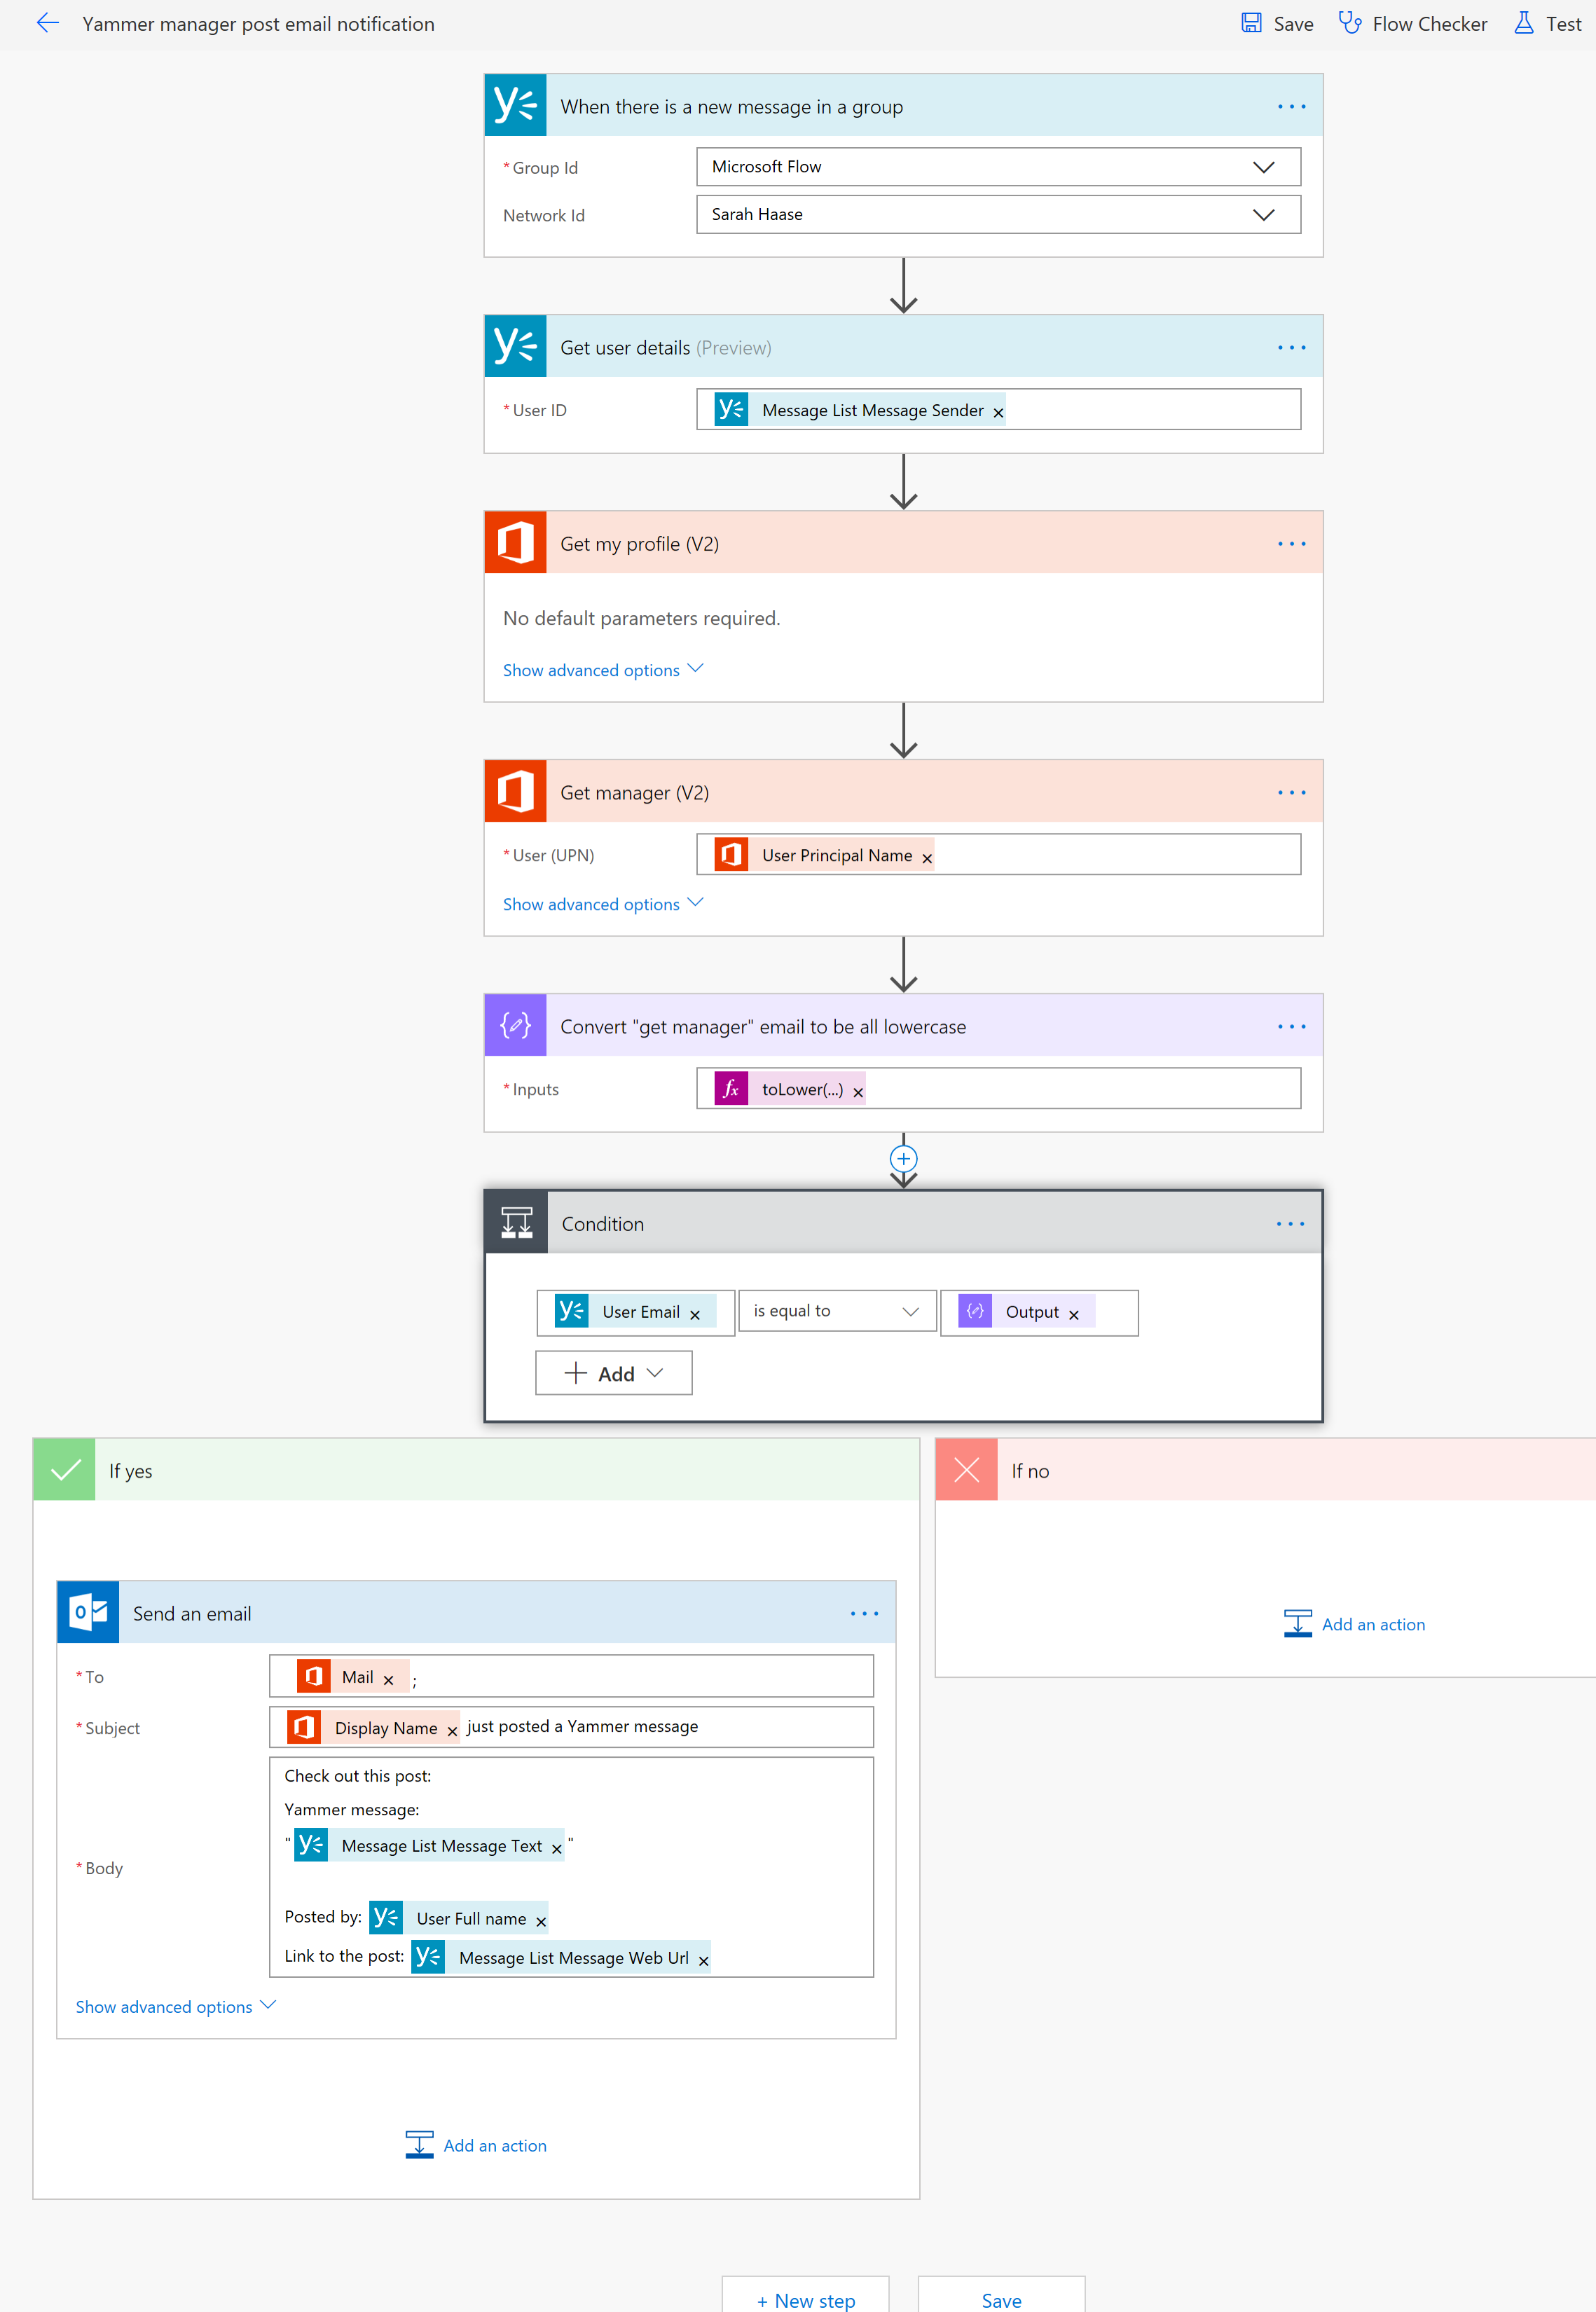
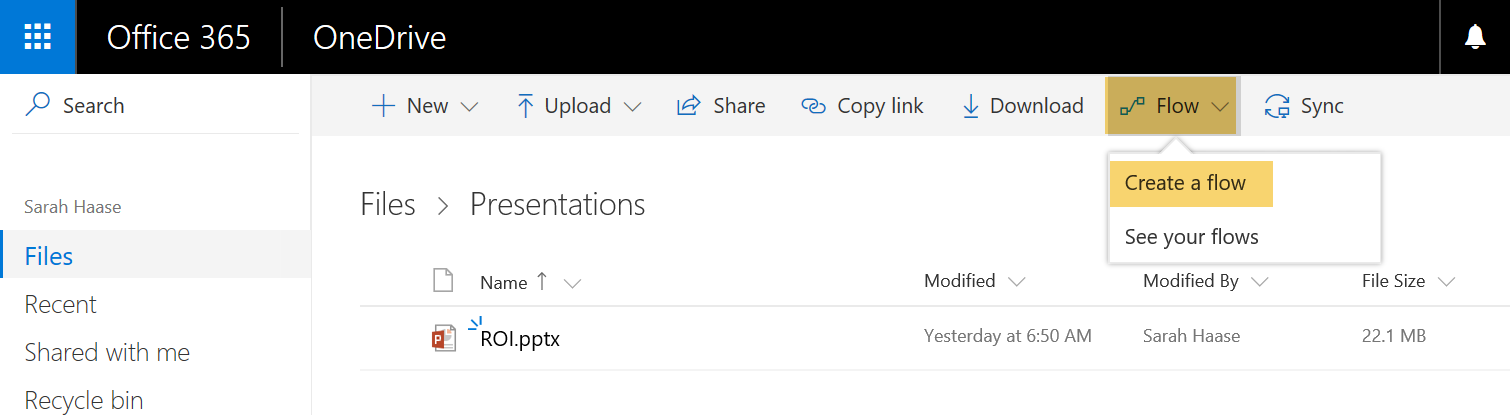
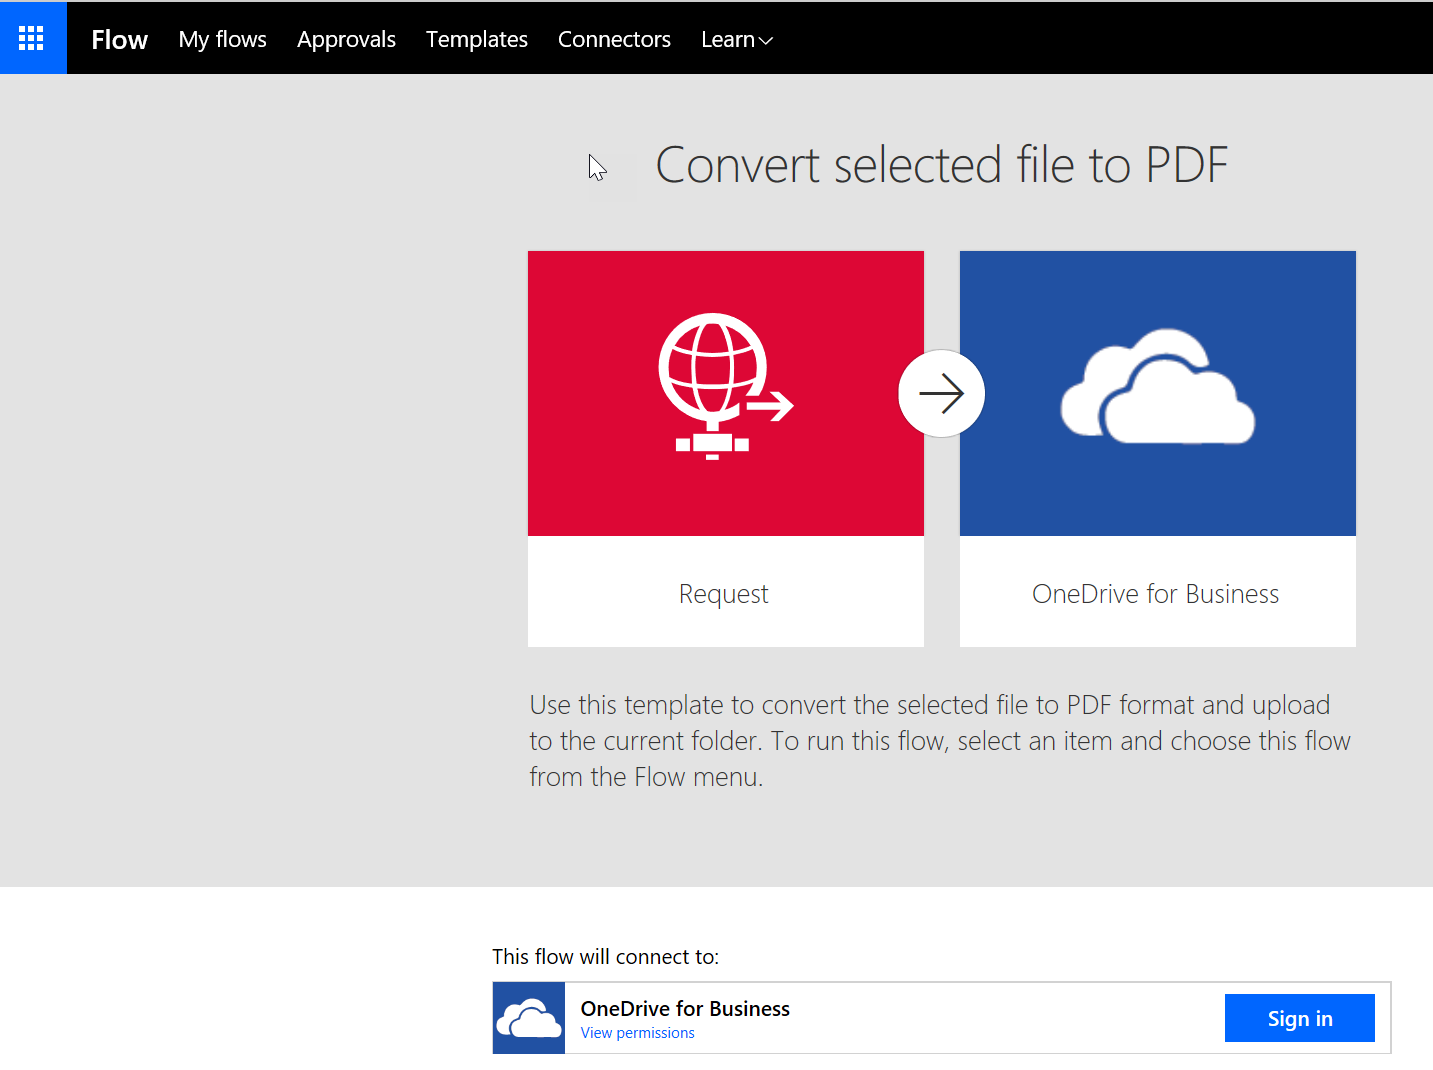
If this is your first time using Flow, you’ll be asked to choose your country and click on the Get started button.
  4. You’ll be taken to a detail page that has information on the Convert selected file to PDF template. If this is your first time using Flow, you may be prompted to sign in and authenticate to OneDrive so the flow can be built. Simply click the Sign in button to log in. Once you’re logged in successfully, the Sign in button will be replaced with a Continue button. Click Continue to start working on your flow.
    Flow_OneDrive_03
  5. The template will populate, showing you all the preconfigured options for your flow. The flow is designed to save the selected file in PDF format and upload it to the root of your OneDrive folder structure. These default options are good, but I opted to make two changes to my flow:
    1. I clicked into the Flow name field and re-named my flow to PDF converter flow. This is the name that will show up in my menu of flows to run in OneDrive.
    2. I wanted all my converted PDF files to be stored in my OneDrive Presentations folder. To configure this option, I opened the Create file step and specified the creation folder path of /Presentations. (Note: If you choose to use a custom folder to store your PDFs, you must create the folder in OneDrive before you can specify the folder name in your flow.)
    3. Once these changes were made, I clicked on the Create flow option to create my new flow:
    4. Flow_OneDrive_04.png
  6. Once my flow is created, I’m taken to the complete screen. All I need to do is click Done to exit.
    Flow_OneDrive_05
  7. Now I’m taken to the overview page for my new flow. I can see that this flow is turned on and is set up to run on my OneDrive account. I also see a run history box. An audit record for each run of this flow will be recorded in the run history.
    Flow_OneDrive_06
  8. Now I’m ready to return to OneDrive and test my new flow. To do this, I navigated back to OneDrive, selected the file I wanted to convert to PDF, clicked on the Flow dropdown menu and selected my new PDF converter flow.
    Flow_OneDrive_07
  9. After waiting 5-10 seconds, I refreshed my page and there’s my new PDF!
    Flow_OneDrive_08

A few lessons I learned during the process of setting up this new flow:

  • Neither the free version of Flow nor the E1 tenant license supports PDF document conversions. While the free version of Flow and my E1 tenant could be used to create other flows, the PDF converter required at least an E3 Flow license.
  • The PDF conversion flow can’t be run against multiple files at once. I had to start the PDF converter flow for each file individually.
  • PDF conversion speeds are variable based on file size. A 51MB PowerPoint file took almost a minute to convert. Small PowerPoint files converted in under 8 seconds.

If you’d like more information on the integration between Flow and OneDrive, read the blog post announcement from the Flow team.

Innovation Games: An Introduction

Let’s start with the obvious question–what are Innovation Games?

Innovation Games are a set of simple games you can play with your customers, your peers and your project teams to build shared understanding. There are a wide variety of Innovation Games; each game is designed to elicit a different outcome or data set. Some games can help you uncover unmet market needs. Other games are geared to driving product design, building/repairing relationships or creating strategic plans. The games themselves are just tools; a set of gaming principles and best practices you can leverage to gather qualitative information. The data gathered through Innovation Games can be used to shape strategies, gain momentum and build bridges with core constituent groups. Bottom line: Innovation Games are a fun way to engage your customers, your employees and your teams.

In September 2015, I led an introductory workshop on Innovation Games for MNSPUG (the Minnesota SharePoint User Group). The session introduced the concept of Innovation Games and highlighted how Innovation Games can help teams gather requirements, build consensus, drive strategic direction and recover broken work streams and projects. MNSPUG attendees were able to see Innovation Games at work firsthand. Don Donais, Liz Sundet, Matt Ruderman and I facilitated a live version of the Low-Tech Social Network and four separate iterations of the Speedboat game during the 3-hour workshop. Check out the pics of our completed games below.

This slideshow requires JavaScript.

If you’re interested in learning more, check out the MNSPUG session recording below. (A big thanks to the folks at Avtex for providing the recording.) To help you navigate the lengthy session, track times are outlined below.

07:48 – Kickoff of the Innovation Games session
11:29 – What are Innovation Games?
15:45 – Why use Innovation Games?
26:45 – How do Innovation Games work?
34:08 – Introduction of the Low-Tech Social Network game
44:33 – Introduction of the Speedboat game
59:00 – Summarizing the results of your game
01:15:30 – What types of other Innovation Games are there?
01:32:07 – Resources/Recommended Follow-Up Reading
01:34:00 – Video of MNSPUG attendees playing the Low-Tech Social Network game
01:35:52 – Results of the Low-Tech Social Network game
01:39:00 – Video of Sarah teaching attendees how to facilitate a Speedboat innovation game

How do I disable the Edit link on my SharePoint 2013 pages?

Did you know that granting your end-users Contribute level access in SharePoint 2013 enables them to edit wiki and web part pages across your site (including your site’s home page)?

Site pages are stored in the Site Pages library by default. Since this library automatically inherits its permissions from the site, anyone with read/write access to the site also has read/write access to all site pages. Users with read/write access will see the Edit link shown below whenever they navigate to a site page.

EditPage-01

So how do you grant your users Contribute (aka read/write) access to your site and ensure they don’t get an Edit link on site pages? You change the permissions for your Site Pages library. If you grant users Contribute access to your site but read-only permissions to your Site Pages library, they will be able to view all your site pages but not edit them.

Here are the steps to modify the permissions for your Site Pages library:

  1. Go to your site.
  2. Click on Gear > Site contents.
  3. Find and click on your Site Pages library.
  4. Click on the Library tab and then click on the Library Settings button.
  5. Click on the Permissions for this document library link.
  6. Click on the Stop Inheriting Permissions button on the page’s toolbar.
  7. Say OK to confirm you want to customize the permissions for this library.
  8. Modify the library’s permissions as desired.

TIP: Make sure you give users read access to your Site Pages library. This will ensure they can see and access your site’s home page.


Having trouble lining up your SharePoint 2013 app parts on your wiki pages?

If you’ve built any new wiki pages in SharePoint 2013, you may have experienced some issues getting your web parts to line up nicely–particularly if you’ve modified the text layout of your wiki page to have multiple side-by-side columns. The columns make it easy to line up multiple app parts side by side, but the wiki pages’ tendency to add in extra paragraph spacing above some of your app parts can make it hard to line up all your app parts on the same vertical axis point. Here’s an example of a page that is suffering from some extra paragraph spacing:

Spaces05

As you can see in the shaded yellow box, I’m getting an extra paragraph of space above my app part in the left-most column of my page. These extra spaces seem to occur on wiki pages specifically, and usually in the left-most column of my page.

I could solve this problem by creating a Web Part Page instead of a Wiki Page (since web part pages don’t throw in these extra spaces), but I still wanted to figure out how to troubleshoot this type of issue on a wiki page.

Here are the steps I followed to create the wiki page shown above:

  1. Go to Gear > Add a page
  2. Type in a name for your page. (I named mine Queue.) At this point a new wiki page is created and saved in the Site Pages library of your site.
  3. Set the text layout for the page. Go to your Format Text ribbon, click on Text Layout and select Three columns with header
    Spaces01
  4. Now you’re ready to insert your web parts. Place your cursor in your header zone, click on the Insert ribbon and select Web Part.
  5. We’re going to insert an image here, so click on the Media and Content web part category and then select Image Viewer and click on Add.
    Spaces03
  6. I’ll add in my image by clicking on the open the tool pane hyperlink in my new Image Viewer web part. Here’s our finished image:
    Spaces04
  7. Now we’re ready to add some app parts to the page to render our list data. I’m going to add 3 app parts to the page–one in each of my page’s 3 columns. Here are the steps I followed to add each app part:
    1. Click into a column.
    2. Click on the Insert ribbon and select App Part.
    3. Choose the list or library you want to use and select Add.

Once I finish adding my 3 identical app parts to my page, this is what I see:

Spaces05

I tried simply placing my cursor in the extra space and hitting delete, but that deletes my app part entirely. The best way to remove this extraneous spacing is to edit the source of the page and remove the offending HTML paragraph tags. Here are the steps to perform this cleanup:

  1. Place your cursor in the extra paragraph space you want to get rid of.
  2. Click on the Format Text ribbon and select Edit Source.
    Spaces06
  3. Notice the spare paragraph tag located at the top of your HTML Source. (Shown highlighted in yellow below).
    Spaces07
  4. Highlight all the text on line 1 of your HTML Source and press your Delete key to remove it.
  5. Press OK to save your changes.

The trouble with filtering on workflow status columns…

Have you ever tried to filter a SharePoint list or document library view using a workflow status column? It’s harder than you’d think…

Workflow status columns report the current status of a workflow. A unique workflow status column is created in your list (or document library) automatically when you create a new out-of-the-box or SharePoint Designer custom workflow. Conveniently, SharePoint uses the name of your workflow as the name of your workflow status column. An example workflow status column is shown below (in yellow). This Email-notification column reports on the status of the Email-notification workflow.

wf-filtering-01

Being a savvy SharePoint user, you’d think you could use the workflow status verbiage as a filter for your list or document library view. Unfortunately, you’d be wrong. You cannot filter your list or library records using the displayed verbiage in your workflow status column(s).

Let’s take a look at an example:

I have a Team assignments list (shown below). It’s a very simple list that allows people to sign up for product areas they want to support. When a new item is created, a custom SharePoint Designer workflow runs and sends some automated notification emails. I can keep tabs on my workflows using the Email-notification workflow status column. As you can see, I currently have items in several different workflow statuses–2 of my list items are in Completed status while another 2 are in In Progress status.

wf-filtering-01

Now let’s say I wanted to create a new list view that only shows me list items that are in Completed status. I go to the List tab, click on Create View and set up my view filter to display only the items where Email-notification is equal to Completed. Sounds perfect, right?wf-filtering-02

Unfortunately, this view shows zero results–despite the fact that I know I have items whose workflow is in Completed status. Why does this happen? Because Microsoft actually uses numerical status codes to demarcate workflow states. While SharePoint displays “friendly” descriptors for their workflow states (e.g. In Progress or Completed), you need the numerical status codes to be able to filter against the workflow state. The difficult part is finding the correct numeral for the workflow state you want to filter against.

After doing some searching online, I found that the numeral 5 denotes a Completed workflow. When I update my view to filter and display only the items where Email-notification is equal to 5, my list returns the Completed workflow items I was looking for. Here’s a picture of my working filter:

wf-filtering-03

The trick, of course, is figuring out what numerals are used for the other possible workflow states. Here’s a quick list of the workflow states I typically filter against:

  • In Progress = 2
  • Approved = 16
  • Error Occurred = 3
  • Not Started = 0

For a more exhaustive list of workflow status codes, visit http://adayinsharepointv3.blogspot.com/2012/08/filter-list-view-by-sharepoint-workflow.html