There are a variety of ways to add color coding to your SharePoint lists and document libraries, from embedding custom code on your page to creating data view web parts with conditional formatting in SharePoint Designer. The trick is determining which method works best in your situation. Not sure how to do that? Start with the basics:
- Understand your business requirements.
- Build your user adoption strategy.
You have to start with your basic business requirements. You need to determine what data you will be storing, how you will be storing it and when you will be surfacing it to key audiences. Since many of these questions may impact your use of color coding and conditional formatting, they’re critical to understand.
You also need to know how dynamic your users want their solution to be. Do they want to be able to tweak the specific shades of green you’re using? What if they decide that they no longer want to demarcate completed items in grey–instead opting for a nice shade of puce? If you build your color coding solution using custom code or a SharePoint Designer add-on, your average business users will (most likely) not be able to make color modifications on their own.
Once you have the basic business requirements down, you need to figure out what add-ons and additional features your users are dying to get their hands on. Do they get excited about having high-priority items display in red text? Do they want all the completed items in their weekly project tracker to show up in light grey font? Or are they color blind and see no value in having any color differentiation of their SharePoint data? If your users have a wish list of desired functionality that includes color coding a document library, list or calendar, you should be running (not walking!) to find any and every solution that will make their dreams come true. Delivering on your users’ wish list items will ensure smooth user adoption and easier change management.
I’ve used a variety of methods for color coding my SharePoint lists and document libraries. I’m using this blog post to share one of my color-coding favorites–the Path to SharePoint solution that uses embedded HTML strings in SharePoint calculated columns to apply color coding. Here’s an example of the types of color coding you can do with this solution:
Setting up this type of color coding is fast–literally 5 minutes of work per list view you want to customize. But navigating the steps for the first time can be daunting. This blog pulls all the steps together in one easy-to-follow process. We’ll start with a business scenario, then move on to setup in both MOSS 2007 and SharePoint 2010. We’ll finish things off by discussing ways you can customize your new color coding.
Business scenario:
My company uses a SharePoint issue tracking list to store help desk support requests. All SharePoint users have the ability to go to this list and create new support requests as needed. When they go to the list and click on the Add new item link, they get a New Item form with the following basic input fields:
- Title
- Description
- Priority
- Due Date
When a user fills out the New Item form and clicks OK, the help desk ticket information is automatically routed to our help desk team for resolution. To ensure that high priority help requests are easily visible, our help desk manager wants the Priority field in our SharePoint list view to have automated color coding. He’d like all support requests that are High priority to display with a red icon. All Normal priority requests should display with a yellow icon and all Low priority requests should display with a green icon.
And while the team is currently using MOSS 2007, they have plans to upgrade to SharePoint 2010 in the next 3 months. So any color coding solution(s) that we build must work in both platforms.
Solution:
There are a few ways to get this done–including building custom data view web parts in SharePoint Designer. But since our help desk manager wants to modify the colors of his priority icons on the fly (without using SharePoint Designer), we’re going to build out these custom color indicators using HTML encoding embedded in calculated columns. We’ll be using the Priority column that comes with the default Issue Tracking list as the trigger for our color coding. (In other words, the value set in the Priority field will determine whether green, yellow or red color coding is applied to our new calculated field.)
While this solution works in both MOSS 2007 and SharePoint 2010, the setup is a bit different in each platform. Here are the required elements for both platforms:
| MOSS 2007 required elements |
SharePoint 2010 required elements |
- HTML script file (provided by Path to SharePoint) that will render your new HTML tags
- Document library to house the HTML script file
- SharePoint list with a Priority column
- Content Editor Web Part (CEWP)
|
- SharePoint list with a Priority column
- SharePoint Designer 2010
|
The remainder of this blog post outlines MOSS 2007 setup steps, SharePoint 2010 setup steps and cool ways to customize your new color coding.
MOSS 2007 setup
-
-
Upload the HTML script file to a document library on your site. As you can see in the screen shot below, I uploaded my file to a document library named
Site config files. It doesn’t matter what document library you use to store your file, but make sure all site users have at least read-only access to the library you use. This will ensure the HTML script file can be accessed to render the color coding you’re going to set up.

-
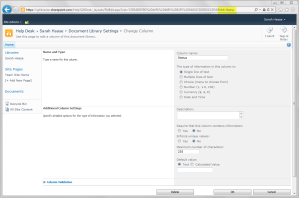
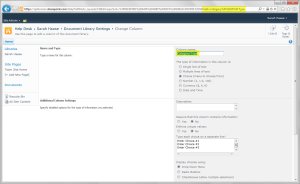
Validate that the SharePoint list or document library that you want to color code is set up with a
Priority field with the following basic settings. (Note that these settings come with the out-of-the-box
Priority site column, which you can add to your list or document library.)

-
-
Copy the formula provided for your desired formatting. In my case, I’m looking to implement a traffic light indicator so I copied the following formula:
="<DIV style=’font-weight:bold; font-size:24px; color:"&CHOOSE(RIGHT(LEFT(Priority,2),1),"red","orange","green")&";’>•</DIV>"
-
Add a new calculated column to your SharePoint list. Paste the HTML formula string you copied into the new column’s
Formula field. Click
OK to save your changes.

-
When you return to your list view, you’ll see your new calculated column displaying with <DIV> tags. Not very attractive.

-
To correct this issue, we’re going to add our HTML script to the page. Click on Site Actions > Edit Page.
-
Click Add a Web Part and add a new Content Editor Web Part to your page.
-
Move your new Content Editor Web Part (CEWP) to the bottom of the page. You need it to display below your list view web part.
-
Click on the CEWP’s
open the tool pane hyperlink.

-
When the web part configuration panel appears, place your cursor in the
Content Link field and enter the location where you stored your HTML script file. Click
OK to save your changes.

That’s it! Your formatting is applied and your page should now display your new color coded field. Here’s a screen shot of my finished view, complete with a Priority Indicator column that displays red, yellow and green traffic lights that correlate with the priority level of each help desk request:

Now that you’ve set up color coding on one list view, you can continue adding more color coding to this view or add color coding to other views. Note that you will need to add one CEWP to each list view page that you want to color code. There is no limit, however, to the number of calculated columns with HTML encoding you can add to your list.
SharePoint 2010 setup
-
Validate that the SharePoint list or document library that you want to color code is set up with a
Priority field with the following basic settings. (Note that these settings come with the out-of-the-box
Priority site column, which you can add to your list or document library.)

-
-
Copy the formula provided for your desired formatting. In my case, I’m looking to implement a traffic light indicator so I copied the following formula:
="<DIV style=’font-weight:bold; font-size:24px; color:"&CHOOSE(RIGHT(LEFT(Priority,2),1),"red","orange","green")&";’>•</DIV>"
-
Add a new calculated column to your SharePoint list. Paste the HTML formula string you copied into the new column’s Formula field. Click
OK to save your changes.

-
When you return to your list view, you’ll see your new calculated column displaying with <DIV> tags. Not very attractive.

-
To correct this issue, we’re going to need to modify this new calculated column. Open your site in SharePoint Designer 2010.
-
Click on Lists and Libraries in your SharePoint Designer 2010 navigation bar. When the list of your site’s document libraries and lists display, click on the list or document library we’re working on.

-
When the list or document library details page displays, look for and click on the name of the view you’re applying color coding to. In my case, I am updating the
All Issues view.

-
Once your view opens, click on of the fields that are displaying those ugly
tags. Notice that the <xsl:value-of> tag in the bottom right-hand corner of your screen lights up in yellow once your field is selected.

-
Hover over the <xsl:value-of> tag until a black dropdown arrow appears. Click on the dropdown arrow and select Edit Tag…
-
A dialog box will pop up with the following text:

Place your cursor between the last quotation mark and the closing > bracket. Now type the text
disable-output-escaping=“yes”
-
Your Quick Tag Editor box should now read like this:

-
Click on the Quick Tag Editor box’s green checkmark icon to save your changes. Your SharePoint Designer page will refresh and your color coding will appear!
-
Click File > Save to save your changes.
That’s it! Your formatting is applied and your page should now display your new color coded field. Here’s a screen shot of my finished view, complete with a Priority Indicator column that displays red, yellow and green traffic lights that correlate with the priority level of each help desk request:

Now that you’ve set up color coding on one list view, you can continue adding more color coding to this view or add color coding to other views. Note that you will need to modify the <xsl:value-of> tag for each column you want to display in HTML format. There is no limit, however, to the number of calculated columns with HTML encoding you can add to your list.
Cool ways to customize your color coding
Now that you have your fields set up, you may want to start customizing the look and feel of your new color coding. Changing out the colors that display is quick and easy:
- Find the new color(s) you want to use. A wide variety of HTML color choices are available. Here is a site that features a variety of HTML colors that are supported in all browsers: http://www.w3schools.com/tags/ref_colornames.asp
- Once you find a new color you’d like to use, note the color’s name.

- Go to your SharePoint list’s List Settings page.
- Find and click on your new color-coded calculated column.
- Look at your field’s formula and find the words red, orange and green. These are HTML color names that are currently being displayed on your SharePoint site. To modify these colors, all you need to do is replace these color names with the new color names you want to use. If, for example, you wanted to change the color orange to the HTML color Violet, all you need to do is highlight the word orange and replace it with the word violet. Then click OK to save your changes.
Here’s a picture of my list view now that I’ve changed orange to violet. Notice that my “normal” priority items are displaying a violet icon:

But what if you want to make other changes–like using a different trigger field? It is quick and easy to change the name of the field you want to trigger your color coding from. Just go to your calculated column, find the word Priority and change it to the name of the field/column you want to use.
The more difficult bit is changing the valid values that you want to trigger off of. The color coding formulas provided assume that you have a choice field with valid values of:
- (1) High
- (2) Normal
- (3) Low
If you want to trigger color coding off of different values, you will need to tweak your calculated column formula. Fortunately, the fantastic folks at Path to SharePoint have already anticipated this need and have written a follow-up blog post with more formula examples. Take a look – http://blog.pathtosharepoint.com/2008/12/09/color-coding-more-examples/