General SharePoint solutions

A visual approach to content type tagging for your document library

In a previous post, I dove into the scary underbelly of file repositories. Most document libraries are a hoarder’s paradise, complete with hundreds of sub-folders and thousands of files. These document libraries are 1-way streets. You can easily upload your content to them, but it is virtually impossible to go the other direction and find/retrieve files. In order to maximize usefulness and value, we need our document libraries to support 2-way traffic–file upload and easy file retrieval.

Document uploads are relatively easy. Most of our business users can figure out how to upload a document (or know someone with a few SharePoint skills that can teach them how to drag-and-drop in SharePoint 2013). Content retrieval is much harder. It relies on “advanced” features like metadata, content types, document sets and information policies to make documents find-able and retrieve-able. Unfortunately, metadata is often a tough sell. We try to convince our end-users that metadata can help them with document retrieval, but getting them to consistently apply metadata tags to the documents they upload is a nearly impossible task. Unless you’re working for a company (or industry) that requires document metadata tagging as a fundamental job requirement, your only lasting hope is to make metadata tagging simple, easy or automatic. This post walks through an everyday business scenario for document storage and outlines an out-of-the-box metadata tagging solution that was built to support it.

Business Scenario

You’ve just been assigned as the project manager for a new software development project. Since you’ve worked on other project teams and seen firsthand the challenges of storing project documents in gargantuan file repositories, you know you want to implement a metadata tagging scheme for your project content. The goal is to tag each project document as it gets uploaded to SharePoint, and then use the metadata tags to build a browse-able document navigation tree for your SharePoint site. The challenge is figuring out how to design and use tags that reflect both the document’s purpose and the project lifecycle stage that the document pertains to.

You sit down with your SharePoint SME (subject matter expert) to find a solution to this tagging conundrum, and together you devise a graphical model of your content:

ContentType26

Your model breaks down all project documentation into 6 categories: project discovery, project scoping, solution building, solution testing, solution deployment and iterative change management.

Each of these 6 content categories have different information needs. Discovery and Scoping documents, for example, need to be tagged with the assigned business analyst resources that will write/finalize solution requirements. Build documents need to be tagged with code review/release dates and Test documents need to be tagged with test status and tester assignments. All content categories need to be tagged with the release/version number they apply to.

Your SharePoint SME suggests using content types to organize your metadata fields. He plans to build one content type for each of your six project categories. Each content type can present targeted metadata fields that are specific to each project category AND provide default values where applicable. And because you’d be using content types and metadata fields to tag your content, you could store all your project documents in a single document library with (gasp) no file folders! The trick is designing a quick and easy way for users to upload and tag their project documents.

The approach

We know we’re building a single document library with six custom content types. But how do we quickly and easily enable users to specify which content type their file(s) belong to? An out-of-the-box solution doesn’t cut it, because we know our users won’t go through the process of selecting their appropriate content type when they upload their files.

Your SharePoint SME goes back to the drawing board and comes up with a creative idea. How about displaying buttons on the main page of your site….and make each button a clickable link? When users click on a button, they’d be taken to the document upload page for that corresponding content type (effectively bypassing the need to select the content type of the document they are uploading). Yes, your users would still need to add in metadata that applies to their document’s content type, but we’d be able to sidestep the content type selection in its entirety. We can also plug in default column values for each content type, simplifying the metadata tagging process. Sound interesting? Let’s take a look at the steps for building this out.

Part 1: Creating your new content types

  1. Click on Gear > Site settings.
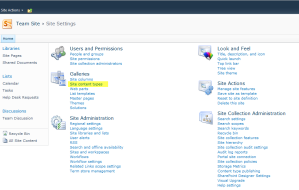
  2. Under Web Designer Galleries, click on Site content types.
    ContentType01
  3. Click on the Create button.
  4. In the Name field, type Discovery.
  5. In the Select parent content type from field, select Document Content Types.
  6. In the Parent Content Type field, select Document. Your page should now look like this:
    ContentType02
  7. Click OK.
  8. You will be taken to a configuration page for your new content type. Click on the Site Content Types page header to return to the Site Content Types page.
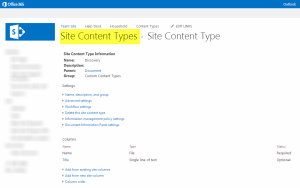
    ContentType03
  9. Repeat steps 3-8 to create each of your new content types.

Part 2: Setting up your document library

  1. Click on Gear > Add an app.
  2. Select the Document Library app.
  3. When prompted, enter a name for your new document library.
  4. When you are returned to the Site Contents page, find and click on the blue icon for your new document library.
  5. While in your new library, click on the Library subtab and the List Settings icon.
  6. Click on Advanced settings and set the Allow management of content types field to Yes.
  7. Click OK.
  8. Go to the Content Types section of the page and click on the Add from existing site content types link.
    ContentType04
  9. Locate the dropdown field that controls the content type groups being displayed. Change the dropdown value from All Groups to Custom Content Types. Your newly created content types will display in the Available Site Content Types box.
  10. Select one of your new content types and click on the Add button. Repeat this step until all your new content types have been added (as shown below).
    ContentType05
  11. Click OK. You are now returned to the main list settings page.
  12. Go to the Content Types section of the page and click on the Change new button order and default content type hyperlink.
    ContentType06
  13. Uncheck the checkbox for the Document content type and click OK. Also make sure your content types are ordered correctly. Since we want our content types to be listed in the order of our project phases, our content types appear in the following order:
    • Discovery
    • Scope
    • Build
    • Test
    • Deploy
    • Change
  14. Now it’s time to create all the new columns for your document library. As you create your columns, be mindful of the new Add to all content types checkbox that now displays on your column creation page. If you leave this box checked, the column you are creating will automatically be added to each of your 6 project lifecycle content types. If you leave the box unchecked, you’ll need to manually add this new column to the individual content types where you’d like it to be used.
    ContentType12
  15. Once all your columns are defined, it’s time to determine which field(s) should display for each of your content types. To get started, go to your List Settings page and click on the hyperlinked name of one of your content types.
  16. When the content type detail page appears, click on the Add from existing site or list columns hyperlink.
  17. Add the fields you want to display for this content type.
  18. Use the Column order link to define the order in which the content type’s fields should display.
  19. Click on the Settings link in your page’s breadcrumb to return to the list settings page.
  20. Repeat steps 16-20 to define the metadata fields for each of your other content types.
  21. Now it’s time to set up the default values for your metadata columns. This step requires a bit of extra work in SharePoint 2010 and SharePoint 2013. Go to your List Settings page and click on the Column default value settings link.
    ContentType13
  22. To enter a default value for one of your columns, click on the column name and follow the on-screen prompts. After entering my default values, my column default value settings page now looks like this:
    ContentType14

Part 3: Determining the upload URLs for each of your new content types

Now we need to build a custom upload URL for each of your project lifecycle content types. These are the URLs that we’ll associate with your document upload buttons. The first step in building these URLs is turning off the Minimal Download Strategy feature via your site features page. The Minimal Download Strategy feature impacts the length and character of your site’s URLs, making it harder for this solution to work.

  1. Go to your Site Settings page by clicking on Gear > Site Settings.
  2. Click on the Manage site features link under the Site Actions heading.
  3. Scroll down and find the Minimal Download Strategy feature. If there is a Deactivate button next to the feature, click it.
  4. Click on the Deactivate link to confirm you want to deactivate this feature.

Now we’re ready to build your custom upload URLs. Here are the steps you’ll need to follow:

  1. Go to the Library Settings page for your document library.
  2. Copy the URL that is displayed in the address bar of your web browser.
  3. Open a text-based editor on our computer (e.g. Notepad or WordPad).
  4. Paste your copied URL into your text editor.
  5. Find the word listedit in your URL and replace it with the word upload.
    ContentType15
  6. Go to the end of the URL in your text editor and type &Source=
  7. After the &Source= string, paste in the URL for the home page of your SharePoint site.
    ContentType16
  8. Go to the end of the URL in your text editor and type &ContentTypeID=
  9. Return to the Library Settings page for your document library and click on the name of your first content type.
  10. Look at the URL for your page and find the string &ctype=
    ContentType17
  11. Place your cursor in the URL and copy the entire string of characters that follows the &ctype= string. This is the unique ID for your content type.
  12. Return to your text editor and paste your content type ID after the string &ContentTypeID=
    That’s it! You’ve now built a custom upload URL for your first content type. Here’s a picture of the end result. All the parts of the URL I customized are shaded in yellow:
    ContentType18
  13. Now it’s time to test. Copy your newly built URL and paste it an Internet browser window. Validate that you can upload a document, have it auto-tagged with its corresponding content type and that all your default column values work as expected. If the link does not work as expected, re-build your custom upload URL to make sure it is working correctly.
  14. Repeat steps 1-13 for EACH content type in your document library. In the end, you’ll end up with a unique upload URL for each content type.

Part 4: Creating your upload images

Now it’s time to build the images you want to use as your document upload buttons. Feel free to create the buttons in whatever program or design you like—just make sure that you end up with 1 image file for each upload button.

I opted to create the following circle images in PowerPoint. I right-clicked on each image in PowerPoint and selected Save as Picture to save each circle as a separate .PNG file.

ContentType19

Part 5: Adding upload buttons to your site’s home page

There are thousands of ways you can lay out and style your site’s home page. The steps below provide one suggested way of laying out your upload buttons. Feel free to customize.

  1. Go to your site’s home page.
  2. Click on the Edit link in the upper right-hand corner of the page.
  3. Click on the Text Layout button in your Format Text subtab and choose the One column with sidebar option.
    ContentType20
  4. Place your cursor at the top of your page’s sidebar. Select the Heading 1 style from the Format Text subtab and type Upload Center on your page.
  5. Hit the Enter key and type Click on a circle to upload a document. Your sidebar should now look like this:
    ContentType21
  6. Hit Enter again.
  7. Click on the Insert subtab and then the Table button. Add a table with 3 columns and 2 rows.
  8. Place your cursor in the left-cell of the upper row. You’re now ready to insert your first image.
  9. Click on the Insert subtab. If your images are already uploaded to your SharePoint site, select Picture > From SharePoint and select your first image. If your images are not uploaded to SharePoint yet, select Picture > From Computer and select your first image.
  10. Your image will now be displayed in your table cell. If you want to resize your image, change the Horizontal Size and Vertical Size settings on the Image subtab. Since my images were a bit large, I’ve resized them down to 100×100 pixels.
  11. Now it’s time to add the upload link to your image. Click on your image to select it. Then click on the Insert subtab and select Link > From Address.
    ContentType22
  12. Copy the upload URL you created for this content type and paste it into the Address box of the Insert Hyperlink dialog box.
    ContentType23
  13. Click OK to save your changes.
  14. Click on the Page subtab and click on the Save button to save your page.
  15. Now it’s time to test! Click on your first upload button and validate that you can successfully upload a document. Validate that the document gets auto-tagged with its corresponding content type and that all your default column values work as expected. If the link does not work as expected, re-build your custom upload URL to make sure it is working correctly.
  16. Repeat steps 9-15 to upload your remaining images and link them to your custom upload URLs.
  17. If you’d like to remove the gridlines from displaying around your table cells, edit your page, go to your Design subtab, click on Styles and select the Table Style 1 – Clear option.

Here is my page now:

ContentType24

Part 6: Building your document library views and navigation

You’ve now built an easy way for users to upload documents and have them auto-tagged with metadata. Now you need to consider how your users will browse for and find documents that have been uploaded. Will you build out views for each of your content types? If so, how will your users access these views?

I recommend creating new views and adding them as links on your site’s Quick Launch bar. The results may look like the example highlighted in yellow below. Of course, you can get more detailed and elegant in building out these document library views. The important thing is to provide your end-users with easy-to-click-on links that provide a queried short list of documents that meet their specific information need.

ContentType25

Credits:

A big thank you to Matthew Ruderman (SP_Geek) for serving as a technical editor on this post. Without you, Matt, these manually generated upload links would have looked awfully ugly…

Using information policies to set up automated “content review” emails for your SharePoint document libraries

Close-up of white dandelionFile repositories are like weeds–they grow fast, are difficult to control and can choke the life out of everything around them. It’s easy to wish the weeds of your SharePoint environment didn’t exist, but let’s be realistic: People love creating documents, and SharePoint stores documents. This means that file repositories are a part of your SharePoint future (whether you like it or not).

Not all file repositories are bad, though. Well-organized document libraries that make use of content types, metadata tagging, customized views and information policies do exist. The problem is, these well-managed document libraries don’t get much press. So let’s take a look at a solution you can implement to build a content review/retrieval strategy for your document library. It uses information management policies and workflows to send automated reminder (aka nuisance) emails to document owners once a document review/expiration date is reached.

Business scenario:

The ABC Company uses a SharePoint document library to store all of our help desk support documents. When one of our help desk support representatives resolves a new (previously undocumented) issue, we create and upload a new support document. Since we want support documents to be reviewed regularly to ensure they remain current, we’ve added a required Date for Review field to our document library. Now when support reps upload a document, they’re prompted to specify a date when the document should be reviewed. The tricky part is enforcing the review date. We want SharePoint to automatically email the document’s creator when the review date is reached, advising the author that they should review their support document and either delete it or reset its Date for Review.

Solution:

We’ll be using an out-of-the-box information management policy and a SharePoint workflow to build out this solution. The information management policy controls the timing of your solution. It watches the clock and fires off a SharePoint workflow when the Date for Review is reached. The SharePoint workflow is responsible for sending the review notification emails to your document creators. You have two options for creating this review notification workflow–you can use an out-of-the-box SharePoint workflow (a built-in SharePoint workflow that provides limited configuration options) or a custom SharePoint Designer workflow that you build to your specifications. There are pros and cons for using either approach:

Out-of-the-box SharePoint workflow advantages:

  • Can be set up/configured within the SharePoint web interface
  • Only requires admin privileges for your document library–not site admin privileges

Out-of-the-box SharePoint workflow disadvantages:

  • Pre-configured workflows are fairly limiting. You take what is offered, with little ability to customize

SharePoint Designer workflow advantages:

  • Enables you to customize who your email is sent to
  • Enables you to dictate the verbiage that goes in your email
  • Enables you to tailor your workflow to run under specific conditions
  • Enables you to take a wide variety of actions, from sending emails and updating document metadata fields to performing calculations and logging workflow history messages

SharePoint Designer workflow disadvantages:

  • Requires knowledge and use of SharePoint Designer, which is not available to all power users or site collection administrators
  • Requires site owner permissions

Choosing which type of SharePoint workflow to use requires 2 key elements–an understanding of each workflow’s options and a thorough list of your own workflow requirements. To see the options that come with SharePoint’s out-of-the-box workflows, go to your document library and select Settings > Document Library Settings > Workflow Settings.

Since our scenario requires an automated review email notification email with custom verbiage, we’re going to proceed with creating a SharePoint Designer custom workflow.

Phase 1: Set up your document library

  1. Go to the document library you want to update with an automated expiration and email review process. (If the document library doesn’t exist yet, create it.)
  2. Create your Date for Review column. If you want to make sure this column is always populated, make sure you set it to be required.

I’m often asked if you can automatically calculate a review date (as opposed to populating one manually). You can, but SharePoint doesn’t make it easy. The fastest way to calculate a review date is to create a new Calculated column that automatically adds or subtracts days from one of your existing date fields. Unfortunately, information management policies can’t “see” calculated columns, and thus can’t use them to kick off your automated email reminder workflow. Your next-best option is to create a Date/Time column and build a custom SharePoint Designer workflow that performs your date calculation and populates your new Date/Time column. Not ideal, but it’ll get the job done.

Part 2: Building your SharePoint Designer workflow

  1. Go to your document library. Click on the Library sub-tab, click on the Workflow Settings dropdown and select Create a workflow in SharePoint Designer.SharePoint Designer should open up, enabling you to start building your workflow. If SharePoint Designer doesn’t open automatically, don’t worry. Just open up SharePoint Designer 2010 manually, open your site, click on the List Workflow button and select your document library.
  2. When the following dialog box appears, specify a name and description for your workflow:
  3. Click OK to save your changes.
    Now it’s time to set up your workflow. Fortunately, our workflow needs are fairly simple. As we mentioned in the business scenario above, we just need the workflow to send a review reminder email to the document’s creator.
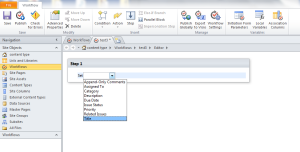
  4. To get started, click on the Action button’s dropdown arrow and select Send an Email.
    The phrase Email these users will appear in Step 1 of your workflow.
  5. Click on the these users hyperlink to configure your email.
  6. Click on the address book icon next to the To field. When the Select Users dialog box appears, double-click on the item User who created current item and click OK.
  7. Place your cursor in the Subject field and type in the subject line that you’d like to use for your email.If you want to include a blend of text and field data from your document library, click on the ellipses ( …) button. This will open the String Builder dialog box. Now you can type in your text and use the Add or Change Lookup button to add field data to your subject line. We opted to have our subject line use a blend of words and field data. Here are the results:
  8. Now you’re ready to enter the body text for your email. Type in whatever message you’d like to send. If you’d like to display item-level metadata in your email body, use the Add or Change Lookup button to select the field(s) you want to display. Consider adding in a hyperlink to your document as well. This makes it much faster (and easier) for your reviewers to find the document to review. For instructions on how to enter the item’s URL in your email body, take a look at Brian Jackett’s blog post.
  9. When you are finished defining the body of your email, click OK to save your email settings. You’ll automatically return to the main edit page of your workflow. The blinking orange line should appear directly below your Email action item.
  10. Click on the Action button’s dropdown arrow and select Log to History List. This action enables you to log a history message to your workflow history list. While your users won’t see this history log, it will be a useful tool for you and other admins to troubleshoot your workflow.
  11. The Log to History List action will be added to your workflow. Click on the this message hyperlink to add a message. Since I want this message to confirm that an email was sent to the document creator, I type in the message Email to document reviewer sent. Hit the Enter key to save your message.My workflow settings now look like this:
  12.  Now it’s time to save and publish your workflow. Fortunately, all the buttons you’ll need to save and publish are located on the SharePoint Designer Workflow tab, which should be displayed immediately above your workflow settings. First, click on the Save button to save your workflow configuration settings. Then click on the Publish button. This publishes your new workflow and ties it to your document library.
  13. Exit out of SharePoint Designer 2010.

Part 3: Setting up your information management policy

  1. Go to your document library. Click on the Library sub-tab and select Library Settings.
  2. Under the Permissions and Management column, select Information management policy settings.
  3. Now you have to determine the granularity level you want for your information management policy. In SharePoint 2010, you can apply a policy at 3 distinct levels:
    • Content Type level (the policy will apply to all documents in the current document library that are tagged with a specific content type (e.g. Document))
    • Document library level (the policy will apply to all documents in the current document library, regardless of content type)
    • Folder level (the policy will only apply to documents stored in a specific folder in the current document library)

    By default, SharePoint 2010 assumes you want your information management policy at the content type level (as shown below).

    To change your granularity level, click on the Change source link. (Note that changing your policy source has broad implications, including the suppression of all content type information policies. I recommend doing some in-depth research before making this change.)

    Since content type management of information management policies is ideal for our business scenario, we’re going to leave the default Content Type selection.

  4. Since our document library is only using the default Document content type, we will click on the Document link to set up our information management policy.
  5. When the Edit Policy page appears, fill in an Administrative Description and a Policy Statement. Follow the on-screen prompts for details on these fields.
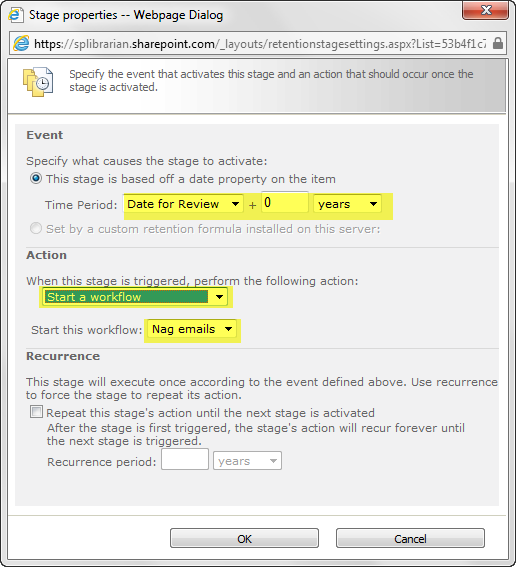
  6. Click on the Enable Retention checkbox.
  7. Click on the Add a retention stage hyperlink to set up the retention schedule for your documents.
  8. In the Time Period dropdown, select your Date for Review field. If you want to use this date as-is, place a 0 in the number of years/months/days to add.
  9. In the Action dropdown, select Start a workflow. Then select the specific workflow to start. In our scenario, we choose to have the Nag emails workflow started.
  10. Click OK to save your changes.
  11. Click OK again to save your new information management policy.

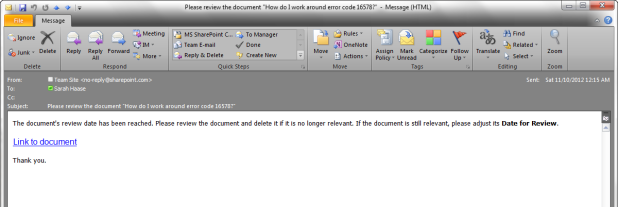
That’s it! Now when users upload documents to our document library, they’ll be prompted to specify a Date for Review. Once that date is reached, the retention schedule we set up will trigger the Nag emails workflow. When the workflow runs, it will send an automated email to the person who originally uploaded the document, telling them the document needs to be reviewed. Here is a picture of the email I received when the review date was reached for a document I uploaded:

Version note: This solution works in both MOSS 2007 and SharePoint 2010.

Limitations on modifying content types via SharePoint Designer reusable workflows

Man's hand tied  limitation with a rope. On a white background.If you’ve read my blog post on using content types to modify your NewForm.aspx and EditForm.aspx pages, you know how fond I am of using SharePoint Designer workflows to flip the values in my Content Type fields. Since content types control which fields are displayed on your forms, they provide an easy way to customize the input forms for your lists and libraries. The trick is building SharePoint Designer workflows that automate the transitions between your content types. By flipping the value in your Content Type field via workflows, you make your list and library forms look dynamic–all without the effort of building custom ASPX pages.

Unfortunately, I hit a major snag this week while trying to modify the Content Type field in a reusable workflow in SharePoint Designer 2010. No matter how I set up my reusable workflow (e.g. assigning the workflow to work with one content type or ALL content types), I couldn’t use the Set field to… action in SharePoint Designer to reset the value in my Content Type field. Neither the Content Type nor the Content Type ID field appeared in the list of columns I could select to update. And I couldn’t add the Content Type or Content Type ID field as Associated Columns either.

reusable-workflow-01

I did some research, talked with a few smart folks and finally figured out why the Content Type field cannot be modified via a reusable workflow. Unlike “normal” list workflows, reusable workflows aren’t tied to a specific document library or list when they are created. Reusable workflows are built and published independently so they can be ported–or assigned–to any of your site collection’s libraries or lists. Unfortunately, the portability that makes the reusable workflows so useful also inhibits the workflow’s ability to modify the Content Type field.

When you associate a content type to a document library or list in SharePoint, the document library or list sees and recognizes the new content type’s ID. Because it knows the content type IDs that are associated to your list/library, SharePoint Designer allows you to query against the content type and update it via a workflow. Reusable workflows aren’t associated with document libraries or lists until after they’re published. As a result, SharePoint Designer can’t see or obtain any relevant content type ID(s) during workflow creation. This is why SharePoint Designer locks out the Content Type and Content Type ID fields from being updated via reusable workflows.

The only ways I’ve found to work around this issue are:

  1. Use list workflows instead of reusable workflows.
  2. Use reusable workflows, but leave out the Content Type field flipping. Your users will just have to reset the Content Type field by hand.

Anyone have additional ideas?

Using calculated columns to add color coding to your SharePoint lists

There are a variety of ways to add color coding to your SharePoint lists and document libraries, from embedding custom code on your page to creating data view web parts with conditional formatting in SharePoint Designer. The trick is determining which method works best in your situation. Not sure how to do that? Start with the basics:

  1. Understand your business requirements.
  2. Build your user adoption strategy.

You have to start with your basic business requirements. You need to determine what data you will be storing, how you will be storing it and when you will be surfacing it to key audiences. Since many of these questions may impact your use of color coding and conditional formatting, they’re critical to understand.

You also need to know how dynamic your users want their solution to be. Do they want to be able to tweak the specific shades of green you’re using? What if they decide that they no longer want to demarcate completed items in grey–instead opting for a nice shade of puce? If you build your color coding solution using custom code or a SharePoint Designer add-on, your average business users will (most likely) not be able to make color modifications on their own.

Once you have the basic business requirements down, you need to figure out what add-ons and additional features your users are dying to get their hands on. Do they get excited about having high-priority items display in red text? Do they want all the completed items in their weekly project tracker to show up in light grey font? Or are they color blind and see no value in having any color differentiation of their SharePoint data? If your users have a wish list of desired functionality that includes color coding a document library, list or calendar, you should be running (not walking!) to find any and every solution that will make their dreams come true. Delivering on your users’ wish list items will ensure smooth user adoption and easier change management.

I’ve used a variety of methods for color coding my SharePoint lists and document libraries. I’m using this blog post to share one of my color-coding favorites–the Path to SharePoint solution that uses embedded HTML strings in SharePoint calculated columns to apply color coding. Here’s an example of the types of color coding you can do with this solution:

Setting up this type of color coding is fast–literally 5 minutes of work per list view you want to customize. But navigating the steps for the first time can be daunting. This blog pulls all the steps together in one easy-to-follow process. We’ll start with a business scenario, then move on to setup in both MOSS 2007 and SharePoint 2010. We’ll finish things off by discussing ways you can customize your new color coding.

Business scenario:

My company uses a SharePoint issue tracking list to store help desk support requests. All SharePoint users have the ability to go to this list and create new support requests as needed. When they go to the list and click on the Add new item link, they get a New Item form with the following basic input fields:

  • Title
  • Description
  • Priority
  • Due Date

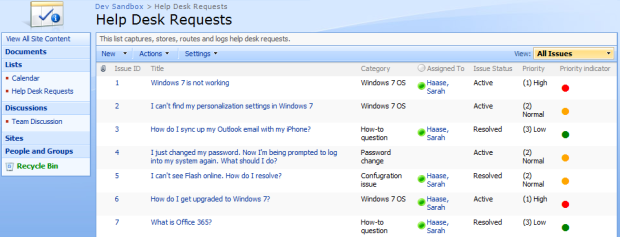
When a user fills out the New Item form and clicks OK, the help desk ticket information is automatically routed to our help desk team for resolution. To ensure that high priority help requests are easily visible, our help desk manager wants the Priority field in our SharePoint list view to have automated color coding. He’d like all support requests that are High priority to display with a red icon. All Normal priority requests should display with a yellow icon and all Low priority requests should display with a green icon.

And while the team is currently using MOSS 2007, they have plans to upgrade to SharePoint 2010 in the next 3 months. So any color coding solution(s) that we build must work in both platforms.

Solution:

There are a few ways to get this done–including building custom data view web parts in SharePoint Designer. But since our help desk manager wants to modify the colors of his priority icons on the fly (without using SharePoint Designer), we’re going to build out these custom color indicators using HTML encoding embedded in calculated columns. We’ll be using the Priority column that comes with the default Issue Tracking list as the trigger for our color coding. (In other words, the value set in the Priority field will determine whether green, yellow or red color coding is applied to our new calculated field.)

While this solution works in both MOSS 2007 and SharePoint 2010, the setup is a bit different in each platform. Here are the required elements for both platforms:

MOSS 2007 required elements SharePoint 2010 required elements
  • HTML script file (provided by Path to SharePoint) that will render your new HTML tags
  • Document library to house the HTML script file
  • SharePoint list with a Priority column
  • Content Editor Web Part (CEWP)
  • SharePoint list with a Priority column
  • SharePoint Designer 2010

The remainder of this blog post outlines MOSS 2007 setup steps, SharePoint 2010 setup steps and cool ways to customize your new color coding.

MOSS 2007 setup

  1. Go to http://pathtosharepoint.com/Downloads/Forms/AllItems.aspx, expand the HTML Calculated Column group header and download a copy of the TextToHTML-v2.1.1 text file.
  2. Upload the HTML script file to a document library on your site. As you can see in the screen shot below, I uploaded my file to a document library named Site config files. It doesn’t matter what document library you use to store your file, but make sure all site users have at least read-only access to the library you use. This will ensure the HTML script file can be accessed to render the color coding you’re going to set up.
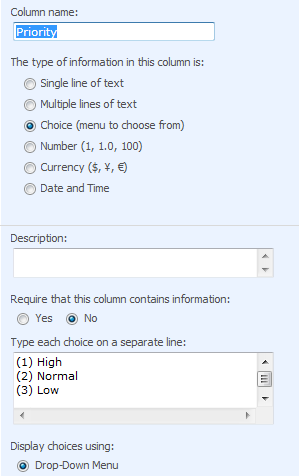
  3. Validate that the SharePoint list or document library that you want to color code is set up with a Priority field with the following basic settings. (Note that these settings come with the out-of-the-box Priority site column, which you can add to your list or document library.)
  4. Browse the color formatting options at http://blog.pathtosharepoint.com/2008/09/01/apply-color-coding-to-your-sharepoint-lists/ and determine which option (e.g. traffic light indicator, font color shading, background shading, KPI icon indicator) you’d like to implement.
  5. Copy the formula provided for your desired formatting. In my case, I’m looking to implement a traffic light indicator so I copied the following formula:
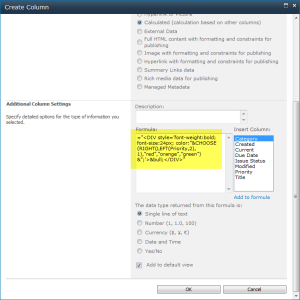
    ="<DIV style=’font-weight:bold; font-size:24px; color:"&CHOOSE(RIGHT(LEFT(Priority,2),1),"red","orange","green")&";’>&bull;</DIV>"
  6. Add a new calculated column to your SharePoint list. Paste the HTML formula string you copied into the new column’s Formula field. Click OK to save your changes.
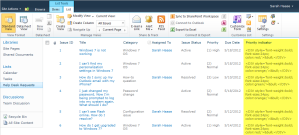
  7. When you return to your list view, you’ll see your new calculated column displaying with <DIV> tags. Not very attractive.
  8. To correct this issue, we’re going to add our HTML script to the page. Click on Site Actions > Edit Page.
  9. Click Add a Web Part and add a new Content Editor Web Part to your page.
  10. Move your new Content Editor Web Part (CEWP) to the bottom of the page. You need it to display below your list view web part.
  11. Click on the CEWP’s open the tool pane hyperlink.
  12. When the web part configuration panel appears, place your cursor in the Content Link field and enter the location where you stored your HTML script file. Click OK to save your changes.

That’s it! Your formatting is applied and your page should now display your new color coded field. Here’s a screen shot of my finished view, complete with a Priority Indicator column that displays red, yellow and green traffic lights that correlate with the priority level of each help desk request:

Now that you’ve set up color coding on one list view, you can continue adding more color coding to this view or add color coding to other views. Note that you will need to add one CEWP to each list view page that you want to color code. There is no limit, however, to the number of calculated columns with HTML encoding you can add to your list.

SharePoint 2010 setup

  1. Validate that the SharePoint list or document library that you want to color code is set up with a Priority field with the following basic settings. (Note that these settings come with the out-of-the-box Priority site column, which you can add to your list or document library.)
  2. Browse the color formatting options at http://blog.pathtosharepoint.com/2008/09/01/apply-color-coding-to-your-sharepoint-lists/ and determine which option (e.g. traffic light indicator, font color shading, background shading, KPI icon indicator) you’d like to implement.
  3. Copy the formula provided for your desired formatting. In my case, I’m looking to implement a traffic light indicator so I copied the following formula:
    ="<DIV style=’font-weight:bold; font-size:24px; color:"&CHOOSE(RIGHT(LEFT(Priority,2),1),"red","orange","green")&";’>&bull;</DIV>"
  4. Add a new calculated column to your SharePoint list. Paste the HTML formula string you copied into the new column’s Formula field. Click OK to save your changes.
  5. When you return to your list view, you’ll see your new calculated column displaying with <DIV> tags. Not very attractive.
  6. To correct this issue, we’re going to need to modify this new calculated column. Open your site in SharePoint Designer 2010.
  7. Click on Lists and Libraries in your SharePoint Designer 2010 navigation bar. When the list of your site’s document libraries and lists display, click on the list or document library we’re working on.
  8. When the list or document library details page displays, look for and click on the name of the view you’re applying color coding to. In my case, I am updating the All Issues view.
  9. Once your view opens, click on of the fields that are displaying those ugly

    tags. Notice that the <xsl:value-of> tag in the bottom right-hand corner of your screen lights up in yellow once your field is selected.

  10. Hover over the <xsl:value-of> tag until a black dropdown arrow appears. Click on the dropdown arrow and select Edit Tag…
  11. A dialog box will pop up with the following text:
    Place your cursor between the last quotation mark and the closing > bracket. Now type the text disable-output-escaping=“yes”
  12. Your Quick Tag Editor box should now read like this:
  13. Click on the Quick Tag Editor box’s green checkmark icon to save your changes. Your SharePoint Designer page will refresh and your color coding will appear!
  14. Click File > Save to save your changes.

That’s it! Your formatting is applied and your page should now display your new color coded field. Here’s a screen shot of my finished view, complete with a Priority Indicator column that displays red, yellow and green traffic lights that correlate with the priority level of each help desk request:

Now that you’ve set up color coding on one list view, you can continue adding more color coding to this view or add color coding to other views. Note that you will need to modify the <xsl:value-of> tag for each column you want to display in HTML format. There is no limit, however, to the number of calculated columns with HTML encoding you can add to your list.

Cool ways to customize your color coding

Now that you have your fields set up, you may want to start customizing the look and feel of your new color coding. Changing out the colors that display is quick and easy:

  1. Find the new color(s) you want to use. A wide variety of HTML color choices are available. Here is a site that features a variety of HTML colors that are supported in all browsers: http://www.w3schools.com/tags/ref_colornames.asp
  2. Once you find a new color you’d like to use, note the color’s name.
  3. Go to your SharePoint list’s List Settings page.
  4. Find and click on your new color-coded calculated column.
  5. Look at your field’s formula and find the words redorange and green. These are HTML color names that are currently being displayed on your SharePoint site. To modify these colors, all you need to do is replace these color names with the new color names you want to use. If, for example, you wanted to change the color orange to the HTML color Violet, all you need to do is highlight the word orange and replace it with the word violet. Then click OK to save your changes.

Here’s a picture of my list view now that I’ve changed orange to violet. Notice that my “normal” priority items are displaying a violet icon:

But what if you want to make other changes–like using a different trigger field? It is quick and easy to change the name of the field you want to trigger your color coding from. Just go to your calculated column, find the word Priority and change it to the name of the field/column you want to use.

The more difficult bit is changing the valid values that you want to trigger off of. The color coding formulas provided assume that you have a choice field with valid values of:

  • (1) High
  • (2) Normal
  • (3) Low

If you want to trigger color coding off of different values, you will need to tweak your calculated column formula. Fortunately, the fantastic folks at Path to SharePoint have already anticipated this need and have written a follow-up blog post with more formula examples. Take a look – http://blog.pathtosharepoint.com/2008/12/09/color-coding-more-examples/

Connecting web parts with a selector and a detail pane (SharePoint 2010 version)

I measure my SharePoint progress by the exciting moments when I finally figure out how to make something work. And I felt like a SharePoint superhero when I discovered how cool (and easy) it was to connect web parts on a web part page.

This blog posts explains how to connect list view web parts. But it goes a step farther, showing how you can build a list view selector that works just like the reading pane in Outlook. So when you select a list item, the corresponding item details will display in a detail pane. If no item is selected, the detail pane remains blank. 

Business scenario:

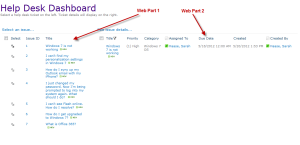
We use a SharePoint list to store help desk support requests. All SharePoint users have the ability to go to this list and add their support request as a new item. Once they submit their request, the support reps take over ownership of the list item. Support reps, help desk customers and their managers need to be able to look at existing help desk tickets, however. There are a variety of ways to search on help desk tickets (by ticket number, by requestor, etc.), but one of our teams wanted an easy selector screen to see help desk ticket details. To support this request, we built a web part page with connected list view web parts. Here’s what the basic solution looks like:

(click on the image to see a larger view)

When you click on the radio button next to a help desk ticket in Web Part 1, the corresponding help desk ticket details display in Web Part 2. Neat! Now I want to take this one step farther…I want Web Part 2 to appear blank (without any issue details displaying) until a help desk ticket is selected in Web Part 1. Sound useful? If so, keep reading for details on how to build this out.

Solution:

This solution took quite a bit of work to build in MOSS 2007. (See Connecting web parts with a selector and a detail pane: MOSS 2007 version for details.) The whole things is much easier to construct in SharePoint 2010, with only a few required components:

  • SharePoint list (can be virtually any type of list, but this example was built with an Issue Tracking list)
  • Out-of-the-box list view web parts
  • SharePoint 2010 web part page

Ready? Let’s start building!

Part 1: Create your SharePoint list

You can’t build a SharePoint mashup without some data. Make sure you have one or more lists created and seeded with test data.

In my case, I built an Issue Tracking list and populated it with some example help desk tickets.

Part 2: Create your web part page

  1. Click Site Actions > More Options.
  2. In the left-hand nav bar, click on the Page link to filter by types of pages.
  3. Select Web Part Page and click the Create button.
  4. Specify a name for your new page. I named my new page Dashboard.
  5. Select the formatting/style of web part page you want to use. (This example was built using the “Header, Footer, 3 Columns” web part page.)
  6. Choose which document library you want the new web part page to be stored in and click Create.

Part 3: Add web parts to your new web part page

  1. Go to your web part page.
  2. Click on the Page tab and select Edit Page.
  3. Find the Left Column of your web part page and click its Add a Web Part link.
  4. To find your list view web part, click Lists and Libraries from the Categories list on the left-hand side of your screen. Then find/select your web part from the list provided in the center of your screen and click on the Add button.
  5. Find the Middle Column of your web part page and click its Add a Web Part link. Repeat step 4 above and add a second list view web part to your web part page.

Now you have 2 identical list view web parts displaying on your web part page. Note that from this point on we’ll call the left-hand web part Web Part 1 and the right-hand web part Web Part 2.

Part 4: Configure your web parts

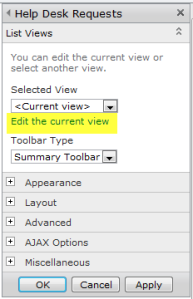
  1. Click on the black dropdown arrow for Web Part 1 (as shown below). When the web part menu displays, click  Edit Web Part.
  2. When the web part editor configuration box appears, click Edit the current view.
  3. Configure your web part, selecting the field(s) you want to display, the sort order, the filters to apply, etc. Press OK to save your changes.
  4. Go back into the web part edit screen and make any other desired changes (e.g. change the web part title, the chrome state, the toolbar type, etc.).
  5. Repeat steps 1-4 for Web Part 2.

Part 5: Connect your web parts

  1. Click on the black dropdown arrow for Web Part 1 (as shown below). When the web part menu displays, click  Connections > Send Row of Data to > Name of your second web part.
  2. If you have pop-ups enabled, a connection dialog box will display. (If you don’t have pop-ups enabled, enable them and repeat this step.)
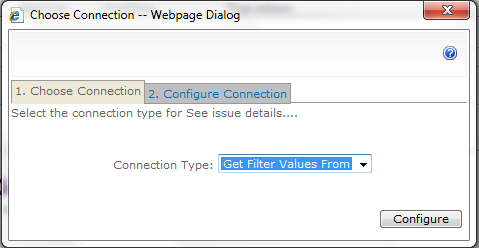
  3. When the “choose connection” dialog box appears, set the Connection Type to Get Filter Values From and click on the Configure button.
  4. When the “configure connection” dialog box appears, select the fields you are using to sync your two web parts. (In my case, I’m using the Title column to sync my web parts so I selected Title in both the provider & consumer field name drop downs.)
  5. Click Finish to save your connection settings.
  6. You will be prompted to confirm that you want to sync on that column in both lists. Click Next again to confirm.

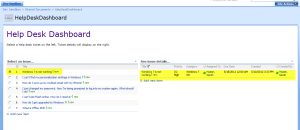
Congratulations! You have just synced your web parts. If you stop editing your page and select an item from Web Part 1, the corresponding record will display in Web Part 2. Here’s what my web part page looks like after finishing these steps:

(click on the image to see a larger view)

Part 6: Make Web Part 2 display as “blank” until an item in Web Part 1 is selected

In MOSS 2007, this step was a doozy–complete with required setup of a data view web part, parameters, web part properties, etc. Fortunately, Microsoft has made this step quite easy for us in SharePoint 2010. Check it out:

  1. Click on the black dropdown arrow for Web Part 1 (as shown below). When the web part menu displays, select Edit Web Part.
  2. Open the Miscellaneous tab and de-select the “Send first row to connected Web Parts when page loads” option.
  3. Click OK to save your changes.

That’s it! We now have a web part page with 2 connected web parts. When a selection is made in the left-hand web part, the corresponding list item details will display in the right-hand web part. If nothing is selected, the right-hand web part will remain blank.

Here’s what my final web part page looks like:

(click on the image to see a larger view)

But remember, this is only the beginning! Think of how else you can bling out your web part page using data view web parts, conditional formatting, etc.

Connecting web parts with a selector and a detail pane (MOSS 2007 version)

I measure my SharePoint progress by the exciting moments when I finally figure out how to make something work. And I felt like a SharePoint superhero when I discovered how cool (and easy) it was to connect web parts on a web part page.

This blog posts explains how to connect list view web parts. But it goes a step farther, showing how you can build a list view selector that works just like the reading pane in Outlook. So when you select a list item, the corresponding item details will display in a detail pane. If no item is selected, the detail pane remains blank.

Business scenario:

We use a SharePoint list to store help desk support requests. All SharePoint users have the ability to go to this list and add their support request as a new item. Once they submit their request, the support reps take over ownership of the list item. Support reps, help desk customers and their managers need to be able to look at existing help desk tickets, however. There are a variety of ways to search on help desk tickets (by ticket number, by requestor, etc.), but one of our teams wanted an easy selector screen to see help desk ticket details. To support this request, we built a web part page with connected list view web parts. Here’s what the basic solution looks like:

(click on the image to see a larger view)

When you click on the radio button next to a help desk ticket in Web Part 1, the corresponding help desk ticket details display in Web Part 2. Here’s what the page looks like when issue ID #1 is selected:

(click on the image to see a larger view)

Neat! Now I want to take this one step farther…I want Web Part 2 to appear blank (without any issue details displaying) until a help desk ticket is selected in Web Part 1. Sound useful? If so, keep reading for details on how to build this out.

Solution:

While this solution can be built out in MOSS 2007 and in SharePoint 2010, the MOSS version does require a bit more leg work. Here are the MOSS 2007 components you’ll need:

  • SharePoint list (can be virtually any type of list, but this example was built with an Issue Tracking list)
  • Out-of-the-box list view web parts
  • MOSS 2007 web part page
  • SharePoint Designer 2007 (required to set up/configure parameters for passing data)

Ready? Let’s start building!

Part 1: Set up your web part page with connected list view web parts

  1. Create the list that will hold the data you want to connect/display.
  2. Create your web part page by going to Site Actions > Create> Web Part Page.
  3. Select the formatting/style of web part page you want to use. (If you’re unsure which format to use, try the “Header, Footer, 3 Columns” web part page. This is the format I used for this example.)
  4. When your new web part page appears, click on Add a Web Part button in the Left Column.
  5. Select the list you created in step 1 above and click Add. You’ve now added Web Part 1 to your page.
  6. Now click the Add a Web Part button in the Right Column.
  7. Select the list you created in step 1 again and click Add. You’ve now added Web Part 2 to your page.
  8. Now it’s time to go into each list view web part and select the columns/fields you want to display in that web part. Click on the edit menu for Web Part 1 and select Modify Shared Web Part.
  9. When the web part config panel displays, click Edit the current view.
  10. Select the field(s) you want to display in Web Part 1. As you can see in my example, I opted to display my ID and Title fields in Web Part 1 and Title, Priority, Category, Assigned To, Due Date, Created and Created By fields in Web Part 2. Note that you must have at least one column that displays in BOTH web parts. This will be your “syncing” column.
  11. When you’ve finished making all your changes, click OK.
  12. For best visibility, also change the Toolbar Type setting. Go to Modify Shared Web Part and set the Toolbar Type dropdown field to “No Toolbar.”
  13. Repeat steps 8-12 for Web Part 2.
  14. Click on the edit menu for Web Part 1 and select Connections > Provide row to > Name of Web Part 2.
  15. If you have pop-ups enabled, a connection dialog box will display. If you don’t have pop-ups enabled, enable them and repeat this last step.
  16. A connection configuration pop-up box will display. Click on the Column dropdown field and select the field you want to use to sync your web parts. Note that the field you choose MUST display on both of your web parts. In my example, I am using the Title field.
  17. Click Next.
  18. Click Next again.
  19. Click Exit Edit Mode to stop editing your page. (If you can’t find the Exit Edit Mode link, look right under your Site Actions button.)

Congratulations! You have just synced your web parts. Now when you select an item from Web Part 1, the corresponding record will display in Web Part 2.

Here’s what my web part page looks like after finishing these steps:

Part 2: Make Web Part 2 display as “blank” until an item in Web Part 1 is selected

To make this happen, we need to pass data between the two web parts via parameters (instead of the “get filter from” connection option). In other words, we’ll force Web Part 1 to send its selected row of data to a data view parameter we’ll create for Web Part 2. We’ll also add a filter to Web Part 2 so it only shows data when Web Part 1  has a selected value. When your page loads, SharePoint will automatically filter out all the records in Web Part 2 since no record will have been selected in Web Part 1 yet. Sound complicated? It is. But don’t worry, the steps are all outlined below. Please pay close attention to the sequence of steps, however. All steps must be followed in the order outlined or the parameters and filter will not work correctly.

  1. Open your web part page in SharePoint Designer 2007.
  2. Highlight the web part that you want to display with zero results on initial page load. (In this case, that’s Web Part 2.)
  3. Right-click the highlighted web part and select Convert to XSLT Data view. You’ll be prompted to convert that you want to make this change. Say OK.
  4. Give your page a minute to refresh. You’ll notice a subtle change in the formatting of Web Part 2. It has now been converted into a data view web part.
  5. Click in the upper right-hand corner of your new data view web part and find the  > smart tag for the web part. (shown below)
  6. Click the > smart tag (aka chevron) and select the Parameters… option.
  7. Click on the New Parameter button.
  8. Specify a name for your new parameter. You can use whatever name you like; just make sure the name is something you’ll remember (for at least the next few minutes) and make sure the name doesn’t contain spaces.
  9. Keep all parameter defaults and click OK. The parameters screen should look roughly as follows:
  10. You’ll be returned to your data view web part. Click on the > chevron and select Filter.
  11. You want to set up a new filter rule that says Field = New parameter, where “Field” is the column you used to sync your connected web parts in Part 1 above and “New parameter” is the parameter you named in step 6. You will pick your field name and your parameter from the dropdowns provided. (Note that your new parameter will appear near the bottom of the Value selection list.) The screen shot below shows my completed filter. As you can see, I used the field Title to sync my web parts and I named my new parameter Param1.)
  12. Click OK to save your new filter.
  13. You’ll be returned to your data view web part. Click on the > chevron and select Web Part Connections…
  14. When the Web Part Connection Wizard dialogue box opens, reset the action dropdown field to “Get Parameters From” as shown below:
  15. Click the Next button repeatedly until you get to the screen shown below. When you get to this dialog, select the following options:
    • In the middle row of the left column, select the column you used to sync your web parts. (In my case, this was the Title field.)
    • In the middle row of the right-hand column, select the new parameter you created in step 6. (In my case, this was the Param1 parameter.)
  16. Click on the Next button.
  17. Click Finish to close out the web part connections dialog box.
  18. You’ll be returned to your data view web part. Click on the > chevron and select Data View Properties…
  19. Go to the General tab and click on the checkbox that says Display text if no matching items are found. In the provided text box, specify the default text you want to display when Web Part 2 is empty. Here’s what my text looks like:
  20. Click OK to save your changes.
  21. Save your web part page in SharePoint Designer. If you are prompted to confirm your changes, say yes.
  22. Preview your changes in the browser.

My final solution looks like this:

We’re off to a great start, but there is so much more that you can do. At this point you have Web Part 2 set up as a data view web part (DVWP). Bling out that DVWP to display conditional formatting or to build editable fields right on your web part page. Let your imagination run wild–this is only the beginning!

Epilogue on having a “customized” or “unghosted” page

As you complete the steps outlined above and turn Web Part 2 into a data view web part, you are effectively customizing (or unghosting) your web part page. There is some debate in the community about unghosting pages, with some calling it a bad practice while others say it is called for on some occasions. I’m going to leave that debate up to the experts, but do want to call out that in some situations unghosted web part pages can lead to upgrade difficulties. To avoid this issue, you can export Web Part 2 from its current web part page and import it onto a clean, new web part page. Once you add Web Part 1 to your new web part page you can connect your web parts again. (This time, however, you will have the option of sending your data via parameters.)  Exporting/importing your DVWP won’t affect the functionality of your connected web parts–it will merely ensure that your new (final) web part page won’t be customized or unghosted. Once  you’ve completed this export/import process, you can then go back and delete your initial web part page.

There are some excellent blog posts that outline the steps for exporting/importing data view web parts. Check out http://www.wictorwilen.se/Post/How-to-export-and-reuse-the-Data-View-Web-Part.aspx for step-by-steps.

Using calculated fields to prioritize your SharePoint projects

I have to admit it…as a SharePoint practitioner I’m often guilty of overthinking. It’s easy to get drawn into designing complex solutions while overlooking simple features that generate a lot of user interest. I think this is a predictable problem, though. As we gain expertise in understanding how a platform like SharePoint works, we often gravitate to looking at complex, highly detailed solutions rather than focusing on the quick wins using “simple” functionality.

This blog post is all about the quick win, though. If you’ve seen me present at conferences or SharePoint user groups before, you know I’m passionate about documenting ROI for SharePoint projects. I follow up and formalize the business value of all my implementations (see my previous blog post I need some ROI…but I have no idea where to begin! for details). But I use ROI as more than just a means to summarize the value of projects I’ve completed. I start capturing ROI data during requirements gathering and rely on ROI estimates to prioritize my SharePoint project queue. This blog post walks through the simple SharePoint solution I built to use ROI estimates to auto-prioritize my projects.

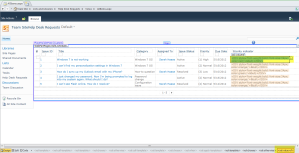
First, let’s look at the completed solution. In the screen shot below, you can see a “SharePoint Requests” web part that displays my SharePoint project queue. Notice the Priority column. This is a calculated column that automatically assigns a low/medium/high priority to each project based on an automated ROI calculation. I use this priority rating to manage my queue of projects and determine my build/deploy schedule. 

Here are the steps to build out this project prioritizer:

  1. Create a new custom list in SharePoint.
  2. Add in the fields you need to track your Sharepoint requests. My list contains the following fields:
    • Project name – text field
    • Requestor(s) – person/group field
    • Request type – choice field
    • Team – text field
    • Request date – date field
    • Status – choice field
    • Collaboration owner – person/group field
    • Estimated ROI per year – currency field
    • Estimated hours to implement – number field
    • Start date – date field
    • Due date – date field
    • High-level goals – multiple lines of text field
    • Detailed requirements – multiple lines of text field

    NOTE: The Estimated ROI per year and the Estimated hours to implement fields must be set up in your new list. They will be essential for the priority calculation.

  3. Now that your base list is ready, you can set up your automated priority calculation. Go into your List Settings and create a new Calculated column named Priority (raw). Copy and paste the following text into the column’s Formula field:

    =IF(ISERROR([Estimated ROI per year]/[Estimated hours to implement]),”-“,[Estimated ROI per year]/[Estimated hours to implement])

    Specify that the data type returned by this formula be a number and press OK to save the settings for this new field.

  4.  Now you have an automatic calculation for your project priorities. But as you start entering data into your list, you’ll see that these numeric results aren’t terribly helpful. Depending on the values you enter into the Estimated ROI per year and the Estimated hours to implementfields, you may end up with raw priority numbers like 6,250 or 71.428571428571.

    I’m no math whiz, but I know I can’t make sense of these numbers. In fact, their only inherent value is their position relative to each other. Fortunately, we’re not done yet! There’s still one more calculated column to set up…

  5. Go into List Settings and create a second Calculated column named Priority. Copy and paste the following text into the column’s Formula field:

    =IF([Priority (raw)]=”-“,”-“,(IF([Priority (raw)]<650,(IF([Priority (raw)]<300,”Low”,”Medium”)),”High”)))

    Specify the data type returned by this formula to be a Single line of text and press OK to save the settings for this new field.

  6. View your results. As you enter new projects and specify their estimated annual ROI and estimated hours to implement, you will see a raw numerical priority value and a subsequent priority ranking of Low, Medium or High.

If you like, you can even change the default numerical thresholds that translate your Priority (raw) values into Low, Medium or High rankings. Just tweak the “650” and “300” numerals in the Priority field’s formula to alter the default thresholds and find the specific differentiators that will best meet your needs.

Next steps I’ve been meaning to try include color-coding my prioritizations and building a fancier dashboard. But that’s for a later blog post 🙂

Storyboarding–the quick and the easy

Information architecture is not optional. And in a perfect world we’d all have adequate time for a formalized, thorough information architecture evaluation process at the beginning of each SharePoint solution cycle. But what if you have limited resources and need to provide a quick–yet effective–information architecture review? What are the essential steps you should be taking? This blog post summarizes my quick and easy information architecture/storyboarding methodology. It may take a bit of work to tweak this for your environment and shorten up the evaluation steps, but the framework should give you a good starting point. Enjoy!

We hold these truths to NOT be self-evident…

Before we begin, a couple of universal user truths:

  1. Users (even the well-intentioned ones) will generally take the path of least resistance. They will create content and take the time to store it, but will often opt for familiar folder storage structures. While these structures make sense to the content creator, they are often difficult for others to navigate.
  2. Users will be interested in functionality that can improve their lives. But they often won’t have the time to investigate this functionality on their own. They need information architects and designers to paint the vision. Often I throw out 15 ideas for each individual idea my business users choose to implement. There’s nothing wrong with a 15:1 ratio. The key is to keep offering ideas that will maximize user opportunities. Even if they don’t implement your ideas right away, they will likely circle back to consider some of the ideas again later.
  3. If information architecture is optional, users will opt out. You need a carrot and a stick to get their attention. If you can offer SharePoint planning services free of charge and have a good reputation for delivering top-notch solutions, that will be all the “carrot” you need. If you can require team members to work with you in order to have a SharePoint site or site collection created, you have your “stick.” Again, if this model doesn’t work in  your organization you’ll need to improvise. Just remember to include both the carrot and the stick.

The storyboarding process

I log my projects against the following SharePoint lifecycle stages:

  • Stage 1 (Initial request received)
  • Stage 2 (Storyboarding in process)
  • Stage 3 (Site/function development)
  • Stage 4 (Iterative review)
  • Stage 5 (Launched)
  • On hold (Waiting on business requestor; funding deferred)

Most of these stages are self-evident. Stage 1 begins when a SharePoint request is received. These can be requests for a new SharePoint site or enhancement requests for an existing site. Both “new” and “enhancement” requests follow the same storyboarding process.

First, I set up some one-on-one time with the business requestor. Since I work in the same geographical location as my customers, I have the luxury of setting up in-person meetings. Here’s the agenda I follow for these initial storyboarding meetings:

  1. Introduce my role and explain our SharePoint methodology. This gives me an opportunity to explain how the “carrot and stick” works in my department while also enabling me to explain how our SharePoint site collections are structured.
  2. Ask about their “vision” for the future. This question is intentionally vague. It is intended as a baseline, and won’t be the final vision statement for your SharePoint design. Usually, users will answer this question with a general statement saying they “want a site like Jane Doe has.” There’s nothing wrong with a broad answer here. Capture whatever the customer says and move on to the next step.
  3. Ask what the business need(s) are they are trying to solve. In some cases, users will already have their scope defined. Generally, though, users are confused by this question. Again, don’t worry about a lack of detail in their answer. Capture the response and move on to the next step.
  4. Get details on the current work process, including highlights, pain points and bottlenecks. Here’s where the deluge starts. Many users may have difficulty outlining a scope or vision for SharePoint, but most can wax poetic on pain points and bottlenecks in their common work processes. Encourage them to whiteboard their current pain points and allow them to dive into details. You’ll want to capture the broad strokes of this content and along the way identify opportunities where SharePoint can provide key wins. I try to capture several types of information during this step:
    • Key steps in the current process that can be automated using SharePoint.
    • Key pain points and bottlenecks. These will turn into the critical success factors for the future SharePoint solution.
    • “Soul crushing” work that can be eliminated or automated. These are the wins that will act as change management agents. Eliminate work that everyone hates and you’ll automatically build support for SharePoint
    • A rough percentage of time that can be shaved off the existing work process. This will help me capture a SWAG return on investment (ROI) for this solution.
  5. Get a wish list of things they dream about. Tell them to think big and ask for the world on a stick. Don’t worry about keeping them “in scope”–just capture their answers. (Note that at this point many users won’t have any idea what SharePoint can do so their wish list may shoot too high or too low. Don’t sweat these details.)
  6. Provide a demo of “similar” functionality already launched. At this point, I have a fairly good idea of the pain points and potential SharePoint solutions that could be built. Now it’s time to give the business requestors some idea of the possibilities. I provide a 15-minute targeted demo of existing SharePoint sites/functions that most closely align with their potential needs. For example, if the customer is in dire need of an optimized issue-tracking solution I’ll demo issue trackers with automated email and reporting that are already in use by other teams. If the customer needs help with document retrieval, I’ll demo a content type-based metadata tagging scheme that enables easy document upload/tagging.The key is to demo live sites that are already in use and have granularity levels or functions that mirror what the new customer needs. If you don’t have any existing SharePoint sites that apply, take them on a survey course of SharePoint wins you’ve already delivered for other teams. If this is your first SharePoint project and you don’t have any production sites to demo, start drawing out possible solutions on a whiteboard.The objective is to “blow the lid off” the customer’s expectations and get them “thinking big” about what SharePoint can do. You’ll know you’re hitting the right note when users start getting visibly excited and start tossing out additional ideas for how SharePoint can help optimize their business. Encourage them to brainstorm–the more ideas on the table the better!
  7. Connect them with business owners that are already on their way. You are not objective. Clearly you are enthralled with SharePoint and have a vested interest in its success at your organization. In order to give your customers a fair (unbiased) view, recommend they touch base with other business owners that have already implemented SharePoint solutions. When these other business owners recommend SharePoint (and you), your customers will be doubly impressed.
  8. Revisit the goals and wish list. Before you close out your meeting, revisit steps 3 and 5 to see what your customers updated goals and wish list items are. By this point, your customers should have a much broader list of features and functions they want to deploy. Capture as much of this information as you can. You’ll have the chance to map these goals and wish list items into project implementation phases at a later point in time.

Note that the timing for each of these eight steps is fluid. Depending on the size and scope of your project you may need to allocate 2 hours, 4 hours or even a full working day to get through all these steps. Over time I’ve been able to wean these steps down to a 1-2 hour meeting for small projects (aka projects that result in a 4-40 hour development effort). As the size of the implementation expands so will the amount of design time that is needed.

Also be aware that you may need to schedule follow-up meetings to dive deeper into one or more of these eight steps. Be targeted about these follow-up meetings. The key is to take up as little time as possible for information architecture. If we make the architecture process too painful, users will opt out and you will lose a SharePoint deployment opportunity. 

Once you have enough raw material gathered, start designing your SharePoint vision for success. Tailor your vision to your audience. If your customer is informal and buys into your vision readily, you may be able to meet with them in person and present your vision for the future using whiteboard diagrams. If your customer is more formal or requires executive sign-off, you will need to create wireframes. Consider using Balsamiq (http://www.balsamiq.com/) or another quick wireframing tool to illustrate your vision. The key is to effectively illustrate your vision without taking the time to build out a robust system before gaining customer approval.

Once your requirements are documented and you get management sign-off you are ready to build out the solution!

Using content types to modify the NewForm.aspx and EditForm.aspx pages

June 2012 blog post update:
I’ve received quite a few SharePoint 2010 questions regarding this solution, so I’ve added SP2010 setup instructions. For you MOSS 2007 users, don’t worry! The old MOSS setup instructions are still included at the tail end of the post.

When I was at the Best Practices Conference in La Jolla a couple of weeks ago, I taught a session on successfully deploying SharePoint lists. While we looked at a wide variety of tips and tricks and list implementation examples, the attendees were really intrigued by a content type solution I’d implemented to quickly/easily modify NewForm and EditForm ASPX pages. I promised them a blog post on the solution–here it is.

Business scenario:

We use a SharePoint list to store help desk support requests. All SharePoint users have the ability to go to this list and add their support request as a new item. Once they submit their request, the support reps take over ownership of the list item. The support reps have additional information they want to log for each support request (e.g. support rep assigned to the issue, issue resolution, etc.). In order to accommodate, we need to add some “for office use only” fields to our list.

So what are our basic requirements for this solution? We need a streamlined NewForm.aspx page that asks users basic questions about their support request. Once a new item is submitted, we need the item’s EditForm.aspx page to contain additional data fields for the support reps.

Solution:

I could modify my OOB NewForm.aspx and EditForm.aspx pages to achieve these results. This is quite a bit of work, though. Since I want my support reps to be able to manage the fields that display on the NewForm and EditForm pages on an ongoing basis, I’d like a simpler approach that can be managed entirely via the SharePoint web interface. The solution? CONTENT TYPES!

Here’s the basic building blocks of this solution:

  • Setup of 2 new content types (one named “New item” and another named “Existing item”)
  • Setup of a simple SharePoint Designer workflow

We’ll apply 2 content types to my list. We’ll set up “New item” as the default content type that is automatically used when a user clicks on the New button. Next, we’ll set up a SharePoint Designer workflow. This workflow will fire whenever a new item is created in my list. The workflow has a single step with a single action–change the Content Type field from “New item” to “Existing item.” That’s it. When a user creates a new item, the “New item” content type will display a shortened set of fields. As soon as this item is saved, our SharePoint Designer workflow will convert the content type to “Existing item” and the resulting “Existing item” content type fields will display.

Here’s the nitty gritty on how to set this up in SharePoint 2010:

Part 1: Create your new content types.

  1. Click on Site Actions > Site Settings.
  2. Under Galleries, click on Site content types.
  3. Click on the Create button.
  4. In the Name field, type New item.
  5. In the Select parent content type from field, select List Content Types.
  6. In the Parent content type field, select Announcement. Your page should now look like this:
  7. Click OK.
  8. You will be taken to a configuration page for your new content type. Click on the Body field. When the field detail page opens, click Remove. Say OK when you’re prompted to confirm your deletion.
  9. Click on the Expires field. When the field detail page opens, click Remove. Click OK to confirm your deletion.
  10. Click on the Site Settings link in your page’s breadcrumb to return to the main site settings page.
  11. Repeat steps 2-9, this time creating an “Existing item” content type.

Part 2: Add your new content types to your list.

  1. Go to your SharePoint list.
  2. Click on the List subtab and the List Settings icon.
  3. Click on Advanced Settings and set the Allow management of content types field to Yes.
  4. Click OK.
  5. Go to the Content Types section of the page and click on the Add from existing site content types link.
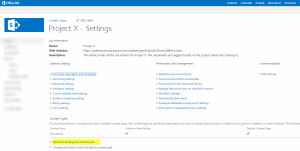
  6. Scroll throught the list of available content types until you find the New item content type you just created. Click on New item and then click on the Add button to move it over to the selection box.
  7. Find and click on Existing item. Click on the Add button to move it over to the selection box.
  8. Click OK. You are now returned to the main list settings page.
  9. Go to the Content Types section of the page and click on the Change new button order and default content type hyperlink.
  10. Uncheck the checkbox for the Item content type and click OK.

Part 3: Configure your content types to display desired fields.

  1. You should still be on your list settings page. Go to the Content Types section and click on your “New item” content type.
  2. Click on the Add from existing site or list columns hyperlink. Add the fields you want to display on your “custom” NewForm.aspx page.
  3. Use the Column order link to define the order in which your fields display.
  4. Click on the List Settings link in your page’s breadcrumb to return to the list settings page.
  5. Repeat steps 1-4 for the “Existing item” content type.

Part 4: Turn “management of content types” off.

Since we don’t want users to see the Content Type field when they are creating or editing list items, we want to turn off the “management of content types” option. Turning this off doesn’t prevent the content types from running–it just prevents the unwanted Content Type field from displaying.

  1. Go to your List Settings page.
  2. Click on Advanced Settings.
  3. Set the Allow management of content types field to No.
  4. Click OK.

Part 5: Create your SharePoint Designer workflow.

This is the last part of this solution. This workflow will automatically detect that a new item has been created and subsequently convert the new item to the existing item content type. Once this is done, the “for office use only” fields will display for the list item.

  1. Open your site in SharePoint Designer.
  2. While on your Site tab, click on the List Workflow dropdown arrow and select your SharePoint list.
  3. When the following dialog box appears, specify a name and (if desired) a description for your new workflow.
  4. Click OK to save your changes.
  5. The workflow builder page will display. Click on the Action button in your ribbon. Then scroll down to the List Actions section and select Set Field in Current Item.
  6. Your workflow will now look like this:
  7. Click on the field hyperlink and select Content Type ID.
  8. Click on the value hyperlink and select Existing item.
  9. Now click on the Workflow Settings button in your toolbar ribbon.
  10. In the Start Options box, check the Start workflow automatically when an item is created option. Next, make sure all other Start Options are unchecked.
  11. Click on the Publish button in your toolbar ribbon to save and publish your new workflow.

That’s it. Now when users create a new item in your list, your SharePoint Designer workflow will automatically reset the new item’s Content Type field from New item to Existing item. This will cause the edit item screen to display a different set of fields for all your existing list items.

Here is our customized NewForm.aspx page:

Here is our customized EditForm.aspx page:

For you MOSS 2007 users, here’s the nitty gritty for setup in 2007:

Part 1: Create your new content types.

  1. Click on Site Actions > Site Settings.
  2. Under Galleries, click on Site content types.
  3. Click on the Create button.
  4. In the Name field, type New item.
  5. In the Select parent content type from field, select List Content Types.
  6. In the Parent content type field, select Announcement.
  7. Click OK.
  8. You will be taken to a configuration page for your new content type. Click on the Body field. When the field detail page opens, click Remove. Say OK when you’re prompted to confirm your deletion.
  9. Click on the Expires field. When the field detail page opens, click Remove. Click OK to confirm your deletion.
  10. Click on the Site Content Type Gallery link in your page’s breadcrumb to return to the main site content type gallery page.
  11. Repeat steps 3-9, this time creating an “Existing item” content type.

Part 2: Add your new content types to your list.

  1. Go to your SharePoint list and click Settings > List Settings.
  2. Click on Advanced Settings and set the Allow management of content types field to Yes.
  3. Click OK.
  4. Go to the Content Types section of the page and click on the Add from existing site content types link.
  5. Find and click on New item. Click on the Add button to move it over to the selection box.
  6. Find and click on Existing item. Click on the Add button to move it over to the selection box.
  7. Click OK. You are now returned to the main list settings page.
  8. Go to the Content Types section of the page and click on the Change new button order and default content type hyperlink.
  9. Change the content type order so your “New item” content type is number 1.
  10. Click OK.

Part 3: Configure your content types to display desired fields.

  1. You should still be on your list settings page. Go to the Content Types section and click on your “New item” content type.
  2. Click on the Add from existing site or list columns hyperlink. Add the fields you want to display on your “custom” NewForm.aspx page.
  3. Use the Column order link to define the order in which your fields display.
  4. Click on the Settings link in your page’s breadcrumb to return to the list settings page.
  5. Repeat steps 1-4 for the “Existing item” content type.

Part 4: Turn “management of content types” off.

Since we don’t want users to see the Content Type field when they are creating or editing list items, we want to turn off the “management of content types” option. Turning this off doesn’t impact the content type display of fields–it just prevents the unwanted Content Type field from displaying.

  1. Go to your list’s settings page.
  2. Click on Advanced Settings.
  3. Set the Allow management of content types field to No.
  4. Click OK.

Part 5: Create your SharePoint Designer workflow.

This is the last part of this solution. This workflow will automatically detect that a new item has been created and subsequently convert the new item to the existing item content type. Once this is done, the “for office use only” fields will display for the list item.

  1. Open your site in SharePoint Designer.
  2. Click on File > New > Workflow.
  3. Specify a name for your new workflow (e.g. “Content type conversion”).
  4. Select your list in the provided dropdown field.
  5. Check the box labeled Automatically start this workflow when a new item is created. Make sure the other 2 checkboxes are not checked.
  6. Click on the Next button.
  7. Click on the Actions button and select Set Field in Current Item.
  8. Click on the field hyperlink and select Content Type.
  9. Click on the value hyperlink and select Existing item.
  10. Click on the Finish button.

That’s it. While this looks like a large number of steps, it only takes about 5 minutes to set up. If you want to re-use this solution multiple times in your site collection, set up your “New item” and “Existing item” content types in your site collection’s content type gallery. This ensures that these content types are available for use in all of the sites within your site collection.

Here is our customized NewForm.aspx page:

Here is our customized EditForm.aspx page: