I measure my SharePoint progress by the exciting moments when I finally figure out how to make something work. And I felt like a SharePoint superhero when I discovered how cool (and easy) it was to connect web parts on a web part page.
This blog posts explains how to connect list view web parts. But it goes a step farther, showing how you can build a list view selector that works just like the reading pane in Outlook. So when you select a list item, the corresponding item details will display in a detail pane. If no item is selected, the detail pane remains blank.
Business scenario:
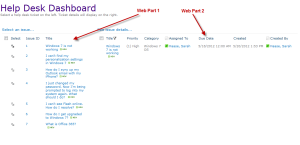
We use a SharePoint list to store help desk support requests. All SharePoint users have the ability to go to this list and add their support request as a new item. Once they submit their request, the support reps take over ownership of the list item. Support reps, help desk customers and their managers need to be able to look at existing help desk tickets, however. There are a variety of ways to search on help desk tickets (by ticket number, by requestor, etc.), but one of our teams wanted an easy selector screen to see help desk ticket details. To support this request, we built a web part page with connected list view web parts. Here’s what the basic solution looks like:
When you click on the radio button next to a help desk ticket in Web Part 1, the corresponding help desk ticket details display in Web Part 2. Neat! Now I want to take this one step farther…I want Web Part 2 to appear blank (without any issue details displaying) until a help desk ticket is selected in Web Part 1. Sound useful? If so, keep reading for details on how to build this out.
Solution:
This solution took quite a bit of work to build in MOSS 2007. (See Connecting web parts with a selector and a detail pane: MOSS 2007 version for details.) The whole things is much easier to construct in SharePoint 2010, with only a few required components:
- SharePoint list (can be virtually any type of list, but this example was built with an Issue Tracking list)
- Out-of-the-box list view web parts
- SharePoint 2010 web part page
Ready? Let’s start building!
Part 1: Create your SharePoint list
You can’t build a SharePoint mashup without some data. Make sure you have one or more lists created and seeded with test data.
In my case, I built an Issue Tracking list and populated it with some example help desk tickets.
Part 2: Create your web part page
- Click Site Actions > More Options.

- In the left-hand nav bar, click on the Page link to filter by types of pages.
- Select Web Part Page and click the Create button.

- Specify a name for your new page. I named my new page Dashboard.
- Select the formatting/style of web part page you want to use. (This example was built using the “Header, Footer, 3 Columns” web part page.)
- Choose which document library you want the new web part page to be stored in and click Create.
Part 3: Add web parts to your new web part page
- Go to your web part page.
- Click on the Page tab and select Edit Page.

- Find the Left Column of your web part page and click its Add a Web Part link.
- To find your list view web part, click Lists and Libraries from the Categories list on the left-hand side of your screen. Then find/select your web part from the list provided in the center of your screen and click on the Add button.

- Find the Middle Column of your web part page and click its Add a Web Part link. Repeat step 4 above and add a second list view web part to your web part page.
Now you have 2 identical list view web parts displaying on your web part page. Note that from this point on we’ll call the left-hand web part Web Part 1 and the right-hand web part Web Part 2.
Part 4: Configure your web parts
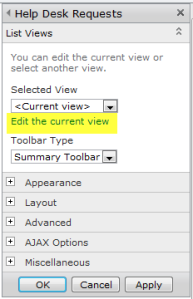
- Click on the black dropdown arrow for Web Part 1 (as shown below). When the web part menu displays, click Edit Web Part.

- When the web part editor configuration box appears, click Edit the current view.

- Configure your web part, selecting the field(s) you want to display, the sort order, the filters to apply, etc. Press OK to save your changes.
- Go back into the web part edit screen and make any other desired changes (e.g. change the web part title, the chrome state, the toolbar type, etc.).
- Repeat steps 1-4 for Web Part 2.
Part 5: Connect your web parts
- Click on the black dropdown arrow for Web Part 1 (as shown below). When the web part menu displays, click Connections > Send Row of Data to > Name of your second web part.

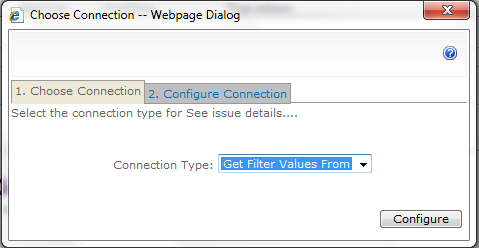
- If you have pop-ups enabled, a connection dialog box will display. (If you don’t have pop-ups enabled, enable them and repeat this step.)
- When the “choose connection” dialog box appears, set the Connection Type to Get Filter Values From and click on the Configure button.

- When the “configure connection” dialog box appears, select the fields you are using to sync your two web parts. (In my case, I’m using the Title column to sync my web parts so I selected Title in both the provider & consumer field name drop downs.)

- Click Finish to save your connection settings.
- You will be prompted to confirm that you want to sync on that column in both lists. Click Next again to confirm.
Congratulations! You have just synced your web parts. If you stop editing your page and select an item from Web Part 1, the corresponding record will display in Web Part 2. Here’s what my web part page looks like after finishing these steps:
Part 6: Make Web Part 2 display as “blank” until an item in Web Part 1 is selected
In MOSS 2007, this step was a doozy–complete with required setup of a data view web part, parameters, web part properties, etc. Fortunately, Microsoft has made this step quite easy for us in SharePoint 2010. Check it out:
- Click on the black dropdown arrow for Web Part 1 (as shown below). When the web part menu displays, select Edit Web Part.

- Open the Miscellaneous tab and de-select the “Send first row to connected Web Parts when page loads” option.

- Click OK to save your changes.
That’s it! We now have a web part page with 2 connected web parts. When a selection is made in the left-hand web part, the corresponding list item details will display in the right-hand web part. If nothing is selected, the right-hand web part will remain blank.
Here’s what my final web part page looks like:
But remember, this is only the beginning! Think of how else you can bling out your web part page using data view web parts, conditional formatting, etc.


I tried use your Part 6, on a list which has filters but it didn’t work 😦 any ideas.
My list has over 600 items and loading that many just so I can filter is making me want to delete the entire list.
I’d try filtering Web Part 1 as soon as you add it to your page–both to improve page load time and to provide a better experience for your users. You may also want to modify Web Part 2 to only pull back 50 records. This will speed up your page display and enable you to get the rest of your configuration done. Then you can go back in and remove the record pull limit on Web Part 2.
many thanks for this, it’s very useful. Unfortunately when I follow your instructions the 2nd webpart is always filtered using the first row item from the first web part, even when I select different row items. I have deselected “send first row to connected web parts” but this has not made any difference. I’ve re-added the webparts numerous times and used different sites but the problem persists. I really would appreciate it if you had any ideas what, if anything, I’m doing wrong.
Are you sure there are no filters in your second web part? And that you’ve connected your web parts correctly? These are the most probable culprits…
Hi Sarah,
I’ll start from scratch again today making sure I check the connection and filters and see if I get better results. Many thanks for your reply.
Hi,
I have this same issue. After connecting the Webparts, there is now an arrow showing the connection at the begining of each list item. The title of the column with the arrow is select. If you click on the arrow, it synchs your webparts. I do not know why this connection selection is not automatic with the filtering. Any ideas, anyone?
Hi, This one I got now automatically when Sharepoint was updated, but how can I make the whole second list/library visible before person is selecting specific item from the first list? Now I have only option “first item” or “nothing”.
Hi Dear, I am also looking for the same solution….did you get the solution if you have please let me know
Hi Sarah, thx for this
I would like to implemet Part 6 to a Windows SharePoint Services 3.0 – is that possible?
I know you can connect list view web parts in WSS 3.0, but am not sure if the “Send first row to connected Web Parts when page loads” option is available. My advice? Give it a go and report back on what you find 🙂
Thanks for posting it. I did it too. I have question for next step, Can we remove Select icon and make Title column as Hyperlink as we did in Moss 2007.
Hi Sarah,
Many thanks for this post 🙂
Unfortunately, I can’t get it to work even though I followed your steps literally. No matter which row I select in the part1 the part2 shows all it’s rows. I have some questions and I hope you can answer me:
1- If I chose the provider & consumer field the title field, should this field has exactly the same text?
2- Do you use the Look up to connect the 2 fields to each other from part1 and part2?
I appreciate your efforts to help others 🙂
Regards
Great questions, Ahsraf. Yes, in order for this solution to work the two fields you’re using to connect your web parts must have exactly matching values. If web part 1 can’t find an exact match in web part 2, it won’t be able to filter your second web part. And yes, I usually use a Lookup field to ensure my column values match exactly.
Thank you Sarah! It was really a great answer that clarified for me how to join 2 view lists. Now I know why it did not work 🙂
Please continue with such as great and useful post 🙂
Best Regards
//Ashraf
I set this up on my SharePoint site, but with one additional step. When clicking on the first list, it sends the row to the second list and that works correctly. I have the second list set up to send its selected record to an infopath form that’s on the page. I set the second list to not send its first row of data. When I first load the page, I click on the first record in the first list, which loads the second list. I click on a record in the second list, which loads the form. All good so far…now the problem: then I click on a new item in the first list, the second list reloads, but the form still shows the old record from the second list (which is no longer shown in the second list). Is there a way to either have the form not show, or to have the first visible record in the second list automatically selected? Thoughts? Thanks!
I have the same question as Adam Halbardier, and another one, also.
We are using Foundation. When I de-select “Send first row to connected Web Parts when page loads” option, instead of sending nothing, the page sends all rows in the connected web part. Wonder if this is a Foundation thing, or something I’m missing. Otherwise, connections work perfectly.
Thanks for the great blog and being a SharePoint promoter. I loved the “SharePoint doesn’t suck…” chant at SP Saturday!
So when web parts are connected by columns other than the ones “linked to edit menu,” how does SharePoint think? Does it look for similarities between column names or values entered in them?
Yes. When you connect your web parts you specify a specific column in each that will be sync’ed.
I setup the connection successfully.
My problem is I’m not able to edit item in the 2nd webpart when I filter the 1st webpart.
Item from the 1st webpart can be edited with or without filter and Item in the 2nd webpart can only be edited if I remove filter from the 1st webpart.
Thanks for the great article… I have a issue I and using a bog and based on comments i filter the details.
The two webpart connected are post and comments. But unfortunately i cannot see radio filter button….
Please help how to make in visible
I am using SP2010
Where are you connecting the web parts? Through the browser or through SharePoint Designer?
Is there any way to change the title of the connection column from “Select” to something else?
No, I don’t believe you can change the “Select” column header.
It would be nice to select anywhere on the row to drive refresh on the connection. Is it possible to remove the select column altogether?
I don’t believe you can alter the select behavior out of the box.
Is it possible to change the buttons on the right side after the connections are made, in 2007 i have a circular radio button, while in 2010 it has those two arrows pointing away from each other. I would like to have the circular radio button again that fills in with a black circle when it is selected.
Sarah, i meant on the left side of web part 1, in the select column, sorry for any confusion.
As far as I know, there is no (easy) way to change out the connection symbols/icons. I’m with you, though, on preferring the radio button interface.
do you know the not so easy fix?
No.
Hi Sarah,
how can I make the whole second list/library visible before person is selecting specific item from the first list? Now I have only option “first item” or “nothing”.
Hi…Did you get the solution..i have the same issue?
What about connecting a data form?
(I know this is old) the only problem i have is after I select the record in web part 1, and the data is displayed in web part 2, all records reappear in web part 1. The record I selected is still selected, but I can’t see it because it is way down in the list. How can I retain just the selected record in web part 1? (as well as in the web part 2)? FYI, I enabled the search box in web part 1 and searched for my desired record, then selected it, and got the wanted data in web part 2. But I got the full list of everything in back in web part 1. SharePoint 2016.
Update, I dropped the search box and created a text filter web part and reconfigured my other web parts to get the value from the text filer web part. Making those changes eliminated the record selector in web part 1 all together and each web part only displays records associated with the value I put in the filter.
How do i retain the collapsed list grouping when connecting the webparts? When i connect the webparts, the first webpart is expanded by default.