You may want to rethink your column names…

Depositphotos_2506386_mWhen I started working with SharePoint in 2003, I used multi-word names for everything–my sites, my libraries and lists, even my column names. It didn’t take me long to realize that spaces wreak havoc on my URLs. Since each space in my name causes a %20 string to appear in my URL, my URLs quickly became long and unwieldy.

Creating a new SharePoint site named Help Desk, for example, results in the URL:

https://splibrarian.sharepoint.com/Help%20Desk/SitePages/Home.aspx

If I create a new document library on that site named Sarah Haase, my new library’s URL lengthens to:

https://splibrarian.sharepoint.com/Help%20Desk/Sarah%20Haase/Forms/AllItems.aspx

And when I add the nested folders Fiscal Year 2013 > Projects > Project X > Design Documents to my document library, my URL extends to:

https://splibrarian.sharepoint.com/Help%20Desk/Sarah%20Haase/Forms/AllItems.aspx?RootFolder=%2FHelp%20Desk%2FSarah%20Haase%2FFiscal%20Year%202013%2FProjects%2FProject%20X%2FDesign%20Documents

You can quickly see how a deep nested folder structure (complete with spaces in your library and folder names) can negatively impact your user’s URL experience. But this problem is easily circumvented. If you create your sites, document libraries and lists using names without spaces (e.g. HelpDesk), you’ll avoid adding %20 strings to your URLs. Once your sites, libraries and lists are created, you can go back and update their names to include spaces. This will add “friendly” spaces back into your site, library and list names without damaging your nice (short) URLs.

But what about column names?

I recently learned that spaces in your column names can also cause difficulties. When you create a new document library or list column, SharePoint automatically sets an “internal name” for the column. This internal name is the ID for your column. You may need to know and reference this internal name as you build out new SharePoint solutions or customize the look and feel of your Content Query Web Parts (CQWPs).

So how do you find out what the internal name is for your columns? Go into your document library settings or list settings page and click on the hyperlink for your column. When the column’s detail page appears, take a look at the URL that appears at the top of the page. Your column’s internal name will appear at the end of the URL after the string Field=

column-internal-names-02

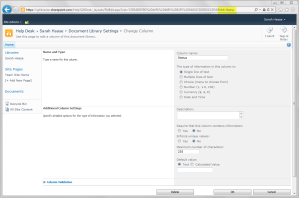
SharePoint bases your column’s internal name off the “friendly name” you give your column when you first create it. If you create a new column named DocumentType, for example, your column’s internal name will be DocumentType.

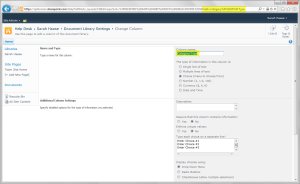
If you include spaces in the name of your new column, SharePoint adds a string of additional characters to your column’s internal name. As the following screen shot illustrates, a new column named Category Type results in the internal name Category%5Fx0020%5FType

column-internal-names-03

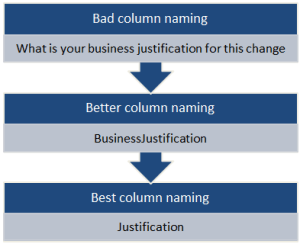
The more words you add to your column’s initial name, the longer your column’s internal name will become. If you name your column:

What is your business justification for this change

Your column’s internal name will be:

What%5Fx0020%5Fis%5Fx0020%5Fyour%5Fx0020%5Fbusiness%5Fx0020%5Fjustification%5Fx0020%5Ffor%5Fx0020%5Fthis%5Fx0020%5Fchange%5Fx003f%5F

Once your column is created and the internal name is set, you cannot change it. Your only option is to delete your initial column and re-create it.

To limit the length and complexity of your internal column names, treat your columns like you treat your document libraries, lists and sites. Keep your column names short and do not include spaces. Once your column is created and your column’s internal name is defined, you can always go back in and edit your column name and add additional words or spaces. This will make your column name more “friendly” without lengthening your column’s internal name.

column-internal-names-06

And think carefully before you repurpose old columns in your lists and libraries. While you may change the name of your column an infinite number of times, the internal name for your column won’t change.

References

I first learned about internal column names during Peter Serzo’s CQWP session at SharePoint Saturday Twin Cities. For more information on the “limitless” CQWP, see Peter’s presentation.

Wes Preston recently published a blog post on internal columns and their impact on the client-side rendering functionality in SharePoint 2013.

Tuning out the SharePoint naysayers

Sooner or later, all SharePoint enthusiasts encounter the scariest of creatures…the intelligent, the opinionated and the immoveable naysayer. These naysayers exist at all levels of the organization and persist in deriding SharePoint without provocation or apology.

SharePoint enthusiasts fear naysayers for several reasons. First, we fear the naysayers will tarnish SharePoint’s image. Yes, we’re used to defending SharePoint against the typical anti-Microsoft rants. But these ideological rants rarely touch on or impact day-to-day operations. Naysayers present a more immediate threat. If the naysayers are vocal, sharing their anti-SharePoint mantras with project managers, executives and line-of-business folks, they can taint others’ view of SharePoint.

Naysayers can also block the use of SharePoint within key business units by simply refusing to adopt the platform. A few well-placed naysayers can cut off avenues for success, making user adoption a challenge.

But by far, the most insidious and debasing fear is that the naysayers are right. What if the naysayers see something we’ve missed–a fatal flaw in SharePoint’s design or a new Google Docs feature that will change the collaboration landscape? This fear can be crippling, and in that moment the naysayers can be like kryptonite for SharePoint enthusiasts. But remember, kryptonite only hurts if you’re Superman.

Here’s the reality: naysayers can’t really hurt SharePoint. Yes, they can be vocal in their opposition. And yes, they can make us work around them. But their greatest threat isn’t what they can do. Their greatest threat is the impact they have on us–the SharePoint enthusiasts. When we encounter a naysayer and start wringing our hands, we give away our power. And when we spend hours and hours of time trying to build out collaboration features to make the naysayers happy, we bear a huge opportunity cost.

I often talk with users that are struggling to “earn” the approval of their SharePoint naysayers. They work like trojans to try and build the perfect SharePoint site or solution for their naysayers, only to find the bar inextricably raised at every turn. No matter how far they come and how great a solution they build, it’s never quite enough to win the naysayers’ approval. They ask me what they can do to help turn the tide and win over their naysayers, and I always say the same thing–STOP!

Stop trying so hard. Stop contorting yourselves to try and become what others are looking for. And stop chasing after users that are not interested in what you (or your SharePoint platform) are offering. If you’re implementing SharePoint correctly, you should have a healthy pipeline of users requesting your SharePoint help and expertise. Why waste your time on the naysayers? Driving effective user adoption is about building tools and solutions that people want to use. Naysayers (by definition) don’t want what you’re selling. So stop trying to sell to them.

If you focus 100% of your time and energy on the customers that want to adopt SharePoint, you’ll be a success. And if you have a methodology that really works, SharePoint will start spreading like wildfire in your organization. So let the SharePoint wildfire run its course…sooner or later, those naysayers will sound pitiful deriding the virtues of a tool that has been embraced (and extolled) by the entire rest of the organization.

Don’t miss your chance to win the Golden Lifeguard Award

If you’re a SharePoint governance pro, you have to check out Axceler’s new Golden Lifeguard Award. The award “honors an individual or a team that has conceived, developed and defined best practices around governance that resulted in a notable increase in security and compliance within their SharePoint environment.”

All award submissions will be evaluated by a team of judges, including myself, Michael Pisarek, Susan Hanley, Ruven Gotz, Veronique Palmer, David Rubinstein and Owen Allen. The winner will be unveiled at a gala event on November 14th at the Tryst nightclub in the Wynn Resort during the SharePoint Conference 2012 in Las Vegas.

To submit an award nomination, go to: http://info.axceler.com/golden-lifeguard-award/. There is no cost to submit, and you do not have to be an Axceler customer to participate.

The nomination deadline is October 18, 2012.

SharePoint Fest Chicago 2012 recap

Last week I had a whirlwind trip to Chicago for SharePoint Fest Chicago 2012. This was my first time attending a SharePoint Fest event, but I really enjoyed its blend of business and technical sessions. I was also impressed with the attendance–the sold-out event had 350+ attendees and a huge array of community/ISV sponsors. Here’s a quick breakdown of the sessions I attended:

  • Revolutionizing your organization with SharePoint 2013 – Dux Raymond Sy
    Dux never disappoints, and his opening keynote was fantastic. He did a great job highlighting upcoming 2013 features and made a solid case that to stop being an IT toy, SharePoint has to be implemented successfully by the business.
  • Be the “Find It” Super Hero – Chris Geier
    Chris’ session offered a couch-to-success plan for using enterprise content types, managed metadata services (including terms, term sets, etc.), information management policies and the content organizer.
  • Creating Reusable & Transportable Workflows in SharePoint Designer 2010 – Asif Rehmani
    Asif’s training sessions are ALWAYS fantastic. He does a great job explaining technical concepts to a wide variety of audiences/knowledge levels. Two of my favorite demos from this session were implementing Parallel Blocks within workflows and using Visio as a workflow modeling tool.
  • A Pragmatist’s Guide to Designing Enterprise Content Types – Chris Beckett
     This was my first time meeting Chris, but I enjoyed his practical guide to analyzing and organizing content. And yes, I was thrilled to raise my hand when he asked for any “lone wolf” librarians that happened to be in attendance. Frankly, I’m surprised I don’t run into more librarians in the SharePoint community. SharePoint’s feature set and focus on content management, enterprise content management, managed metadata, structured content, business process automation and taxonomy/folksonomy management are a natural fit for our time and talent.
  • SharePoint in Practice: 15 Real World SharePoint Solutions that Drive Business Value – Ross Freedman
    Prepare for the tidal wave! This session was jam-packed with examples of successful SharePoint solutions. From New Balance’s new corporate intranet to Medtronic’s collaboration platform designed to connect scientists from around the world, this session showed (in living color) what SharePoint success looks like. Very interesting.
  • Creating Data-Centric Composite Applications Using SharePoint Designer 2010 – Asif Rehmani
    This session was all about the XSLT List View Web Part and the XSLT Data View Web Part. Asif provided background context on where they came from (yes, think Front Page 2003) and how they’ve evolved, while incorporating some great demos to show their power and versatility.
  • Hypermiling with SharePoint Data Protection – Sean McDonough
    I snuck into several of Sean’s sessions at this conference. (My farm admin would have been so proud!) Sean is an excellent presenter, but he gets the hero award for being able to teach hyermiling, disaster recovery and the joys of caching to a librarian.

I also delivered my De-Mystifying ROI calculation for SharePoint session at the conference. I had a great interactive audience, and really appreciate Dennis and Chris for sitting up near the front and serving as my session victims (uh….I mean volunteers). For those of you that are interested, I’ve posted an excerpt of my slides to SlideShare. Check them out below.

And no conference would be complete without a mention of the many SharePoint experts that I feel privileged to call friends. Thanks to Wes Preston, Sean McDonough, Richard Harbridge, Doug Hemminger, Chris Geier, Liam Cleary, Kim Frehe, Jeff Willinger and Dux Raymond Sy for the insights, the laughs and the late-night root bear floats.

How do I change the URL users are sent to after they fill out a New Item form?

This is a common request, particularly if your site has quite a few lists. Rather than bogging your users down with navigating into (and out of) each list, you may want to give your customers a quick and easy way to jump from your site’s landing page into your list forms and then back to your site’s landing page. The steps would look like this:

  1. Customer comes to your SharePoint site.
  2. Customer sees on your landing page a list of the form(s) that apply to them. They click on a link to go to the form they need.
  3. They fill out the form and click Save.
  4. They’re automatically returned to your SharePoint site’s landing page.

The first 3 steps are fairly straightforward, but step #4 is interesting. Normally, you are automatically taken to your list’s default view when you fill out and save a new item request. We want to change this default behavior. We don’t want our users to be taken to our list’s default view, because they don’t need to see all our list data. We want them to find their form, fill it out and then return to where they started. Fortunately, there’s a quick way to alter your user’s default path. By creating a custom link to your form and modifying the link’s HTML code, you can force SharePoint to take your end-users back to their starting point once they’ve finished filling out their form.

There are a variety of ways to modify your hyperlinks, including making customizations via SharePoint Designer. This blog post focuses on building these custom hyperlinks with out-of-the-box SharePoint web parts. Since the process differs slightly for MOSS 2007 and SharePoint 2010, I’ve included setup instructions for both platforms.

MOSS 2007 setup

First, you need to obtain the hyperlink for your list’s New Item form. Here are the steps for capturing this URL:

  1. Go to your site’s landing page.
  2. Click on Site Actions > Edit Page.
  3. Click on one of the Add a Web Part buttons.
  4. Select your list and click on the Add button. A web part for your list will be added to your site’s landing page. (Don’t worry–we’ll delete this web part in just a minute.)
  5. Right-click on the Add new item link that displays in the bottom left-hand corner of your list view web part. When the pop-up menu appears, select Copy Shortcut.
  6. Now you’re ready to delete this list view web part. Click on your web part’s edit link and select Delete.

Now that you have your New Item form’s URL, you’re ready to customize the URL and add it to your site’s default.aspx web part page. (Note that the steps outlined below can be used to add custom hyperlinks to any SharePoint web part page. You are not limited to adding these links to your site’s landing page.)

  1. Go to your site’s landing page.
  2. Click on Site Actions > Edit Page.
  3. Click on one of the Add a Web Part buttons.
  4. Scroll down the list of web parts until you find the Content Editor Web Part. Select this web part and click on the Add button to add it to your page.
  5. When the web part gets added to your page, it will appear with an open the tool pane hyperlink. Click on the hyperlink to configure this new web part.
  6. When the web part pane appears, click on the Source Editor… button.
  7. When the text entry box appears, key in the HTML code shown below. Replace the text highlighted in yellow with the URL for your new item form. Replace the text highlighted in blue with the verbiage you want displayed as your link. Leave the text highlighted in pink–this is the magic code that will make your hyperlink return users back to your site’s landing page after they submit their form.
  8. Click Save to save your changes.

That’s it! Your first HTML link is ready to go. Test it out and validate that it is working as desired.

You may want to pretty up your Content Editor Web Part a little bit (e.g. change the name of the web part and add additional form links), but otherwise you are ready for business. Here’s a picture of my finished page:

And here’s a picture of my final Source Editor code:

Note that I added some additional HTML tagging around my links–just enough to create a bulleted list for my form links. You can add in as much (or as little) HTML tagging as you want.

SharePoint 2010 setup

First, you need to obtain the hyperlink for your list’s New Item form. Here are the steps for capturing this URL:

  1. Go to the list you want to create a custom hyperlink for.
  2. Right-click on the Add new item hyperlink that appears at the bottom of the list view page. When the pop-up menu appears, select Copy Shortcut.
  3. Open a new browser window.
  4. Go to the address bar and do a Ctrl+V to paste in your newly copied URL.
  5. Press Enter. You will automatically be redirected to your list’s New Item page.
  6. Copy the updated URL that appears in your address bar–this is the URL you’ll be using to create your custom hyperlink.

Now that you have your New Item form’s URL, you’re ready to customize the URL and add it to your site’s Home.aspx web part page. (Note that the steps outlined below can be used to add custom hyperlinks to any SharePoint web part page. You are not limited to adding these links to your site’s landing page.)

  1. Go to your site’s landing page.
  2. Click on Site Actions > Edit Page.
  3. Click on the Insert subtab.
  4. Click on the More Web Parts icon.
  5. Click on Forms, select the HTML Form Web Part and click on the Add button.
  6. Once the new HTML Form Web Part is added to your page, click on the chevron for the web part and select Edit Web Part.
  7. When the web part pane appears, click on the Source Editor… button.
  8. Delete the text that appears in the text entry box.
  9. Key in the HTML code shown below. Replace the text highlighted in yellow with the URL for your new item form. Replace the text highlighted in purple with the verbiage you want displayed as your link. Leave the text highlighted in pink–this is the magic code that will make your hyperlink return users back to your site’s landing page after they submit their form.
  10. Click Save to save your changes.

That’s it! Your first HTML link is ready to go. Test it out and validate that it is working as desired.

You may want to pretty up your HTML Form Web Part a little bit (e.g. change the name of the web part and add additional form links), but otherwise you are ready for business. Here’s a picture of my finished page:

And here’s a picture of my final Source Editor code:

Note that I added some additional HTML tagging around my links–just enough to create a bulleted list for my form links. You can add in as much (or as little) HTML tagging as you want.

SharePoint Fest Chicago is coming soon!

I’m thrilled to be heading to Chicago in September to speak at SharePoint Fest. David Wilhelm and the rest of the leadership team have put together a packed schedule, with 75+ sessions in 10 different tracks. Come to the event to attend sessions on:

  • Enterprise Content management (ECM)
  • Social SharePoint
  • Power Users
  • Workflow
  • Search
  • Business Value
  • Governance, Taxonomy & Architecture
  • Infrastructure & Administration
  • Developer
  • SharePoint 2013

I’ll be attending sessions in several tracks, but am also looking forward to delivering Business Value session #102 – De-mystifying ROI Calculation for SharePoint. Here’s the abstract for my session:

ROI is a “fancy” acronym for Return on Investment. While ROI implies success, it usually involves mysterious mathematical formulas that many people can’t see or understand. So how does an everyday SharePoint business owner tackle the ROI puzzle? Do you just “flip the switch” on your implementation and move on? Or are you so busy with post-launch support that you don’t have time to circle back and quantify your results?

This session will help you demonstrate the business value for your SharePoint implementation. We’ll examine common ROI calculation methodologies while providing strategies for identifying your ROI niche and quantifying the business value of your SharePoint implementation.

The session will set the stage for an interactive discussion about ROI–how it can be measured, standardized and communicated. If you’re interested in seeing the session live, register for SharePoint Fest. Use the Haase discount code to register and you’ll save $100!

We are a GO! SharePoint Saturday Twin Cities will be held on November 3, 2012

And it begins again! Yesterday we kicked off preparations for our Fall iteration of SharePoint Saturday Twin Cities, to be held on Saturday, November 3rd, 2012 at Normandale Community College in Bloomington, MN. As you probably know, SharePoint Saturdays are free educational events dedicated to fostering information exchange and networking opportunities for SharePoint end-users, developers and IT Pros. These SharePoint Saturday events occur in local markets throughout the world, wherever there are SharePoint peeps that want to come together and share what they know.

We are blessed to have an amazing SharePoint community in the Twin Cities. Our balmy Minnesota winters have attracted the likes of Bill English, Virgil Carroll, Wes Preston, Raymond Mitchell, Tamara Bredemus and Phil Wicklund. When you have this much local talent, you can get a jump start on building a great educational event. Mix in a strong leadership team and a community that gets excited about attending SharePoint events (even on a Saturday) and you have a hit!

When I first got involved with the Twin Cities SharePoint Camp three years ago, I was thrilled to find an opportunity to learn from and network with other SharePoint enthusiasts. We started out small, with 75-100 people attending Saturday events at a local training center. But after adopting the SharePoint Saturday mantle and forming a leadership team to guide the events, we’ve grown to staggering proportions. Take a look at the growth curve in our number of attendees:

Our last event (held in April 2012) had nearly 30 sponsors, 28 breakout sessions, 2 hands-on labs and 450+ attendees. For a recap of the day, see my summary blog post:  https://sarahlhaase.wordpress.com/2012/04/17/spstc-smashes-our-previous-record-becoming-one-of-the-largest-sharepoint-saturdays-ever/

The pressure is clearly on to maintain the quality of our SharePoint Saturday Twin Cities events. We want to continue pulling in great speakers and offering a great opportunity for attendees to learn and connect. With that in mind, we’ve opened the call for speakers for our November 3rd event. If you have a SharePoint story, please put together an abstract and submit to present. All the submission details are posted on our web site: http://www.sharepointsaturday.org/twincities

Modifying calculated column formulas based on values selected in other metadata fields

I am a librarian, NOT a developer. But today I built a very cool formula that examines list metadata fields and dynamically applies formulas to calculate project milestone completion dates. Here’s my business scenario:

I have a SharePoint list that is used to track project tasks for my documentation department. The list has a variety of fields, including:

  • Project name
  • Project manager
  • Task type – a Choice field with the following valid values:
    • Design documentation
    • Write documentation
    • Proofread
  • Task description
  • Technical writer assigned
  • Task due date
  • Task start date (this is the field I want to auto-calculate)

Project managers will come to this list to enter documentation tasks that need to be completed for upcoming projects. Many of the tasks may be logged early on in the project, but may not need to be started (or completed) until later in the project’s lifecycle. To help ensure that each task is kicked off in a timely manner, the project managers want to automate the calculation of task start dates. When the project managers log each task, they’ll identify the task type and the task due date. They then want SharePoint to look at the task type, deduce how much lead time will be needed to complete the task and automatically specify a task start date.

I’ve built this type of solution before, but have always used custom SharePoint Designer workflows to make my calculations for me. This wasn’t an option in this case, as the project managers wanted to avoid any SharePoint Designer customizations. And while I knew that Calculated columns offer a huge amount of functionality, I was unsure how I (the librarian) was going to figure out how to create the necessary formulas.

I started out reviewing Calculated column formula help guides, including http://msdn.microsoft.com/en-us/library/bb862071.aspx. From there I started experimenting with a basic formula that would look at the Task type field. When it found a list item whose Task type field was set to Design documentation, it would take the value in the Task due date field, subtract 52 days and report the results. Here’s this starter formula:

=IF([Task type]=”Design documentation”,[Task due date]-52)

And here’s how my calculated Task start date column looks, now that I’ve inserted this formula:

Let’s check out how this new field works. When you look at my list below, note that the top list item has a Task type of Design documentation. And just as we wanted, this task’s start date is automatically set to 52 days prior to the recorded task due date. Perfect!

There is a problem, however. All of my list rows that have a Task type not equal to Design documentation have a task start date value of 0. This is clearly not what we were hoping for. So I went back to the drawing board to create a formula that would work for binary fields (aka fields that have 2 possible valid values). Here’s the result:

=IF([Task type]=”Design documentation”,[Task due date]-52,[Task due date]-10)

Notice that this field includes 2 calculations–one for subtracting 52 days and another for subtracting 10 days. This formula will examine each list item’s Task type field. If it finds a value of Design documentation, it will subtract 52 days from the Task due date. If it finds any other value in the Task type field, it will subtract 10 days from the Task due date.

This is a bit better than our first option, but it won’t scale if our field has more than two options. I also don’t like how non-specific this formula is. It treats every value other than Design documentation identically.

After some trial and error, I evolved the formula again, this time modifying it so I could explicitly call out each possible field value and the corresponding date calculation to be made:

=IF([Task type]=”Design documentation”,[Task due date]-52,IF([Task type]=”Write documentation”,[Task due date]-40,IF([Task type]=”Proofread”,[Task due date]-10))

This new formula has 3 clauses, each of which specify a Task type value and the corresponding number of days that should be subtracted from the Task due date to determine the Task start date. Here are each of the clauses, broken out into different lines for easier viewing:

  • IF([Task type]=”Design documentation”,[Task due date]-52,
  • IF([Task type]=”Write documentation”,[Task due date]-40,
  • IF([Task type]=”Proofread”,[Task due date]-10))

Here’s how my calculated Task start date column looks, now that I’ve inserted this formula:

And here’s the final result:

Nice! Now my Task start date field automatically reads the type of project task and determines the date when the task should be started. I should also mention that this solution works for both SharePoint 2010 and MOSS 2007.

A reality check on happiness

If you’re a goal setter like me, you have a host of personal and professional objectives you’re striving to meet. Have you ever noticed, though, that the emotional high you get when you reach the finish line doesn’t last long? Yes, it feels great to finish what you’ve started…and you may take a few minutes to bask in glory of your accomplishment. But all too quickly you stop reveling and start mapping the next goal.

I always assumed that that honeymoon feeling (the emotional high of success) was my propellant, what pushed me out of my comfort zone and towards fulfilling my goal. After watching Shawn Achor’s TED talk The happy secret to better work, I realized that the optimism and joy of the journey–not the fleeting euphoria of the finish line–spurs me forward.

Happiness is not an aspirational state. And counter to popular thought, it’s not wholly dependent on external forces. As with many things, happiness is in the eyes (and the hands) of the beholder. Check out Shawn Achor’s video to see what I mean.