Information Architecture

The forgotten layer of content management

An old, abandoned house in the woods, overgrown plants

Many organizations have Content Management Systems (CMSs) in place to house their business-critical content. CMSs offer a deep set of features and capabilities, including content creation/storage, provisioned access based on user groups or roles, compliance tracking/reporting and content metadata tagging for content retrieval and re-use. The type of content stored in a CMS varies by industry, but may include case files for law firms, documentation for software firms, digital image assets for photography studios, and UPC/SKU content for retailers.

Although CMSs serve a critical function, they cannot stretch to house and govern all the data generated by business users. Think of all the e-mails that users create and send on a daily basis. These emails are often a critical part of ongoing work efforts, but the emails themselves are not managed effectively. A single work issue may result in a series of inefficient emails sent to multiple users. Add in all the critical work data sitting in Excel spreadsheets on shared drives and you have a huge mass of unstructured, disorganized content.

Why do users create all this unstructured content? Because they need to keep business flowing. Remember, business users are responsible for keeping the wheels of motion turning. If they don’t have the time, tools, or expertise to design automated solutions for their information management problems, they fill in the gaps with manual processes built on e-mail, Microsoft Excel, etc. These gap measures are often critical to the success of the business, but the processes themselves are not regulated or optimized. The data trapped inside these gap measures is the forgotten layer of content management.

We’ve identified the problem. Now we need to bring our business data into the light. If we can standardize the content and drive consistency in when and how it is captured, we can build repeatable processes and workflows to automate our core tasks. If we store the data in a single location and route it to employees on an as-needed basis, we will reduce the noise our employees wade through every day. Reduction in email volumes alone can save hours a day per employee.

SharePoint can be an incredibly effective toolset to store, route and manage this forgotten layer of content management. If we structure our content in SharePoint lists, map out workflows to standardize our processes and use filters, views and audience targeting to route data to people on a just-in-time basis, we can streamline our work processes and automate manual tasks.

The table below outlines WHAT we need to do, WHY we need to do it and HOW we’ll build successful replacement solutions in SharePoint. Check out the related links below for details on how to choose your first project, gather your requirements and calculate the cost of your business processes.

Forgotten layer of content management - 01

Related Blog Posts

A visual approach to content type tagging for your document library

In a previous post, I dove into the scary underbelly of file repositories. Most document libraries are a hoarder’s paradise, complete with hundreds of sub-folders and thousands of files. These document libraries are 1-way streets. You can easily upload your content to them, but it is virtually impossible to go the other direction and find/retrieve files. In order to maximize usefulness and value, we need our document libraries to support 2-way traffic–file upload and easy file retrieval.

Document uploads are relatively easy. Most of our business users can figure out how to upload a document (or know someone with a few SharePoint skills that can teach them how to drag-and-drop in SharePoint 2013). Content retrieval is much harder. It relies on “advanced” features like metadata, content types, document sets and information policies to make documents find-able and retrieve-able. Unfortunately, metadata is often a tough sell. We try to convince our end-users that metadata can help them with document retrieval, but getting them to consistently apply metadata tags to the documents they upload is a nearly impossible task. Unless you’re working for a company (or industry) that requires document metadata tagging as a fundamental job requirement, your only lasting hope is to make metadata tagging simple, easy or automatic. This post walks through an everyday business scenario for document storage and outlines an out-of-the-box metadata tagging solution that was built to support it.

Business Scenario

You’ve just been assigned as the project manager for a new software development project. Since you’ve worked on other project teams and seen firsthand the challenges of storing project documents in gargantuan file repositories, you know you want to implement a metadata tagging scheme for your project content. The goal is to tag each project document as it gets uploaded to SharePoint, and then use the metadata tags to build a browse-able document navigation tree for your SharePoint site. The challenge is figuring out how to design and use tags that reflect both the document’s purpose and the project lifecycle stage that the document pertains to.

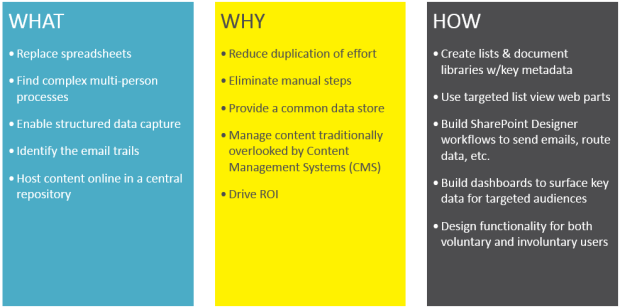
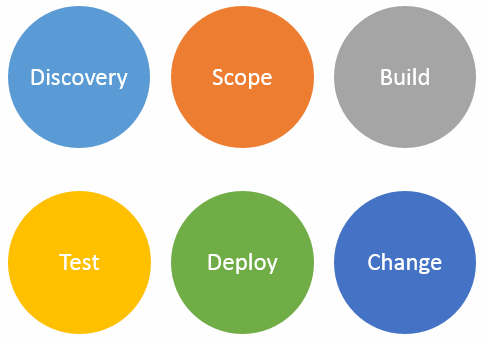
You sit down with your SharePoint SME (subject matter expert) to find a solution to this tagging conundrum, and together you devise a graphical model of your content:

ContentType26

Your model breaks down all project documentation into 6 categories: project discovery, project scoping, solution building, solution testing, solution deployment and iterative change management.

Each of these 6 content categories have different information needs. Discovery and Scoping documents, for example, need to be tagged with the assigned business analyst resources that will write/finalize solution requirements. Build documents need to be tagged with code review/release dates and Test documents need to be tagged with test status and tester assignments. All content categories need to be tagged with the release/version number they apply to.

Your SharePoint SME suggests using content types to organize your metadata fields. He plans to build one content type for each of your six project categories. Each content type can present targeted metadata fields that are specific to each project category AND provide default values where applicable. And because you’d be using content types and metadata fields to tag your content, you could store all your project documents in a single document library with (gasp) no file folders! The trick is designing a quick and easy way for users to upload and tag their project documents.

The approach

We know we’re building a single document library with six custom content types. But how do we quickly and easily enable users to specify which content type their file(s) belong to? An out-of-the-box solution doesn’t cut it, because we know our users won’t go through the process of selecting their appropriate content type when they upload their files.

Your SharePoint SME goes back to the drawing board and comes up with a creative idea. How about displaying buttons on the main page of your site….and make each button a clickable link? When users click on a button, they’d be taken to the document upload page for that corresponding content type (effectively bypassing the need to select the content type of the document they are uploading). Yes, your users would still need to add in metadata that applies to their document’s content type, but we’d be able to sidestep the content type selection in its entirety. We can also plug in default column values for each content type, simplifying the metadata tagging process. Sound interesting? Let’s take a look at the steps for building this out.

Part 1: Creating your new content types

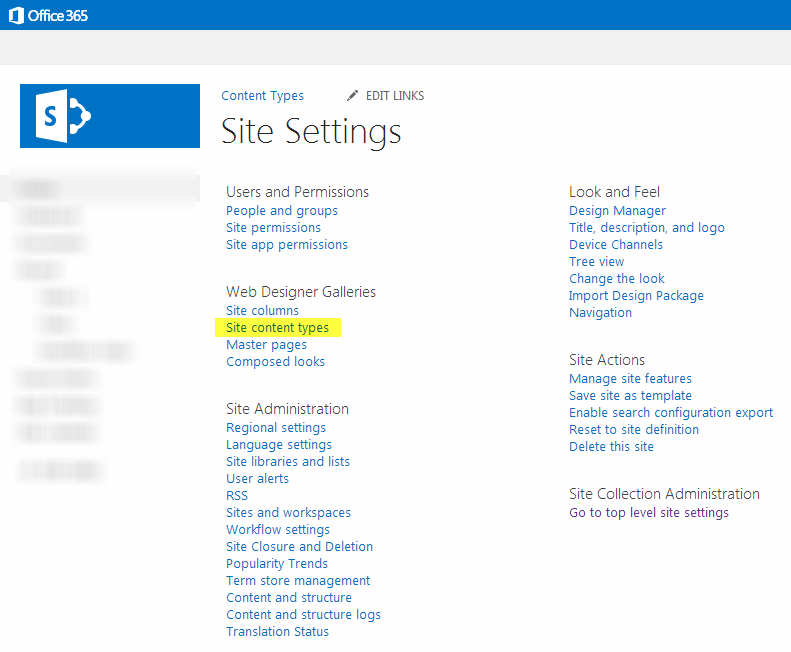
  1. Click on Gear > Site settings.
  2. Under Web Designer Galleries, click on Site content types.
    ContentType01
  3. Click on the Create button.
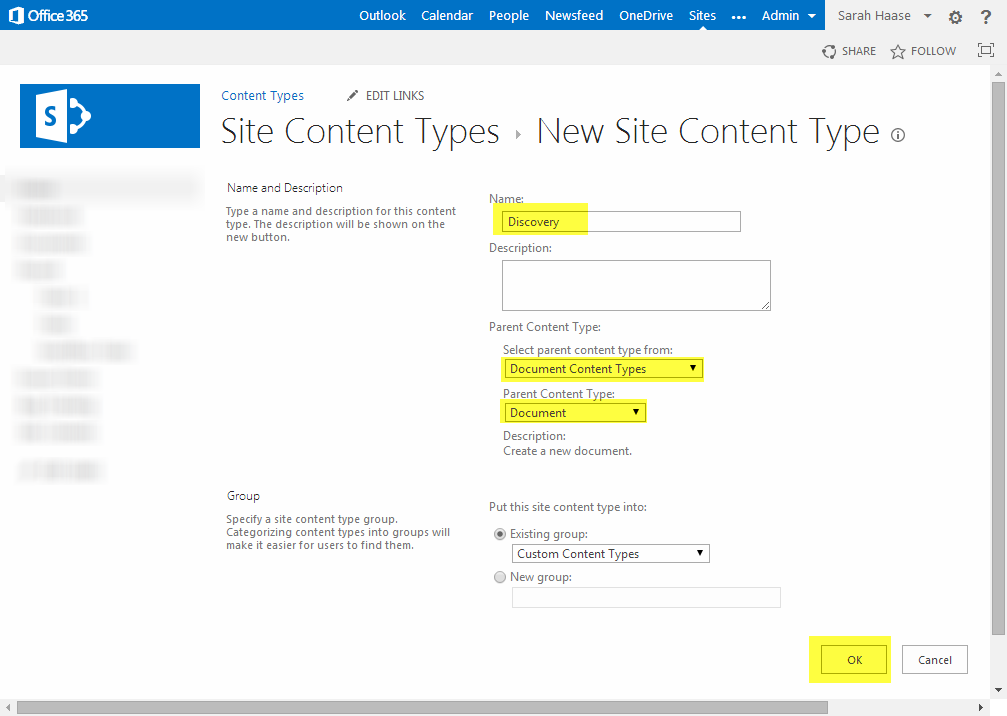
  4. In the Name field, type Discovery.
  5. In the Select parent content type from field, select Document Content Types.
  6. In the Parent Content Type field, select Document. Your page should now look like this:
    ContentType02
  7. Click OK.
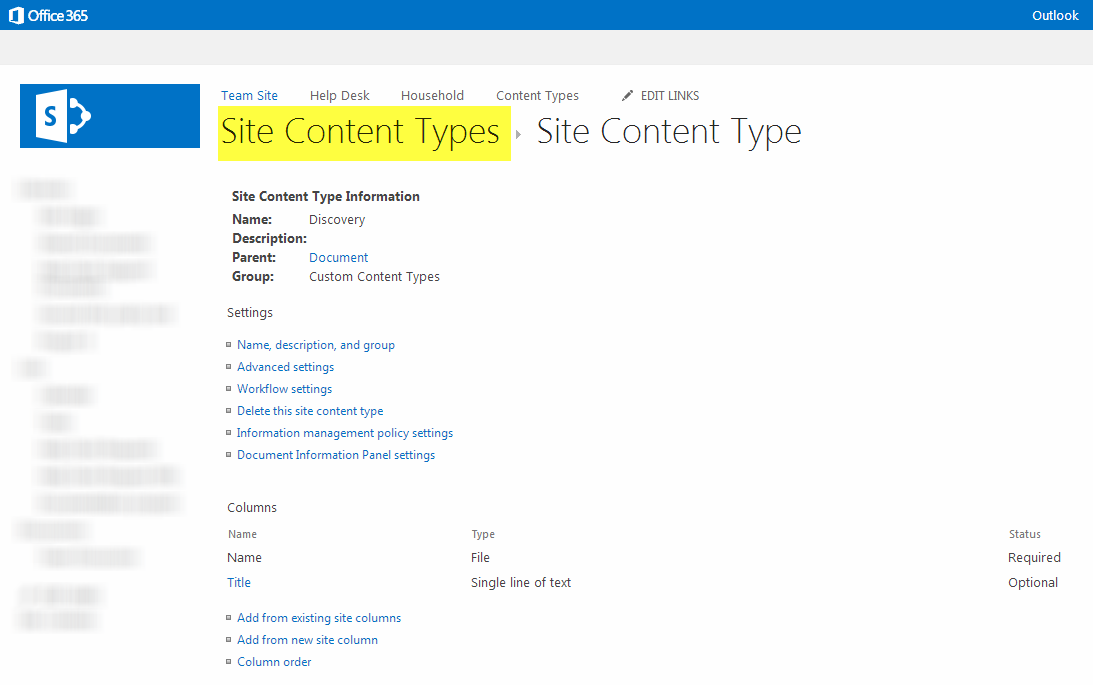
  8. You will be taken to a configuration page for your new content type. Click on the Site Content Types page header to return to the Site Content Types page.
    ContentType03
  9. Repeat steps 3-8 to create each of your new content types.

Part 2: Setting up your document library

  1. Click on Gear > Add an app.
  2. Select the Document Library app.
  3. When prompted, enter a name for your new document library.
  4. When you are returned to the Site Contents page, find and click on the blue icon for your new document library.
  5. While in your new library, click on the Library subtab and the List Settings icon.
  6. Click on Advanced settings and set the Allow management of content types field to Yes.
  7. Click OK.
  8. Go to the Content Types section of the page and click on the Add from existing site content types link.
    ContentType04
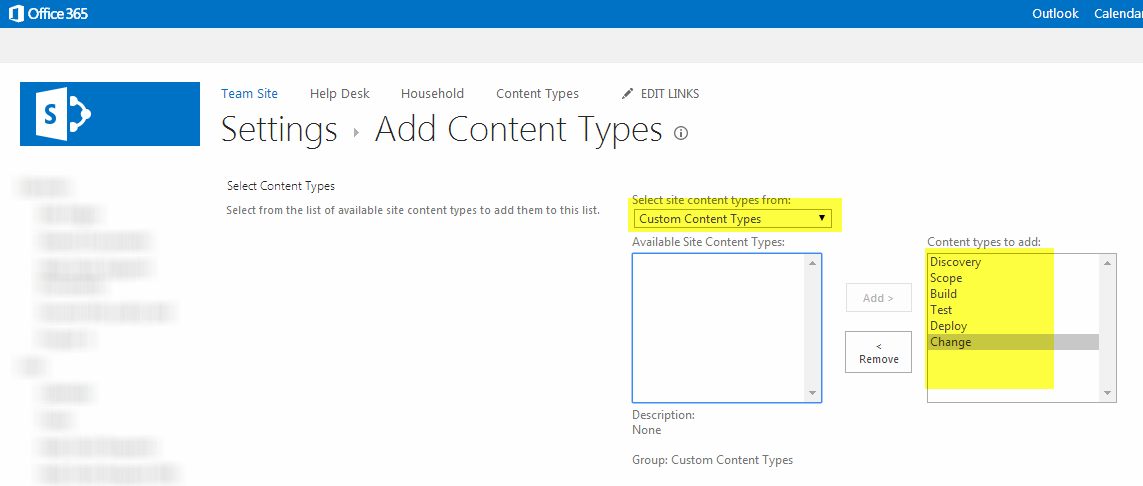
  9. Locate the dropdown field that controls the content type groups being displayed. Change the dropdown value from All Groups to Custom Content Types. Your newly created content types will display in the Available Site Content Types box.
  10. Select one of your new content types and click on the Add button. Repeat this step until all your new content types have been added (as shown below).
    ContentType05
  11. Click OK. You are now returned to the main list settings page.
  12. Go to the Content Types section of the page and click on the Change new button order and default content type hyperlink.
    ContentType06
  13. Uncheck the checkbox for the Document content type and click OK. Also make sure your content types are ordered correctly. Since we want our content types to be listed in the order of our project phases, our content types appear in the following order:
    • Discovery
    • Scope
    • Build
    • Test
    • Deploy
    • Change
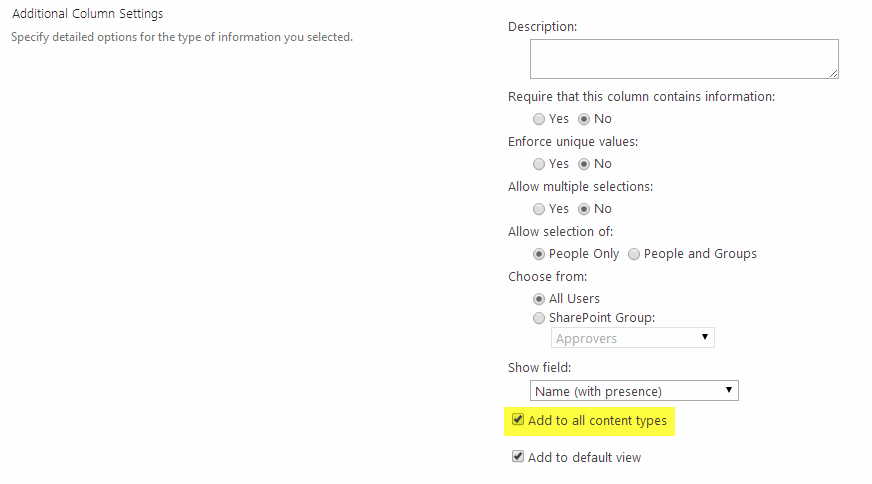
  14. Now it’s time to create all the new columns for your document library. As you create your columns, be mindful of the new Add to all content types checkbox that now displays on your column creation page. If you leave this box checked, the column you are creating will automatically be added to each of your 6 project lifecycle content types. If you leave the box unchecked, you’ll need to manually add this new column to the individual content types where you’d like it to be used.
    ContentType12
  15. Once all your columns are defined, it’s time to determine which field(s) should display for each of your content types. To get started, go to your List Settings page and click on the hyperlinked name of one of your content types.
  16. When the content type detail page appears, click on the Add from existing site or list columns hyperlink.
  17. Add the fields you want to display for this content type.
  18. Use the Column order link to define the order in which the content type’s fields should display.
  19. Click on the Settings link in your page’s breadcrumb to return to the list settings page.
  20. Repeat steps 16-20 to define the metadata fields for each of your other content types.
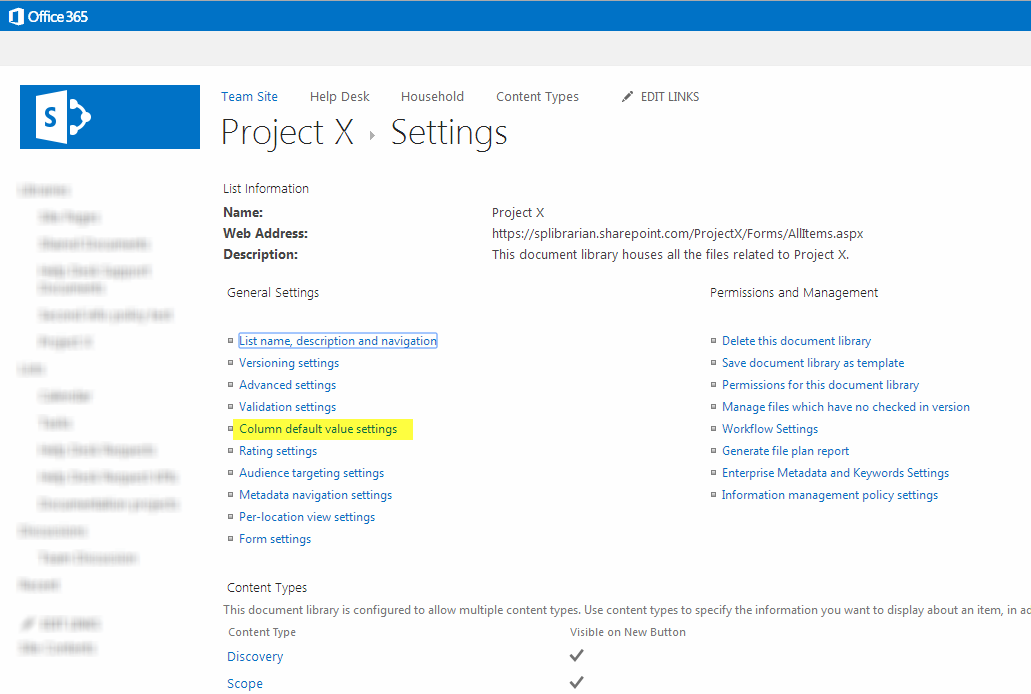
  21. Now it’s time to set up the default values for your metadata columns. This step requires a bit of extra work in SharePoint 2010 and SharePoint 2013. Go to your List Settings page and click on the Column default value settings link.
    ContentType13
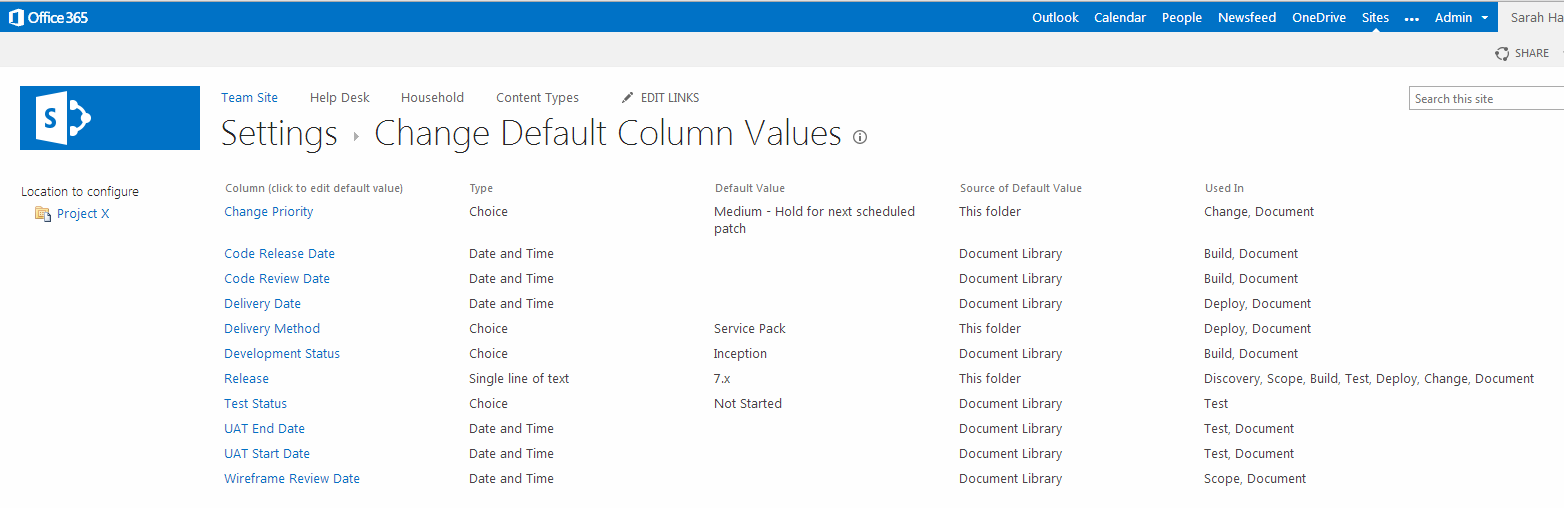
  22. To enter a default value for one of your columns, click on the column name and follow the on-screen prompts. After entering my default values, my column default value settings page now looks like this:
    ContentType14

Part 3: Determining the upload URLs for each of your new content types

Now we need to build a custom upload URL for each of your project lifecycle content types. These are the URLs that we’ll associate with your document upload buttons. The first step in building these URLs is turning off the Minimal Download Strategy feature via your site features page. The Minimal Download Strategy feature impacts the length and character of your site’s URLs, making it harder for this solution to work.

  1. Go to your Site Settings page by clicking on Gear > Site Settings.
  2. Click on the Manage site features link under the Site Actions heading.
  3. Scroll down and find the Minimal Download Strategy feature. If there is a Deactivate button next to the feature, click it.
  4. Click on the Deactivate link to confirm you want to deactivate this feature.

Now we’re ready to build your custom upload URLs. Here are the steps you’ll need to follow:

  1. Go to the Library Settings page for your document library.
  2. Copy the URL that is displayed in the address bar of your web browser.
  3. Open a text-based editor on our computer (e.g. Notepad or WordPad).
  4. Paste your copied URL into your text editor.
  5. Find the word listedit in your URL and replace it with the word upload.
    ContentType15
  6. Go to the end of the URL in your text editor and type &Source=
  7. After the &Source= string, paste in the URL for the home page of your SharePoint site.
    ContentType16
  8. Go to the end of the URL in your text editor and type &ContentTypeID=
  9. Return to the Library Settings page for your document library and click on the name of your first content type.
  10. Look at the URL for your page and find the string &ctype=
    ContentType17
  11. Place your cursor in the URL and copy the entire string of characters that follows the &ctype= string. This is the unique ID for your content type.
  12. Return to your text editor and paste your content type ID after the string &ContentTypeID=
    That’s it! You’ve now built a custom upload URL for your first content type. Here’s a picture of the end result. All the parts of the URL I customized are shaded in yellow:
    ContentType18
  13. Now it’s time to test. Copy your newly built URL and paste it an Internet browser window. Validate that you can upload a document, have it auto-tagged with its corresponding content type and that all your default column values work as expected. If the link does not work as expected, re-build your custom upload URL to make sure it is working correctly.
  14. Repeat steps 1-13 for EACH content type in your document library. In the end, you’ll end up with a unique upload URL for each content type.

Part 4: Creating your upload images

Now it’s time to build the images you want to use as your document upload buttons. Feel free to create the buttons in whatever program or design you like—just make sure that you end up with 1 image file for each upload button.

I opted to create the following circle images in PowerPoint. I right-clicked on each image in PowerPoint and selected Save as Picture to save each circle as a separate .PNG file.

ContentType19

Part 5: Adding upload buttons to your site’s home page

There are thousands of ways you can lay out and style your site’s home page. The steps below provide one suggested way of laying out your upload buttons. Feel free to customize.

  1. Go to your site’s home page.
  2. Click on the Edit link in the upper right-hand corner of the page.
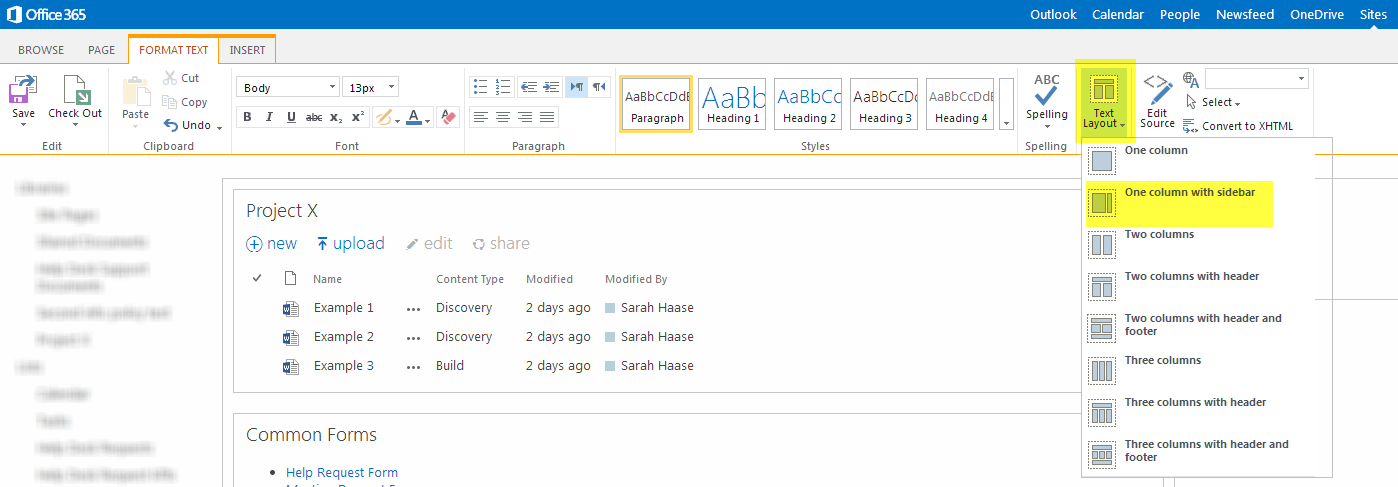
  3. Click on the Text Layout button in your Format Text subtab and choose the One column with sidebar option.
    ContentType20
  4. Place your cursor at the top of your page’s sidebar. Select the Heading 1 style from the Format Text subtab and type Upload Center on your page.
  5. Hit the Enter key and type Click on a circle to upload a document. Your sidebar should now look like this:
    ContentType21
  6. Hit Enter again.
  7. Click on the Insert subtab and then the Table button. Add a table with 3 columns and 2 rows.
  8. Place your cursor in the left-cell of the upper row. You’re now ready to insert your first image.
  9. Click on the Insert subtab. If your images are already uploaded to your SharePoint site, select Picture > From SharePoint and select your first image. If your images are not uploaded to SharePoint yet, select Picture > From Computer and select your first image.
  10. Your image will now be displayed in your table cell. If you want to resize your image, change the Horizontal Size and Vertical Size settings on the Image subtab. Since my images were a bit large, I’ve resized them down to 100×100 pixels.
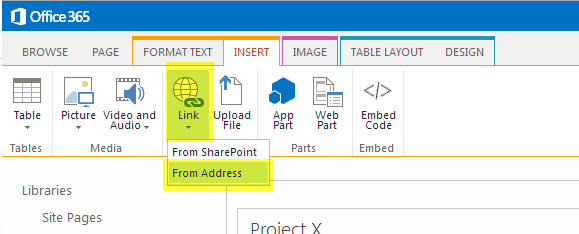
  11. Now it’s time to add the upload link to your image. Click on your image to select it. Then click on the Insert subtab and select Link > From Address.
    ContentType22
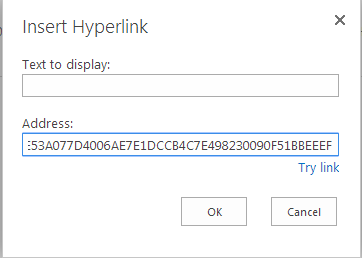
  12. Copy the upload URL you created for this content type and paste it into the Address box of the Insert Hyperlink dialog box.
    ContentType23
  13. Click OK to save your changes.
  14. Click on the Page subtab and click on the Save button to save your page.
  15. Now it’s time to test! Click on your first upload button and validate that you can successfully upload a document. Validate that the document gets auto-tagged with its corresponding content type and that all your default column values work as expected. If the link does not work as expected, re-build your custom upload URL to make sure it is working correctly.
  16. Repeat steps 9-15 to upload your remaining images and link them to your custom upload URLs.
  17. If you’d like to remove the gridlines from displaying around your table cells, edit your page, go to your Design subtab, click on Styles and select the Table Style 1 – Clear option.

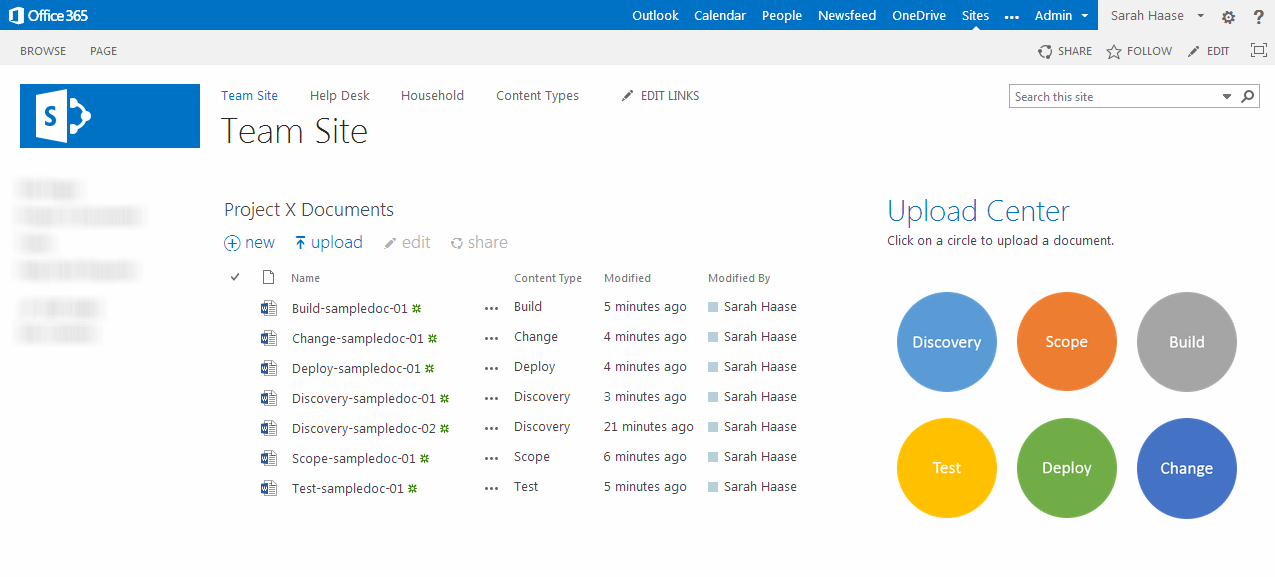
Here is my page now:

ContentType24

Part 6: Building your document library views and navigation

You’ve now built an easy way for users to upload documents and have them auto-tagged with metadata. Now you need to consider how your users will browse for and find documents that have been uploaded. Will you build out views for each of your content types? If so, how will your users access these views?

I recommend creating new views and adding them as links on your site’s Quick Launch bar. The results may look like the example highlighted in yellow below. Of course, you can get more detailed and elegant in building out these document library views. The important thing is to provide your end-users with easy-to-click-on links that provide a queried short list of documents that meet their specific information need.

ContentType25

Credits:

A big thank you to Matthew Ruderman (SP_Geek) for serving as a technical editor on this post. Without you, Matt, these manually generated upload links would have looked awfully ugly…

SharePoint universal truths

I’ve worked with end users in many organizations. While companies (and their employees) vary wildly, there are underlying similarities in how they all work. I call these similarities universal truths. Understanding these truths can help you relate to your users, drive effective change management and (ultimately) increase SharePoint’s business value. So here is the starter pack of SharePoint universal truths:

1. Businesses shouldn’t be run via spreadsheets stored on shared drives. What would happen to your company’s bottom line if Microsoft Excel went off the grid tomorrow? Most employees would be at a complete loss. They use spreadsheets and e-mail every day to manage their work and move data around. Unfortunately, the labor costs of these “poor man’s workflow” solutions is high. The time spent creating, maintaining, organizing, and copying data between spreadsheets and e-mails is time lost.

If you are implementing SharePoint as a workflow automation tool, you can’t ignore the opportunity spreadsheets provide. Focus on converting large, unwieldy spreadsheets into structured SharePoint lists that include query-based list views and out-of-the-box or custom SharePoint Designer workflows and you’ll improve the lives of your end-users.

2. My job isn’t about giving users what they want. It’s about giving users what they really need. They may want massive Excel spreadsheets stored in a Documents library with unlimited versioning. But they may need a granular SharePoint list with workflows and automated email notifications. In the end, our challenge (and our journey) is to identify the “true business need” and raise awareness about SharePoint solutions that can change the way our business users work.

3. Users will be interested in functionality that can improve their lives. But most of the time they don’t have the time to investigate this functionality on their own. They need information architects and designers to paint the vision. Often I throw out 15 ideas for each individual idea my business users choose to implement. There’s nothing wrong with a 15:1 ratio. The key is to keep offering ideas. Even if they don’t implement your ideas right away, they will likely circle back to consider some of the ideas again later.

4. If information architecture is optional, most users will opt out. Many users are unfamiliar with information architects, but that doesn’t mean they don’t need them. The right information architect will take the time to understand the underlying business value SharePoint can provide. They’ll understand your content and use SharePoint’s feature set to build solutions that make a quantifiable difference in your organization. The trick is enticing, encouraging and (ultimately) requiring your users to engage in the information architecture process. If you can offer SharePoint planning services free of charge and leverage a solid reputation in your organization for delivering top-notch solutions, you’ll have the “carrot” you need to get people to buy into information architecture. If that’s not an option at your organization, you’ll need to identify other methodologies for engaging users in the information architecture process.

5. SharePoint markets itself…once you deliver your first couple of wins. I’ve managed several corporate knowledge bases, and they all have one thing in common. Regardless of the technology they’re built on, the amount we invested in them or the number of cool features they had, all these knowledge bases were giant, sucking holes of need. No matter how long I evangelized their use or offered incentives for people to submit content, they would never spawn a cult following. They would always require care, feeding, and emotional propping. SharePoint is just the opposite. If you build SharePoint solutions that automate business processes and save your end-users time and frustration, people will come—in droves.

6. Your SharePoint solution isn’t complete until you’ve measured its effectiveness. This is an astonishingly common “miss.” People build great SharePoint solutions—solutions that save their companies hundreds of thousands of dollars per year—and fail to quantify their success. Your job does not end when a new SharePoint site is launched. Your job ends when you have measured the site’s effectiveness.

These universal truths aren’t complex. They merely reflect the basic instincts of most business users. But understanding these universal truths gives you an edge—an edge your counterparts don’t have. These truths are the keys for obtaining buy-in, effecting real change management, and learning how to quantify your results. By incorporating these truths into your business process strategy, you will fundamentally shift how your business users view their tools.

Storyboarding–the quick and the easy

Information architecture is not optional. And in a perfect world we’d all have adequate time for a formalized, thorough information architecture evaluation process at the beginning of each SharePoint solution cycle. But what if you have limited resources and need to provide a quick–yet effective–information architecture review? What are the essential steps you should be taking? This blog post summarizes my quick and easy information architecture/storyboarding methodology. It may take a bit of work to tweak this for your environment and shorten up the evaluation steps, but the framework should give you a good starting point. Enjoy!

We hold these truths to NOT be self-evident…

Before we begin, a couple of universal user truths:

  1. Users (even the well-intentioned ones) will generally take the path of least resistance. They will create content and take the time to store it, but will often opt for familiar folder storage structures. While these structures make sense to the content creator, they are often difficult for others to navigate.
  2. Users will be interested in functionality that can improve their lives. But they often won’t have the time to investigate this functionality on their own. They need information architects and designers to paint the vision. Often I throw out 15 ideas for each individual idea my business users choose to implement. There’s nothing wrong with a 15:1 ratio. The key is to keep offering ideas that will maximize user opportunities. Even if they don’t implement your ideas right away, they will likely circle back to consider some of the ideas again later.
  3. If information architecture is optional, users will opt out. You need a carrot and a stick to get their attention. If you can offer SharePoint planning services free of charge and have a good reputation for delivering top-notch solutions, that will be all the “carrot” you need. If you can require team members to work with you in order to have a SharePoint site or site collection created, you have your “stick.” Again, if this model doesn’t work in  your organization you’ll need to improvise. Just remember to include both the carrot and the stick.

The storyboarding process

I log my projects against the following SharePoint lifecycle stages:

  • Stage 1 (Initial request received)
  • Stage 2 (Storyboarding in process)
  • Stage 3 (Site/function development)
  • Stage 4 (Iterative review)
  • Stage 5 (Launched)
  • On hold (Waiting on business requestor; funding deferred)

Most of these stages are self-evident. Stage 1 begins when a SharePoint request is received. These can be requests for a new SharePoint site or enhancement requests for an existing site. Both “new” and “enhancement” requests follow the same storyboarding process.

First, I set up some one-on-one time with the business requestor. Since I work in the same geographical location as my customers, I have the luxury of setting up in-person meetings. Here’s the agenda I follow for these initial storyboarding meetings:

  1. Introduce my role and explain our SharePoint methodology. This gives me an opportunity to explain how the “carrot and stick” works in my department while also enabling me to explain how our SharePoint site collections are structured.
  2. Ask about their “vision” for the future. This question is intentionally vague. It is intended as a baseline, and won’t be the final vision statement for your SharePoint design. Usually, users will answer this question with a general statement saying they “want a site like Jane Doe has.” There’s nothing wrong with a broad answer here. Capture whatever the customer says and move on to the next step.
  3. Ask what the business need(s) are they are trying to solve. In some cases, users will already have their scope defined. Generally, though, users are confused by this question. Again, don’t worry about a lack of detail in their answer. Capture the response and move on to the next step.
  4. Get details on the current work process, including highlights, pain points and bottlenecks. Here’s where the deluge starts. Many users may have difficulty outlining a scope or vision for SharePoint, but most can wax poetic on pain points and bottlenecks in their common work processes. Encourage them to whiteboard their current pain points and allow them to dive into details. You’ll want to capture the broad strokes of this content and along the way identify opportunities where SharePoint can provide key wins. I try to capture several types of information during this step:
    • Key steps in the current process that can be automated using SharePoint.
    • Key pain points and bottlenecks. These will turn into the critical success factors for the future SharePoint solution.
    • “Soul crushing” work that can be eliminated or automated. These are the wins that will act as change management agents. Eliminate work that everyone hates and you’ll automatically build support for SharePoint
    • A rough percentage of time that can be shaved off the existing work process. This will help me capture a SWAG return on investment (ROI) for this solution.
  5. Get a wish list of things they dream about. Tell them to think big and ask for the world on a stick. Don’t worry about keeping them “in scope”–just capture their answers. (Note that at this point many users won’t have any idea what SharePoint can do so their wish list may shoot too high or too low. Don’t sweat these details.)
  6. Provide a demo of “similar” functionality already launched. At this point, I have a fairly good idea of the pain points and potential SharePoint solutions that could be built. Now it’s time to give the business requestors some idea of the possibilities. I provide a 15-minute targeted demo of existing SharePoint sites/functions that most closely align with their potential needs. For example, if the customer is in dire need of an optimized issue-tracking solution I’ll demo issue trackers with automated email and reporting that are already in use by other teams. If the customer needs help with document retrieval, I’ll demo a content type-based metadata tagging scheme that enables easy document upload/tagging.The key is to demo live sites that are already in use and have granularity levels or functions that mirror what the new customer needs. If you don’t have any existing SharePoint sites that apply, take them on a survey course of SharePoint wins you’ve already delivered for other teams. If this is your first SharePoint project and you don’t have any production sites to demo, start drawing out possible solutions on a whiteboard.The objective is to “blow the lid off” the customer’s expectations and get them “thinking big” about what SharePoint can do. You’ll know you’re hitting the right note when users start getting visibly excited and start tossing out additional ideas for how SharePoint can help optimize their business. Encourage them to brainstorm–the more ideas on the table the better!
  7. Connect them with business owners that are already on their way. You are not objective. Clearly you are enthralled with SharePoint and have a vested interest in its success at your organization. In order to give your customers a fair (unbiased) view, recommend they touch base with other business owners that have already implemented SharePoint solutions. When these other business owners recommend SharePoint (and you), your customers will be doubly impressed.
  8. Revisit the goals and wish list. Before you close out your meeting, revisit steps 3 and 5 to see what your customers updated goals and wish list items are. By this point, your customers should have a much broader list of features and functions they want to deploy. Capture as much of this information as you can. You’ll have the chance to map these goals and wish list items into project implementation phases at a later point in time.

Note that the timing for each of these eight steps is fluid. Depending on the size and scope of your project you may need to allocate 2 hours, 4 hours or even a full working day to get through all these steps. Over time I’ve been able to wean these steps down to a 1-2 hour meeting for small projects (aka projects that result in a 4-40 hour development effort). As the size of the implementation expands so will the amount of design time that is needed.

Also be aware that you may need to schedule follow-up meetings to dive deeper into one or more of these eight steps. Be targeted about these follow-up meetings. The key is to take up as little time as possible for information architecture. If we make the architecture process too painful, users will opt out and you will lose a SharePoint deployment opportunity. 

Once you have enough raw material gathered, start designing your SharePoint vision for success. Tailor your vision to your audience. If your customer is informal and buys into your vision readily, you may be able to meet with them in person and present your vision for the future using whiteboard diagrams. If your customer is more formal or requires executive sign-off, you will need to create wireframes. Consider using Balsamiq (http://www.balsamiq.com/) or another quick wireframing tool to illustrate your vision. The key is to effectively illustrate your vision without taking the time to build out a robust system before gaining customer approval.

Once your requirements are documented and you get management sign-off you are ready to build out the solution!